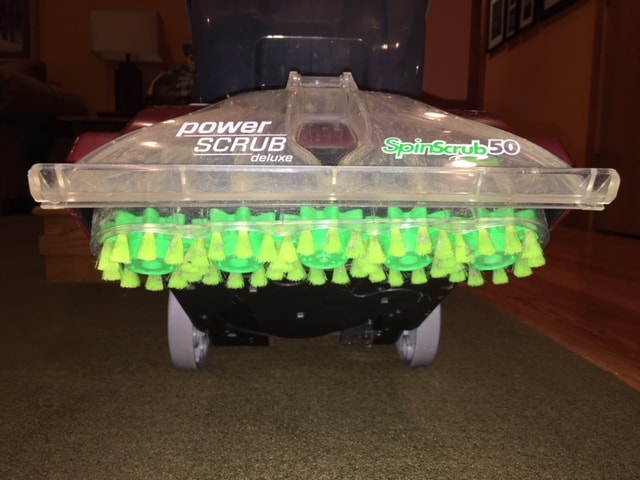
If you read our article on the Hoover Power Scrub carpet cleaner, then you know just how much we like it. We’ve had it since 2015 and it does a great job. It’s perfect for both spot cleaning and powerful enough to clean an entire room. So when we found that our Hoover carpet cleaner brushes quit spinning, we were a little distressed.
After doing some research I found that the brushes are driven by an air turbine that is powered by the vacuum air. There is a screen filter that can plug off, inside the front nozzle, but that normally only causes the brushes to slow down. However, I did find out that after a few years of use, it’s not uncommon for the turbine to seize up if it sets for long period of time between uses.
What we’ll cover in this article is how to disassemble the Hoover carpet cleaner, down to the turbine, and get to the root of the problem. Once we get to that point I have a short video explaining this particular issue and how to correct it.
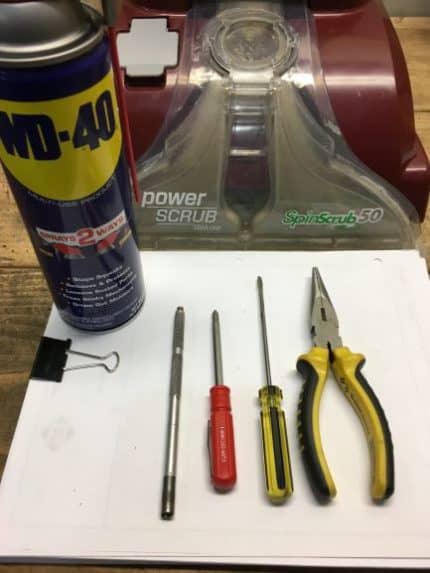
Unfortunately, many replacement parts are getting hard to find for some of the Hoover products for this generation of carpet cleaners. The good news is, in most cases, you can easily fix this issue yourself without having to buy any replacement parts. It’s a fairly quick repair and should only take about ½ hour.
In this article, we will be providing you with a few links to some products for pricing and informational purposes. We are required to let you know some of these links are “affiliate links”. This means if you click on a link and make a purchase, we could make a small commission, at no extra cost to you. This helps offset the cost of maintaining our website. Now, let’s get started.
How To Disassemble And Access The Turbine Motor
Table of Contents
This is a step by step break down on how to access the turbine motor. Then we’ll take a close look at how to take care of the problem. It only requires a few tools to disassemble the carpet cleaner. Another good thing is although you have to remove 17 screws in the process, they are all the same length. There’s no need to remember where the long screw goes.
Before beginning you’ll want to remove the brushes and verify that the brushes themselves are spinning freely. The first three steps will take you through pulling the brushes. If the brushes spin freely, then continue on with the disassembly.
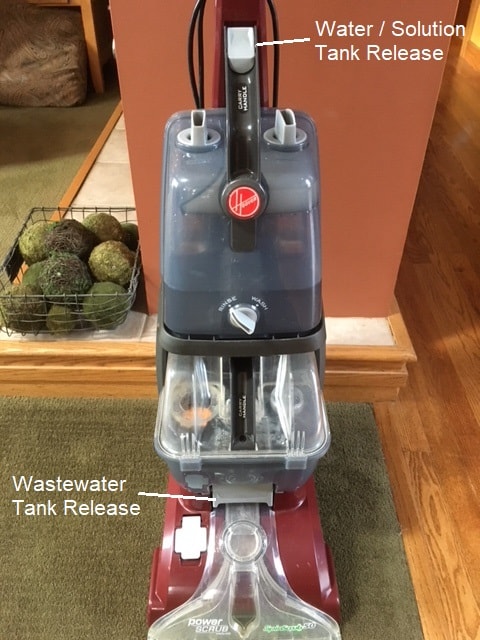
Step 1 – Remove both water tanks (water/cleaning solution tank and wastewater tank). To remove the water/cleaning solution tank press the gray button on the handle and lift. The wastewater tank can be removed by releasing the latch located at the lower front of the tank.
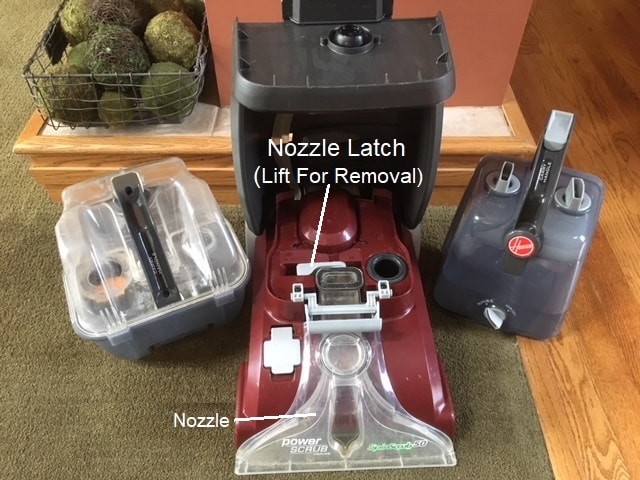
Step 2 – To remove the front nozzle assembly lift the latch under where the wastewater tank sat and pull the nozzle assembly straight out.
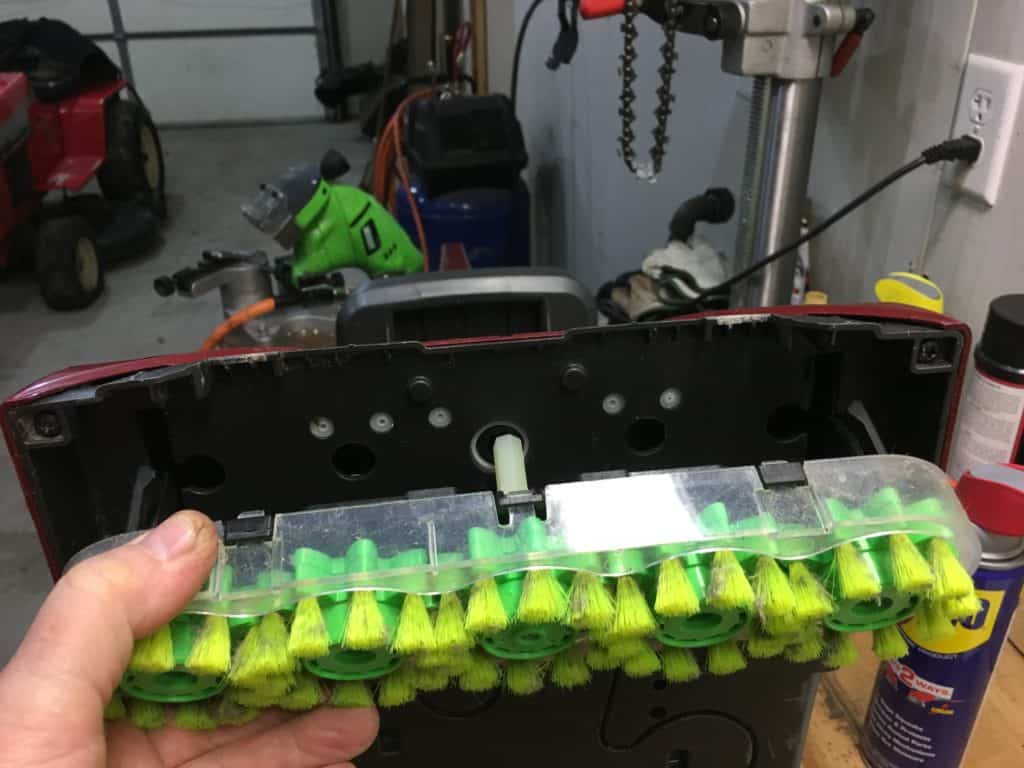
Step 3 – Tip the unit back and remove brushes. Pull firmly and they should pop straight out. With the brushes removed, make sure the hex drive pin is not damaged or broken, and that the brushes spin freely.
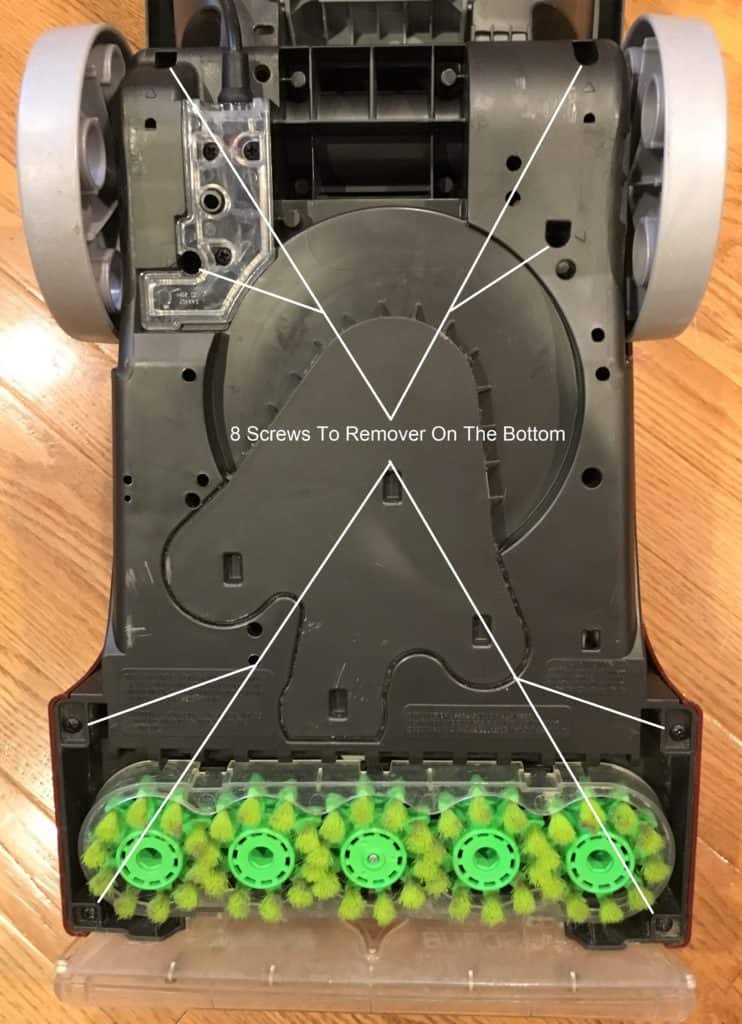
Step 4 – To continue there are 8 screws on the bottom to remove. Most of them are marked with arrows. Press the handle release and lay the unit out flat, then flip it upside down. You could get a cup or two of water out of the unit when flipped over. You may want to lay it on a bath towel.
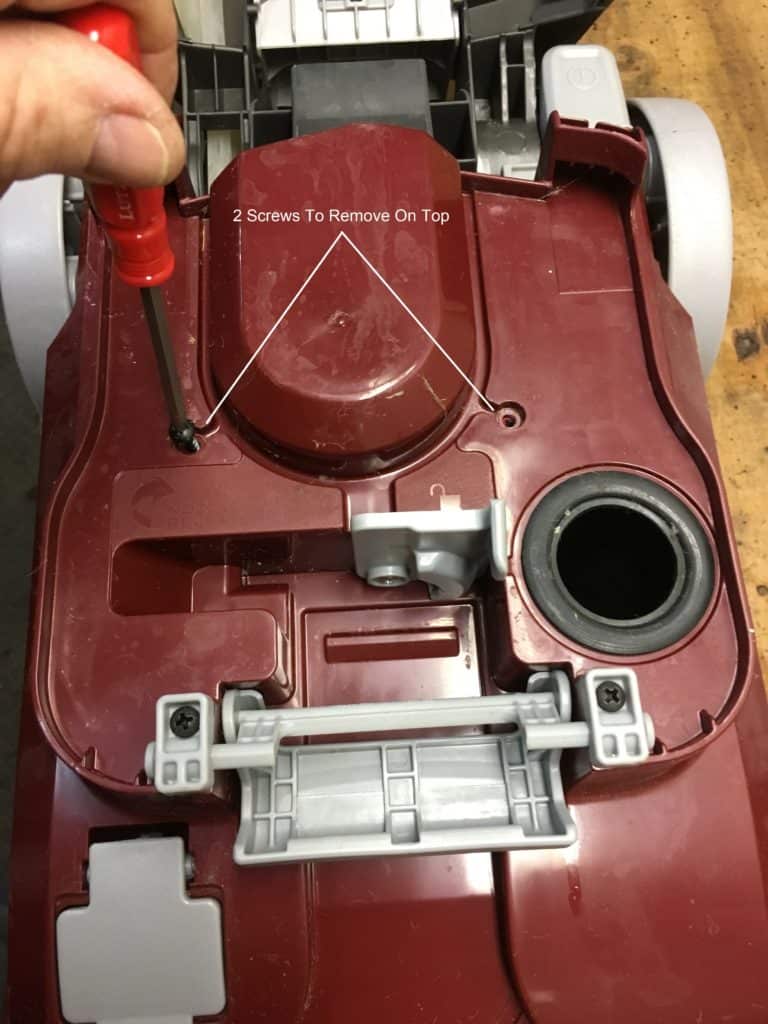
Step 5 – Flip the unit right side up and remove the two screws in the top cover. The cover still snaps on, so grab the edges and firmly lift up. Continue working around the edges and the cover will pop off.
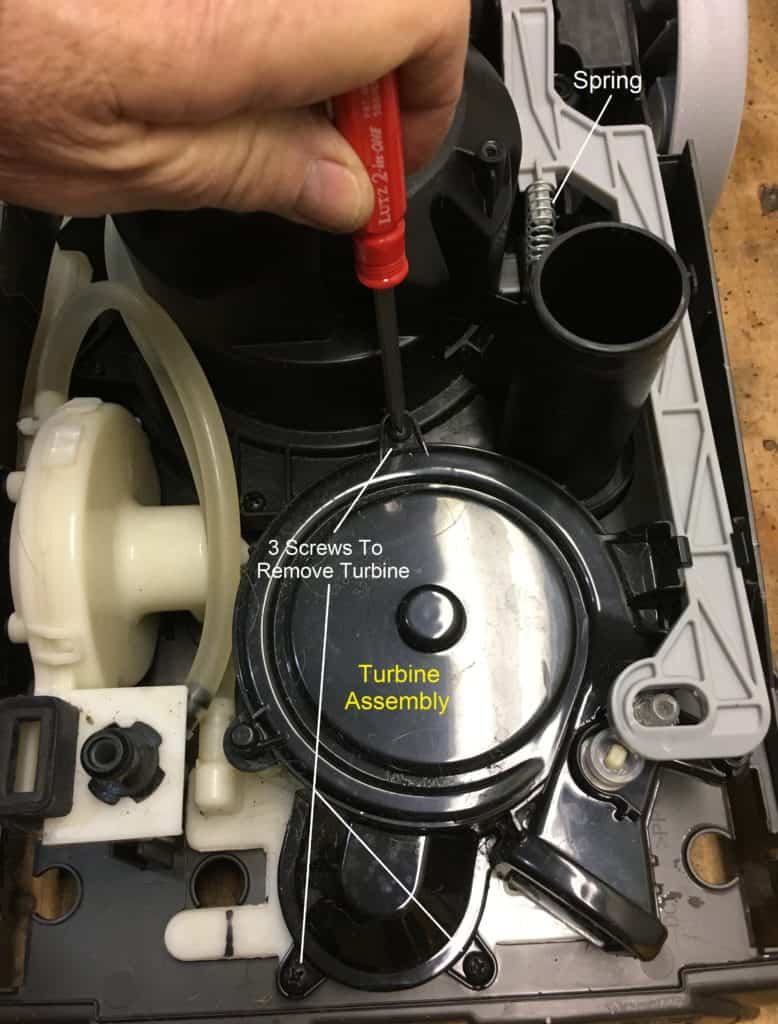
Step 6 – The turbine motor assembly is the round black device located toward the front. Remove the three screw holding the turbine motor assembly down. The light colored arm on the right-hand side will come with it. Be sure to take the spring with it.
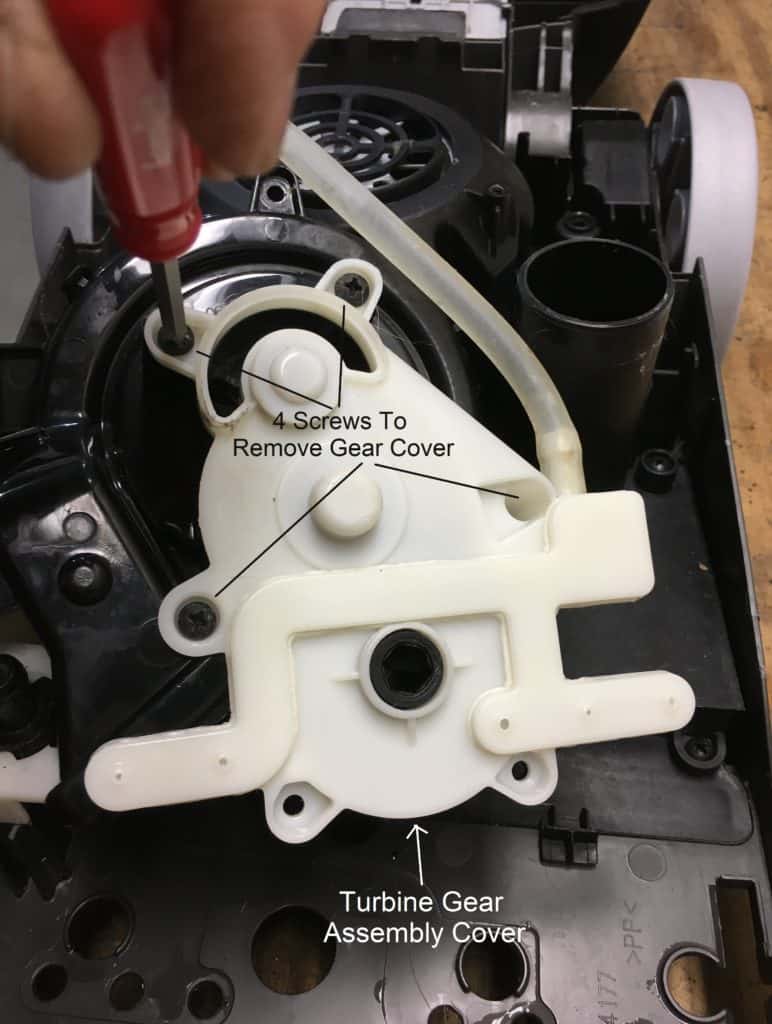
Step 7 – Flip the turbine motor over and remove the four screws holding the white drive gear cover. Once the cover is removed, the typical problem area is exposed.
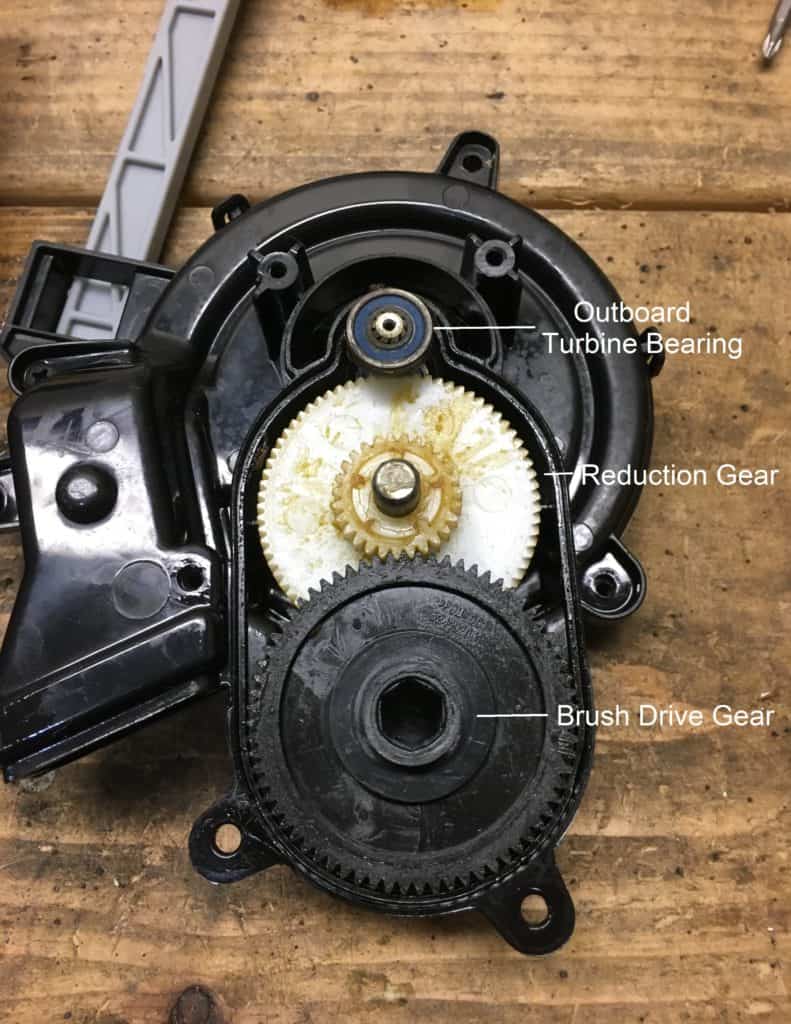
Step 8 – With the cover removed the drive gear assembly is accessible. Start by removing the black drive gear. This gear is what drives the brushes.
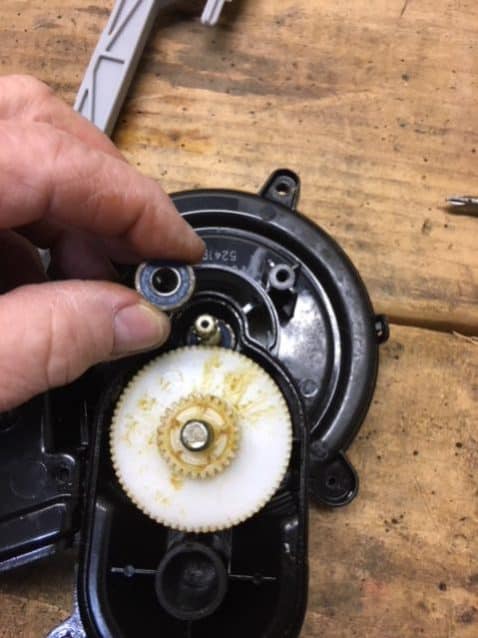
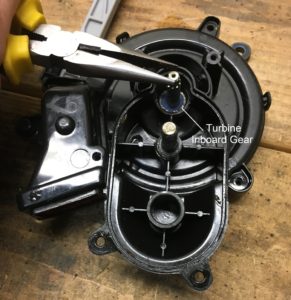
Step 9 – Next, remove the “outboard” bearing on the turbine shaft.
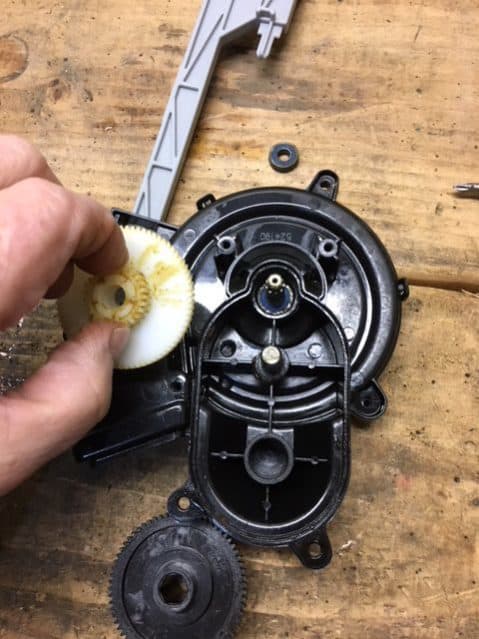
Step 10 – Lift the white reduction gear out. This provides clear access to the “inboard” bearing on the turbine shaft.
That completes the disassembly of the carpet cleaner for this problem. The issue was that both of the turbine shaft bearings had seized up. Read on to see how to fix the problem.
How To Free Up The Turbine Motor
To free up the bearings I sprayed each of them with a little WD-40. Then each bearing has to be worked to free them up. To free up the “inboard” bearing carefully grab the end of the shaft with a pair of pliers and begin by twisting it back and forth. Start with a very small movement in each direction. Watch this short video to see how this stage of the repair is done.
My research into this suggests that in almost every case the bearings will free up fairly quickly. Our bearing freed up right away and within 5 or 10 seconds I was spinning it freely with my fingers. The outboard bearing broke loose quickly too, but it was a little trickier to do. I was able to hold the inner race on the bearing with a pair of pliers (see photo) and work the outer race back and forth with my fingers. Again it broke loose easily.

Update: In my original post and in the video below, I called for “lubricating” the bearings with WD-40. I had a video viewer point out that WD-40 is not a lubricant. He is correct. WD-40 is great for loosening up rust and freeing up the bearings. However, once the bearings are spinning freely you’ll need to follow up with a lubricant.
These small bearings are sealed so a light lubrication oil would be better than using a grease. “WD” actually makes a silicone-based spray lubricant that would work well. I use this product on garage door roller bearings too. Another good option is good old household 3-in-1 oil. You could also try using skateboard bearing lubricants. I’ve never used these products, but they are made for small, higher-speed bearings and may work well.
Video: Hoover Carpet Cleaner Brushes Not Spinning
Reassembly The Carpet Cleaner
After the turbine is spinning freely you can reassemble the turbine/gearbox assembly. It’s a good idea to put a little white lithium grease on the gears and bears. This will help lubricate the plastic gears and is not harmful to the plastic. The grease on the bears will help keep moisture from getting into them. This should help extend the life of the turbine unit.
Continue by putting the carpet cleaner back together in the reverse order that it was taken apart. After the cover is on re-install the front nozzle. At this point, you can turn the carpet cleaner on to make sure the brushes work. Remember, the suction inside the nozzle is what drives the turbine. The handle has to be released and in the down position for the brushes to work.
If the brushes seem to be moving slowly, partially cover the nozzle suction area with your hand. This will increase the suction pressure inside the nozzle and should cause the brushes to spin faster. As long as the brushes are spinning they should continue to improve a little as the oil and grease fully lubricate the gears. Also make sure to clean any hair, string, or debris from the brushes. This will allow them to spin freely and they will do a better job of cleaning too.
Conclusion
That’s it! Now you can put the tanks back on and it’s ready for combat. We usually keep water and cleaning solution in ours all the time. It’s perfect for quick cleanups. So if your vacuum or carpet cleaner starts acting up, don’t get upset.
Remember most appliances will need a little tender loving care from time to time. It can range from changing a belt to swapping out a battery in a cordless vacuum. These types of repairs are easy to do and can get you back up and running in no time. Don’t be afraid to give it a try!
If you have any comments or questions, you can leave them in the comments section below or you can email us at [email protected]. FYI, we do not collect or share email addresses. We will only use them to reply to your comments or provide answers to your questions. We are also required to let you know that some of our links are “affiliate links”. This means if you click on a link and make a purchase, we could make a small commission, at no extra cost to you. This helps offset the cost of maintaining our website. So, if you like what you’ve seen, please be sure to give us a “Like” and “Share” on Facebook and Instagram too. Thank you for reading and good luck with all your home projects!
I have not seen any of the newer models. FYI, The handle has to be lowered to engage the brushes, so make sure that mechanism is in order and connected.
Bearings loosened up and all moving parts lubed but still not working once re assembled. Have they fixed this poor design issue in newer models?
Thank you for sharing!
I had this problem with a fairly new one. After taking it apart as you did I found nothing, so I went a bit further, splitting the case of the turbine apart and found the turbine was broken in three pieces. Going to try to find one on Amazon or whoever that may have it. Hope this helps someone who doesn’t find anything wrong with bearings
We’re glad you liked it!
The best directions ever! Thank you for not making me whatcha 30 minute video! You are awesome for posting this!
Glad it helped.
Thanks! Really appreciate the instructions on how to disassemble… takes the guess work out of it. I was able to get my brushes spinning again. Thanks again!
Thanks for the update!
I actually found the part on Amazon!
$50 isn’t too bad for a carpet cleaner. Where were you able to find the turbine? Parts are getting hard to find.
Thank you so much for this post! I grabbed a free carpet cleaner (same model as yours) and following your instructions, upon disassembling the parts, I found the black turbine motor assembly to be disintegrating. It broke apart into pieces with each screw I removed! So I replaced the whole turbine assembly and we’re good as new! (though my free carpet cleaner now cost me $50)
A little ingenuity helped you feed the kids yet another day. Actually, on some older models, it may be hard to find replacement parts, so you may have saved the cost of a whole new cleaner. That’s got to be at least a weeks worth of vittles for the kids! Thanks for sharing your repair!
Your unassemble and reassemble instructions were both concise and encouraging. However, my symptoms included “intermittent, or very slow and powerless brush spin.”
Upon unassembly, I found the bearings were “free,” but the turbine driven worm gear “skipped” when turned by hand. So, I delved into the turbine assembly by removing one more screw, and carefully navigating the 3 turbine assembly snap locks.
There I found the turbine had split almost completely in half, releasing the worm gear from its duty. Fear struck. How much could a turbine assembly cost? Should I feed the kids or price out what was likely a $30 part?
Then the fix-it mode settled in – finding ways to repair broken parts with available resources…
Thank the lordy for crazy glue! Everyone should have a few tubes on hand. They’re available @ Dollar Tree, with 4 unit dose tubes per pack!
I removed the turbine, drowned the crack with crazy glue, squeezed the cracked turbine back together until the glue set. Then I sliced two 1/4 x 3/4 inch strips from a useless CD, Kelly Ckarkson from her thinner days, and then glued them along the flat side of the turbine, just to insure repair integrity.
Then I heated the glued turbine in a 200 degree oven for 20 minutes. Perfect!
Then I tapped the turbine back onto the worm gear, just enough to make sure the turbine didn’t scrape its opposing part, added a few drops of Crazy to the worm gear/turbine union, lubed all shafts with the available grease, and then reassembled.
The end result was a perfect “slow” brush repair!
Thanks for your clear, encouraging, instructions and what must be patience for reading this post….
Thanks for the info! What is the model number of your cleaner?
For those of you who had done EVERYTHING right and your brushes still don’t turn, don’t fret. There are two hoses the lead up to the handle switch. The smaller of the two may be pinched. You can either replace it with standard hose available at Home Depot or you can remove it and turn it around. I pulled my hose, heated the kink with a blow dryer and reformed it, turned it around and the brushes started spinning again. Be careful removing it from the white unit at the base. I had to heat the end with the blow dryer and carefully slide it off using a screwdriver. You don’t want to brake the nipple. Good luck.
I found bearings that worked on Amazon. You’ll have to measure them and go by size. As for the gears, they are getting hard to find. If you’re lucky, you might find something on eBay.
Where can I find new bearing and gears ?
When you tested it, did you have the handle lowered? Lowering the handle is what activates the turbine.
Hello. Great article – thank you so much! I followed all the steps, and it still does not work. I turned it on without the brush connected to see if the hex part was spinning, but it doesn’t. All the parts are all lubricated and do fine when testing them manually, but the power does not make anything spin. What else can I try? Thank you.
It sounds like it doesn’t have enough power to keep the brushes spinning. It could be the bearings starting to seize up, but I would check a couple of other things first. Have you cleaned the small screen under the nozzle cover? The airflow through it is what drives the turbine for the brushes. Also make sure the brushes and brush drive gears don’t have hair, strings, or other debris wound up in them. Any of these items could slow, or stop, the brushes from spinning. Especially in a higher pile carpet. Hope this helps.
My steamvac brushes spin freely but stop when in contact with the carpet surface. Is this still the same problem?
Depending on the model and age of your cleaner, you may be able to find the whole turbine unit online. You just have to start searching. I did have one of my readers comment and say they were able to use a reduction gear from another model’s turbine assembly. But I cannot confirm that. Sorry I couldn’t be of much help.
Hi thank you, I have a similar problem but it’s shredded the reduction gear
Any idea what type or any help to source one please
Sorry, I’m not a parts dealer. Depending on the age of your cleaner, you should be able to find parts on the internet. Get the model number off your unit and start there. Good luck.
Do you know where I can buy a new reduction gear for my Hoover Steamvac V carpet cleaner? Can I buy it from you?
Glad it helped!
THANK YOU!!! Your instructions and photos are excellent. I was able to repair my machine instead of buying a new one. You are the best!!
That does seem strange. Did it sit for a long time between uses? This bearing issue has been the only trouble I’ve had with my Hoover. I wish they could resolve the problem.
Was surprised to find the outboard bearing stuck with only about 3 hours use. Freed bearing by gently removing the seals and hitting it with brake cleaner spray, then blowing out with compressed air. Lubed bearing, replaced seals and now working OK. Seems strange the bearing got stuck so soon.
Mine (about 5 yrs old) is rusted like crazy, the white cover will not even come off easily. I have to buy a new one. I just use water and vinegar mix.
Now, how does water get into bearing housing? I was looking and appears it has to be via the casing edges that are not sealed? Just trying to see how to prevent this…
I’m so glad it helped.
Thank you so much for the detailed and accurate instructions. It fixed the issue I had with the brushes not spinning.
I’m glad it helped. Believe it or not, I just had to work on mine again this past week. I was able to free the bearing up and it is still going strong. I did look into it and you can find the bearings on the internet. So, if you can’t get them freed up and spinning nicely, there is a replacement option.
Thank you for this. I probably could have figured it out after about a year of tinkering LOL. If I lasted a year tinkering with it.
I would have never guessed this was turbine based.
Any thoughts on how long it stays fixed for? I could hear mine making a louder and louder whine until I finally noticed they weren’t moving anymore.
Anyways, thanks again saving me $200 or a ton of time with such amazing details and pictires.
Sorry, it’s very difficult to troubleshoot without ing the cleaner. I have to ask… did you lower the handle before checking the brushes? There is a mechanism inside the shuts the brushes off when the handle is in the upright and locked position.
Unfortunately my brushes still wont turn. I followed everything in your steps..bearings were not locked, cleaned the filter, etc.
What else might it be?
Tutorial did the trick for me
Thanks
Easy to correct problem with the brushes
$$$$$$ saved
Glad it helped. And thanks for the “grout glaze” tip!
We’ve had our Hoover Elite for about 2 1/2 years now. Was exactly the problem as you described and remedied. Our gear area had a lot more rust affect than you video, but your fix and subsequent silicone lubricant brought it back to being a great workhorse once again. BTW, we’ve also used the machine a number of times o remove grout glaze from fresh tile floors!
I’m so glad it helped!
Thank you so much for this info! I found it more helpful than all of the YouTube videos! I just completed the repair and my machine is working like-new! I admit I was intimidated at 1st but your step-by-step guidance was perfect! Couldn’t have done it without you! Thank you for taking the time to post this!
That’s a very good question. I have written to Hoover asking them that question. If I hear back from them I will share their reply.
I’m so glad it helped!
Thanks for this! I use my carpet cleaner infrequently, only about once every couple of months. This was the exact problem I ran into and your guide helped me fix it! 😀
why are the parts discontinued? I mean, they still sell these machines
I’m so glad it worked for you!
,
Awesome, saved me cost of new machine, works like new.
This worked for me!! Thanks
I’m so glad it helped.
Thank you very much for this well-written article. I was able to fix my Hoover Power Scrub which saved me several hundred dollars on buying a new cleaner.
I am disappointed though, with Hoover in that this happened in the first place. I had a huge amount of rust on the bearings and on both shafts. This means that water had gotten into the housing. After cleaning off the rust and freeing the bearings, I placed a bead of grease round the whole perimeter of the housing before re-assembling the cover. Hopefully this will prevent water from entering in the future. Hoover should have placed a gasket around the perimeter. Thanks again for this excellent article.
I am not sure how the two might be related. I believe both the brushes and pump are driven by the unit’s suction power, but they may have separate sources. I would start by giving it a good thorough cleaning. Especially the screen under the suction nozzle. That’s where the brushes get their drive power. As for the spraying, it sounds like the pump must be working for the hose attachment to work. The main spray nozzles may be plugged. Sorry I can help more, but it’s hard to troubleshoot remotely.
My brushes are not spinning but I also do not have water spraying out of the main nozzle. If I use the attachment, the water comes out no problem. Do you know if this could be related to why the brushes are not spinning?
I am so glad our blog article helped!
My brushes stopped working and we were also having issues with suction. I followed your tutorial and it did the trick! I was able to access the gears and they were completely stuck. But I removed them and used some WD-40. Thanks to your website the brushes are working fine now! We were considering buying a new carpet cleaner. You saved us at least a couple hundred bucks!
It sounds like you are describing the actual turbine impeller. As mentioned, it’s getting almost impossible to find the turbine assemblies anywhere except eBay. You’ll just have to keep checking and looking for the best deal. As for your repair, JB weld and other epoxies are amazing. I am a huge fan of them and have actually written an article on epoxy repairs. I’m sure that the turbine spins at a fairly high speed, so it will test the strength of the JB Weld. I’d be interested in hearing how long the repair lasts. Good luck in your search and thank you for sharing your story.
Thank you none the less! I do think I figured it out and because the parts are unavailable was able to use jb weld for plastics to put the gear back together. Probably won’t last but maybe will buy me some time until something shows up on ebay.
In case anyone else would benefit from this, the gear to which I was referring is on the other end of the turbine shaft in your illustration. It has fins on it and is spun by vacuum. That in turn rotates the shaft and subsequently the two gears referenced in your article. This turbine gear is accessed by flipping over the assembly and removing the two screws that hold the black housing opposite the “gearbox assembly”.
I am not 100% what gear you’re asking about. Unfortunately, turbine parts are hard to find for these cleaners. Your best bet is to check out eBay. Sorry, I couldn’t be of greater help.
Thank you for the article and video. I’m hoping you might be able to answer and additional question for me. Opposite the plastic turbine drive gears you show is a single large plastic turbine gear. Mine has broken in two and the old cleaner is not worth replacing the entire turbine assembly. Do you know which direction the fins face should I be able to find a replacement gear? Towards the drive gear or towards the fins in the enclosure?
Thank you.
I’m glad I was able to help!
Great tips. Awesome and detailed instructions. And yes, about 30 minutes to fix. Thank you very much.
I’m sorry to hear you’ve had a bad experience with these carpet cleaners. We have had good luck with ours for several years now. I will say that all of our carpets are lower pile carpet. If you have high (longer) pile carpets, that may put extra pressure on some of those internal parts. Just a thought.
I have bought several versions of this steam cleaner from low to high price. Everytime I take them in, it is due to small plastic parts broken off. They said these things are not intended for extended use. I love the fact that it is an auto mixer but I am getting tired of buying new ones. Thanks for the video!
Unfortunately, many of the parts for the Power Scrub carpet cleaner and SteamVac are being discontinued. Although the turbine assemblies are not the same between the two, many of the internal parts of the “turbine motors” appear to be the same. One of my readers was able to take the big white gears out of one assembly and was able to make them work in the other. From what I can see I believe the bears are the same as well. The Hoover replacement part number for the bearing is 91001075, but I could not find any dimensions. However, in another article I found online, they were able to use some bearings they found on Amazon (https://www.amazon.com/PGN-R4-2RS-Sealed-Bearing-Lubricated/dp/B07GT739PV). As mentioned earlier, the turbine internal parts look the same, but no guarantees.
Farwellbear, your tutorial saved me, it was so helpful thank you so much! I have redone this a couple of times this past year but the bearings are pretty much done for now. I live in Europe and ordered the hoover fh50150 by ebay 2 years ago. The problem is that I can’t get any turbine assembly parts anymore, the vendors say they are discontinued so I was hoping you could tell me what bearings are installed. Mine have become unreadable. I’m sure if I have the number/I’d of the bearings i might be able to order them even from local shops here.
Thanks in advance
I assume you mean the hex pin on the brush assembly. If so, that could indicate that is where the issue may be. Look for damage or objects stuck in the brushes and/or the drive gears between each of the brushes. Hopefully, it’s something simple. Many of the parts for the Power Scrub Deluxe are getting hard to find. Ebay maybe your best option if you need to replace the brush assembly.
What do I do if the hex drive pin won’t spin once I take the brushes off?
We’re glad we could help!
Thank you for the great explanation and pictures. Fixed my dumpster dive cleaner.
Yes and it was very easy to do!
Saved yourself a pretty penny there.