Many DIY hobbies and home projects require drilling holes. For example, I wrote an article on a home electrical wiring project we did, that required drilling many holes. These holes did not need sharp, clean edges, or have to look nice, they just needed to allow a wire to pass through a stud wall. However, there are many home projects and hobbies that require holes that are both functional and that look good. In this article, you’ll learn the different drill bits that are available to you and I’ll share a few tricks I’ve learned over the years.
I am going to focus mainly on drilling holes in mild steel and wood. 75% of home projects involve working with metal and wood. I will cover some of the basics of drilling into masonry products too. When it comes to drilling holes in any materials it’s important to know that there are different drill bits for different materials. Having the correct drill bit is paramount when starting out.
In this article, we will be providing you with a few links to some products for pricing and informational purposes. We are required to let you know some of these links are “affiliate links”. This means if you click on a link and make a purchase, we could make a small commission, at no extra cost to you. This helps offset the cost of maintaining our website. Now, let’s get started.
Safety First
Table of Contents
I have to stress the importance of using eye protection anytime you are drilling any material. You will also find that hearing protection is also very important as you progress to different materials, making larger holes, and using the different equipment needed to make these holes. Please consider reading my article on personal protective equipment (PPE). It covers safety when working on home projects.
The second safety “must-do” is always secure your material in a vise or securely clamp it to a bench or work table. Never hold the piece you are drilling in your hand! Many bits used for drilling holes, especially larger holes, have a tendency to “grab” the piece that’s being drilled. If it’s not securely fastened down, or you’re holding it in your hand, this can cause serious cuts or injuries.
With that said, if you are using a hand drill, and the drill bit should grab the material, be aware that the drill will twist in your hands. If you are not prepared and do not have a firm grip on the hand drill, this can cause injuries to your hands and wrist. This becomes more of a risk when drilling larger holes and using bigger, more powerful hand drills. The key is to be aware and always be prepared!
Working with Metal
As mentioned above, for small holes you simply put the proper sized drill bit in your hand drill, or drill press, and drill away. If a larger hole is needed, you can start with a small hole, frequently called a pilot hole, and then increase the size of the drill bit and make the first hole bigger. It sounds simple and relatively is that simple. However, there are a few things you can do to make the process a little easier.
Tips For Drilling Holes in Metal
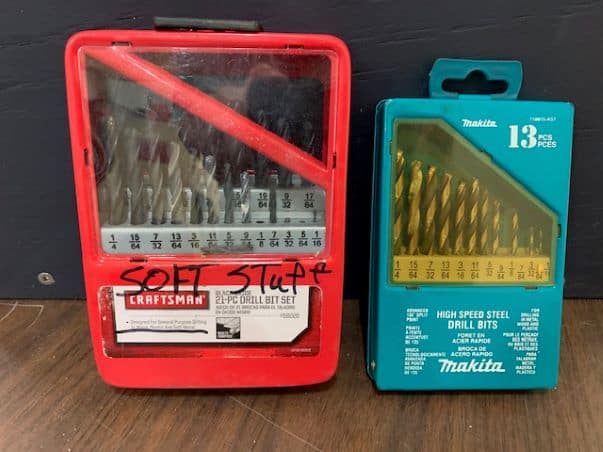
#1 – First and foremost is to make sure you have drill bits designed for drilling steel. For steel, you will need bits made of high-speed steel (HSS) or cobalt. “Carbon steel” bits should only be used on softer materials like wood or plastic. If you try using the carbon steel bits on steel, it will only ruin the bits and cause you lots of frustration. Good drill bits cost more, but it’s for a reason.
#2 – Secondly, you should use a little lubricant on the drill bit during drilling. The lubricant helps keep the bit cool and will prolong its life. They make special cutting fluids, but at a minimum use a little penetrating oil or motor oil. As mentioned earlier, good quality bits cost a little more, so why not protect your investment for future projects.
#3 – Another good rule of thumb is that as the size of the hole gets larger, you should slow the speed (rpm’s) of your drill down. Remember the old childhood game of “crack the whip”? Well, the same principle applies. The further out from the center of the hole you get, the faster the bit is traveling. That additional speed will generate more heat and potentially damage the bit. Here’s where a good lubricant is very important, especially when using hole saws. Also by reducing the speed, it helps in those situations when the drill bit “grabs” the material. It makes it easier for you to maintain control of the hand drill.
#4 – If you need to drill a hole in a precise location, it’s a good idea to use a “center punch” and a hammer to mark the spot. The center punch will create a dimple that makes it much easier to start your drill bit in. This is especially important when drilling a hole in the side of some round stock or any surface that isn’t flat. Remember, if the hole location is critical, use a center punch first.
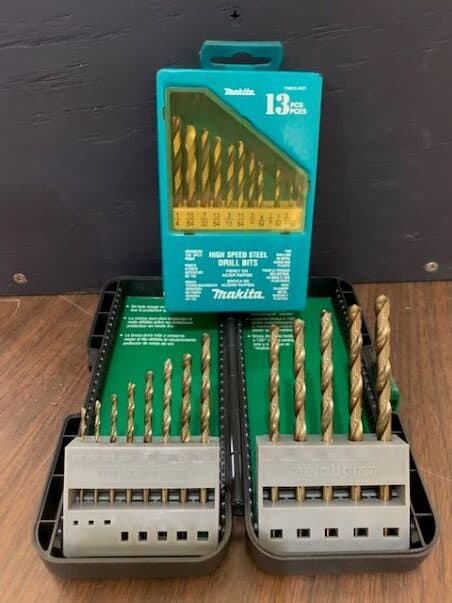
Types of Steel Bits
There are three main types of drill bits I use when drilling metal. They have different applications depending on the thickness of the material being drilled.
Step Bit
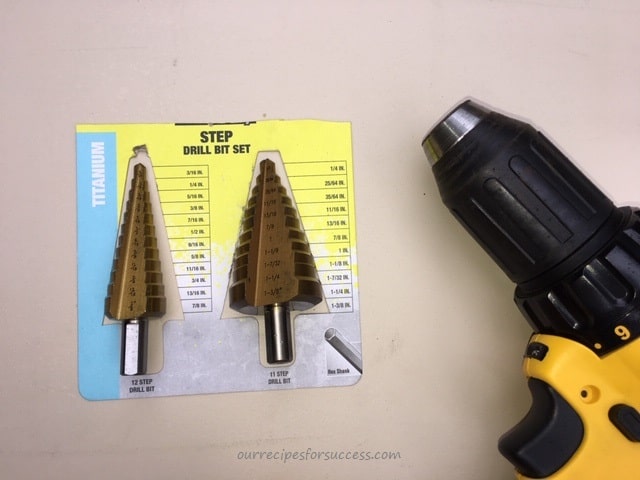
I’ve already discussed the need for high-speed steel (HSS) bits for drilling metal. But for larger holes, there are a few more options. The first is called the “step bit”. Click on the blue text to check out the price of these bits that are available through Amazon.
Because each of the steps on these bits ranges from 1/8” to 1/4”, these bits are normally used on thinner steel or sheet metal. These are great drill bits because you can drill a variety of hole sizes, without having to change bits.
Reduced Shank Drill Bits

5/8″ Bit To 1/2″ Shank Reduced Shank Drill in 1/2″ Drill


Another option is the “reduced shank drill bit“. These are normally larger diameter drill bits, with the shank turned down to fit into a normal hand drill or smaller drill press. For hand drills or drill presses 1/2” chucks there are 1/2” reduced shank bits that typically go up to 1” in diameter. Click on the blue links to check pricing and other options at Amazon.
These bits are good for drilling through thicker steel. When drilling thicker steel, be sure to use multiple step pilot holes, with increased size each step (1/8”, 1/4”, 1/2”, 3/4”, etc…). Remember, these larger diameter holes are the ones that the drill bits can “grab” the material, so hang on to the drill motor tightly. And make sure to use plenty of the appropriate cutting lubricant.
Mandrel Hole Saw
The last option I will be talking about is called the mandrel holes saw. Sometimes referred to as an arbor hole saw. If you’re cutting metal with this type of hole saw, you need to use the “bi-metal” material. They are designed for cutting metal. You can probably get away with cutting up to 1/4” thick mild steel without to much trouble. Just remember to watch your speed, use lots of cutting fluid, hold on tight, and be prepared.
Drilling Holes In Wood
The good news is many of the same principles apply when drilling holes in wood. All the same safety rules apply! You still need to secure your material in a vise or clamp it to a workbench. And you still need to take care when drilling large diameter holes.
Twist Drill Bits For Wood
There are four basic, relatively inexpensive, options that I use for most of my home woodworking projects. The first is the regular “twist” drill bit discussed above. The other three will be covered in more detail below.
Working with wood doesn’t require the use of HSS twist drill bits, but if you need to buy bits, why not buy the better bits upfront. You’ll have them for future projects, whether it’s for metal or wood.
Drilling Pilot, Clearance, And Countersink Holes
There’s no real magic here. Like in the game “Rock, Paper, Scissors”; steel usually wins over wood. However, when it comes to drilling holes in wood to be used with screws, there are a few very important technics you should be aware of. They will help prevent cracking and splitting your wood projects.
This is important when using thinner material on any project. Pre-drilling these holes helps prevent cracking and splitting the boards, yet makes for tight secure joints.
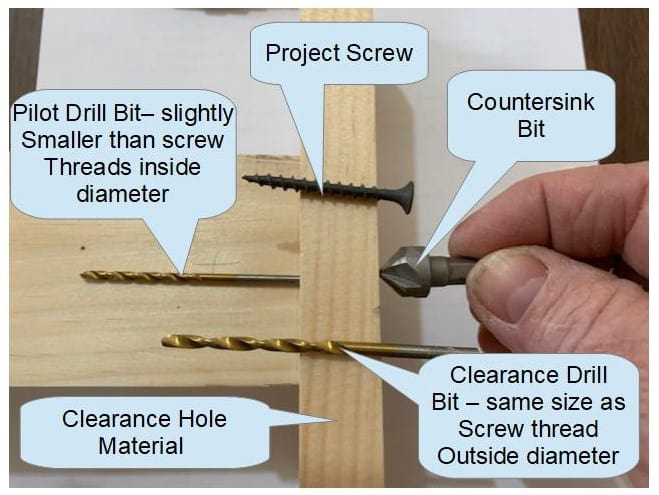
Pilot holes are drilled in the board that the screw will anchor into and should be smaller than the screw diameter. The small diameter hole should still provide plenty of material for the screw to grab ahold of but does not cause enough pressure that will cause some thinner pieces of wood to split.
Clearance holes are drilled through the board that the screw passes through and is about the same size as the outside diameter of the screw threads. This allows the board to be pulled tightly against the board it’s being anchored to. For more information on pilot and clearance hole sizing, visit the DIYDATA.COM website. They have good reference information.
The countersink is a chamfered screw hole on the surface of the wood, that allows a flathead screw to tighten and be flush with the finished surface. This gives the finished product a very clean look.
Countersink, Clearance, Pilot Drill Bit Options
To drill these holes you have several options available to you. I will show you a couple I use routinely with good results. If you currently need to purchase a countersink bit, I will list a few of the different types below for pricing and information.
The first method is to simply use two different drill bit sizes and a countersink bit. It’s very effective but does require you to switch between bits. However, it does cut down on the cost of buying additional “special” countersink drill bits that we’ll look at below.
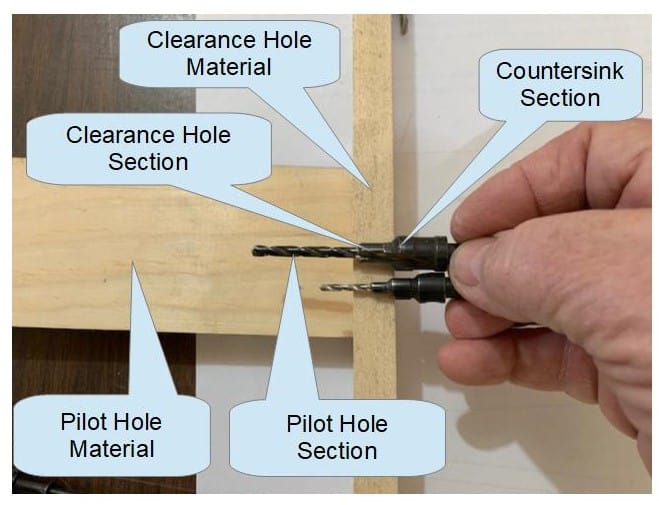
The second method I use, whenever possible, is to use a countersink drill bit. The downside of these bits is you need a different drill bit for each of the different screw sizes you may use in a project. I’ve also found that the clearance hole may not be deep enough when working with thicker wood.
Below is an example of two of the countersink bits I own and use. As you can see if I was using a larger screw with the top bit, it would probably work just fine in this 3/4″ board. But if I were using a smaller diameter screw, the bottom bit’s clearance section may not be long enough to be effective and pull the two boards tightly together.
Or if I were using 2″x4″ boards, neither one of these bits would be effective by themselves. I will frequently use one of these bits to drill the pilot and countersink, but I still may have to install a larger bit to finish drilling the clearance hole. It’s still better than switching drill bits three times and you have a nice, tight joint when you’re finished!
Because of the above variations in wood and screw sizes, I occasionally add to my collection. If you think you might be shopping for some countersink bits in the near future, below are a few of the types I have my eye on if they are need for my next project
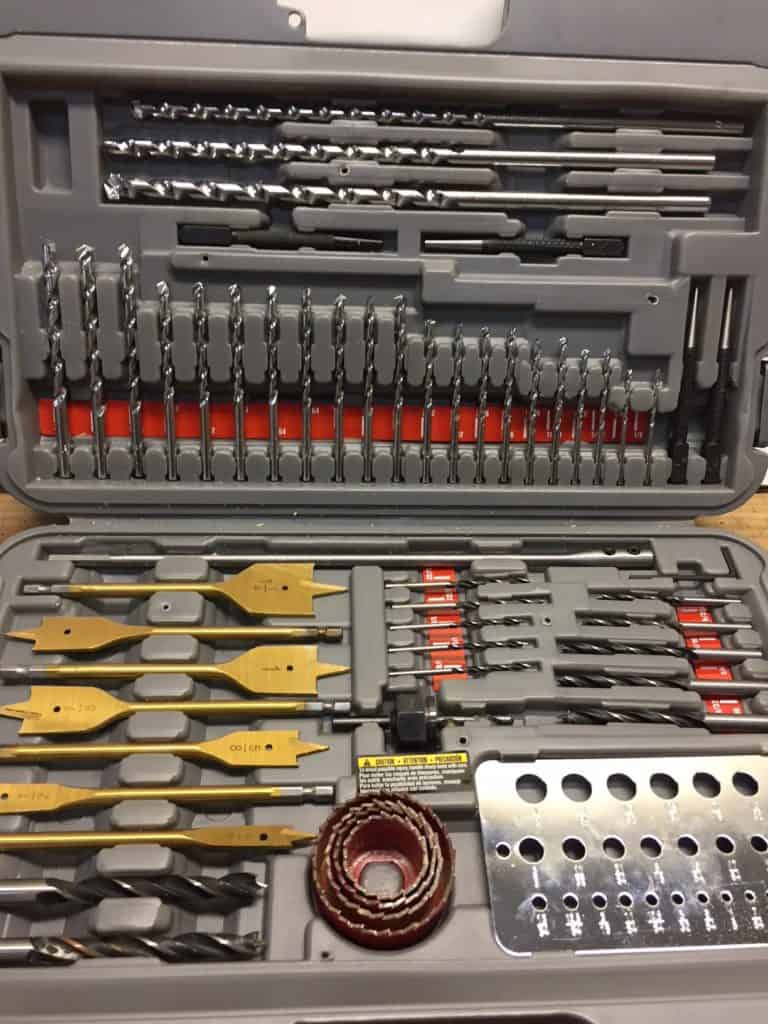
Drill Bits Available For Larger Holes In Wood
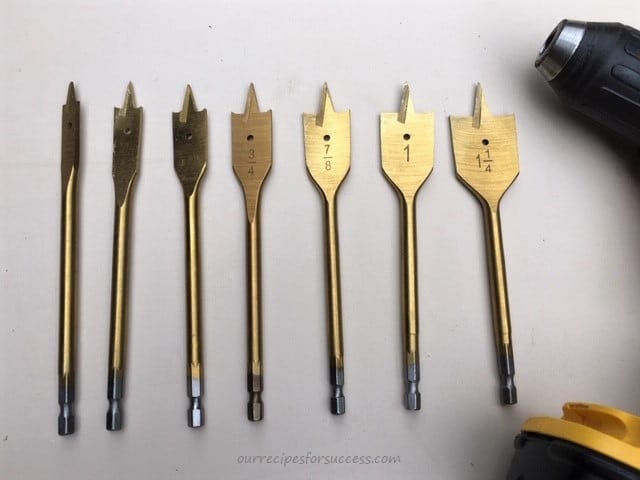
The first one is the spade (paddle) bit. This is the type I use most of the time for holes up to 1-1/4”. The shank size is 1/4”, so it fits in most hand drills.
The second option is the auger bit. This is a good bit and seems to be a bit hardier than the paddle bit. They normally have the 1/4” shank, so they work in most hand drills, as well.
The third option is the mandrel hole saw. The teeth on the mandrel hole saws do plug up with sawdust, so you do have to stop frequently and clean them out. But other than that, they cut nice holes.
Tips For Drilling Holes In Wood
The first tip I have to offer applies to drilling holes in both metal and wood. When clamping your material to the top of a workbench, lay a scrap piece of wood down first. This will allow the drill bit to completely go through your material without damaging your work surface or the drill bit.
Also, be sure to use a hand drill that can handle the job. For one or two smaller holes, a cordless drill will work fine. If you are drilling several holes, or a few larger holes, be sure to use a heavier duty drill with some horsepower. You can easily overheat and ruin a lighter duty drill.
#1 issue: One thing you’ll likely encounter when using hole saws on wood, is the starting (front) side looks good, but the backside will be a mess. It will be jagged or have big chunks break out. If the backside is out of sight, it may not be a big deal, but for many projects, that just will not do.
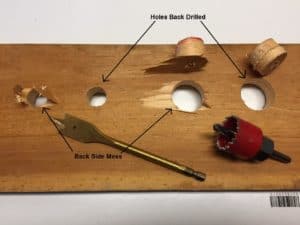
The cure: To prevent this from happening, begin drilling the hole normally, but watch for the center bit, of the hole saw, to just start coming through on the backside. Stop immediately! Then either flip the piece over or move to the backside. Now place the center bit of the hole saw into the small hole it just made, when coming from the other side, and begin drilling in the opposite direction. It should make a nice clean cut on the back surface, and then just continue drilling until the hole is completed. You should have a nice clean hole that will only require some light sanding.
For a good demonstration on drilling a clean hole, click on this link. This will take you to a video I made for a project we did on how to build your own cornhole board game. In the video, I am using a 6″ mandrel drill to drill the hole in the cornhole board. The hole turned out very nice. This video also demonstrates the above safety item mentioned earlier about holding your drill motor firmly. Large drill bits and holes saws can occasionally grab the material. Take a couple of minutes to check it out.
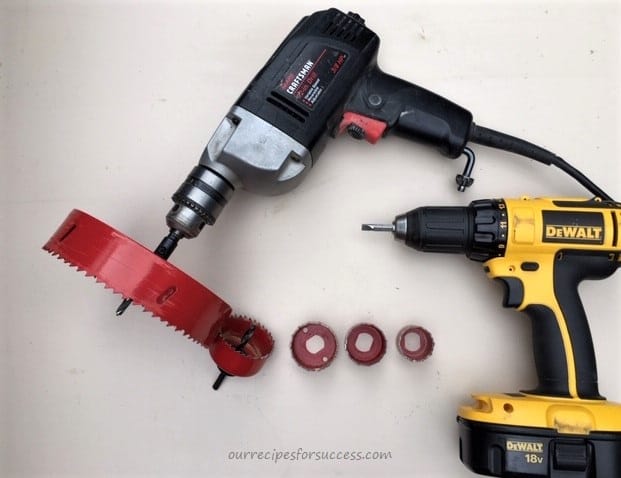
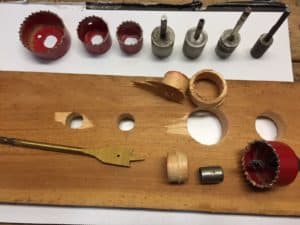
#2 issue: What if you’ve cut a hole and decide it needs to be bigger. All of these hole saws have center bits that drill through the wood as it guides the cutting edge/teeth straight through the wood. Before you throw the piece away and start over, try one of these remedies. Both of these methods require the use of a mandrel hole saw to cut the new hole.

Plug – Spacer – Larger Mandrel Bit Plag and Spacer Installed in Bit


Cure #1: The simplest remedy is to find a piece of round stock that fits snuggle into the original hole. Even if you have to put a couple of wraps of tape around it. In these photos, I used the plug I originally drilled out. It worked very well! The mandrel cutter’s center drill had something to start in. Once started, it drilled out nicely. Don’t forget to flip it over and drill from the back to prevent those jagged edges. See the results below.
Cure #2: Another option is to create an adapter to replace the drill bit in the mandrel hole saw. Several years ago I had access to a lathe and made several adapters for different hole sizes. After putting the new desired size hole saw on the mandrel, remove the drill bit and install the adapter, for the appropriate size hole that exists. The adapter should guide the new saw through the wood nicely. These work well for enlarging holes in metal too.

Drilling In Masonry Products
Occasionally you may need to drill into concrete, cement blocks or bricks for a project. For larger holes, you may want to go to the local rental center and rent a rotary hammer or a core boring machine. But for smaller jobs like hanging a shelf there or anchoring your workbench legs to the floor so they won’t slide, the average homeowner has a decent option. Let check it out.

Carbide Tip Close Up Masonry Bit Kit with Concrete Anchors


Masonry Drill Bits
These drill bits are equipped with carbide tips that allow them to chew into most masonry products you’ll find at the average home. Used with a good quality anchor and installed properly, they will do a good job for most home projects.
Here’s a link to a masonry drill bit set at Amazon, so you can check pricing and other options. Here are also a couple of good quality anchors that work well. The first is a lead machine screw anchor and the second is a hex sleeve anchor. Be sure to follow the installation instructions and use the appropriate number of fasteners for the job and these two fasteners usually do a good job of holding.
Masonry Drilling Tips
The use of masonry drill bits does come with a couple of extra tips to help ensure you end up with a good hole and it’s done safely.
Tip #1 – Along with wearing your eye and hearing protection, add a dust mask, or better yet, a respirator. Drilling into masonry products will generate air born particles. Breathing this dust is not recommended.
Tip #2 – Do not drill to close to the edge of a cement wall. You should not install cement anchors too close together either. Drilling to close could cause the edge to break away and installing anchors to close can cause the cement to break. According to the website “engineeringexpress.com“, you should space your anchors 12x the diameter of the anchor from the next anchor or to the edge of a concrete wall.
Tip #3 – When drilling into masonry materials with a normal drill and masonry drill bits keep the speed down. Excess speed can heat the bit up and cause the carbide to chip or break. Stop frequently to allow the bit to cool and using water helps the cooling too. Be patient! It will take a little longer than a rotary hammer, but it can be done.
Conclusion
I hope this information helps you when you need to drill some holes for a project. It all boils down to some basic fundamentals. If you invest in the right equipment, have patience, and work safely, you can drill perfect holes every time!
If you have any comments or questions, you can leave them in the comments section below or you can email us at [email protected]. FYI, we do not collect or share email addresses. We will only use them to reply to your comments or provide answers to your questions. We are also required to let you know that some of our links are “affiliate links”. This means if you click on a link and make a purchase, we could make a small commission, at no extra cost to you. This helps offset the cost of maintaining our website. So, if you like what you’ve seen, please be sure to give us a “Like” and “Share” on Facebook and Instagram too. Thank you for reading and good luck with all your home projects!
I’m glad it helps. You should never try and hold the piece you’re drilling with your hand. It could result in an injury pretty easily. Always secure your work in a vise or clamp it to a work surface. Good luck with all your projects.
I like your tip about clamping down the metal and wood. That way it won’t jiggle when you drill. I’ll have to consider just getting someone else to drill anything I need.