
If you need to replace or install a new receptacle, it’s important to know how to wire an electrical outlet the safest possible way. By following some basic best wiring practices this can easily be done.
Keep in mind, if this is a receptacle replacement, the wiring connections used may not be the best connection for the job. There are three typical ways of wiring a receptacle. I’d like to share with you what I, and many electricians, believe is the best and safest way to wire your receptacles.
Let me start by saying that if you find one of the two methods of wiring that I’m not recommending, I’m not saying your electrician did a poor job. That’s not what this article is about. Electricians do a wonderful job and if you’re not comfortable working with electrical equipment, you should definitely call one for help.
However, when armed with the right information, you’ll be better equipped to work with your electrician to get the job done how you want. I’m sure your electrician will be glad to work with you.
In this article, we will be providing you with a few links to some products for pricing and informational purposes. We are required to let you know some of these links are “affiliate links”. This means if you click on a link and make a purchase, we could make a small commission, at no extra cost to you. This helps offset the cost of maintaining our website. Now, let’s get started.
Why Is This Important To Us?
Table of Contents
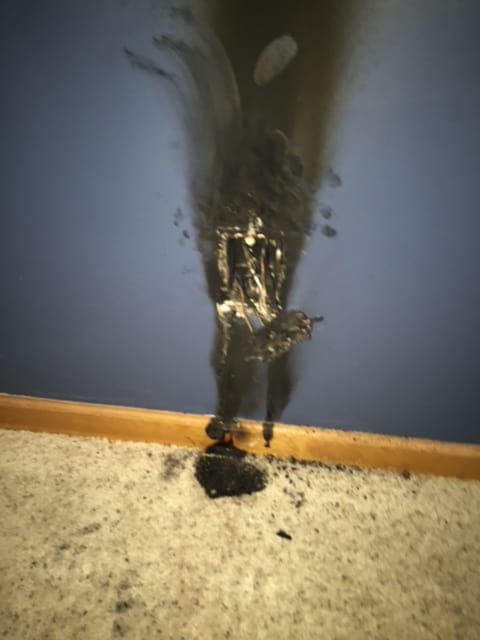
The reason this is so important to us is our family had a close call a few years ago. My mother-in-law called us one night, at midnight, saying she had a small electrical fire in the house and asked me to come over and check things out. When I got there I found an electrical outlet badly burnt in her bedroom. It had gotten hot enough to melt part of the outlet and the outlet cover. The melted plastic dripped down on the carpet and trim board causing them to catch fire too.
We were very lucky that night. If my mother-in-law would not have woken up when she did, she could have lost her home. Frankly, this outlet was right next to her bedroom door and, if she hadn’t woken up when she did, she may not be with us today! That is a very scary feeling. To this day she’s not sure why she woke up, but we’re so thankful that she did! Not only that, but she did everything right. She had the presence of mind to turn the electrical breaker off and poured water on the burning carpet and trim.
When I arrived I was shocked! It had been much larger than I imagined. It had cooled off, so I pulled the receptacle out of the wall to make sure there was no sign of fire inside the wall. All was good and she monitored it until the morning. Since the fire, I have rewired many of the receptacles in her home to help prevent electrical fires in the future. I’d like to share the method I used.
How To Prevent Electrical Fires
There are several things that can cause an electrical fire. Keep in mind that sometimes they can be a combination of the below causes. Below are some of the most common causes of electrical fires. By knowing what causes them and identifying the causes that put you at risk, you can reduce the chances of an electrical fire at your home.
According to a 2012 – 2016 report published by NFPA (the National Fire Protection Association), 50% of home electrical fires are caused by electrical distribution and lighting equipment. This equipment is responsible for safely supplying electricity throughout your home. If you suspect you have any type of electrical issue, be sure to have it checked out.
Below is a list of a few of the most common causes of electrical fires. There are a few things on the list that may be more difficult to identify, but there are some items you can address to help prevent electrical fires in your home.
What Caused Our Receptacle Fire?
Although there is no way to prove it 100%, we believe the cause of our fire was one of the terminals on the receptacle may have become loose over time. One side appeared to have more damage than the other side, but everything was so badly melted it was difficult to say. Although the receptacle was not in use at the time of the fire, an electric room heater was plugged in and used earlier that evening.
I believe the receptacles wiring could have contributed to the situation. There are three typical ways you can wire receptacles. One way is usually considered a no-no, one is commonly used and considered good, and the third is used by many and is considered the best option. All three methods meet the electrical code.
For this reason, I want to focus on receptacle wiring practices for the remainder of this article. We will look at each wiring method a little closer, so you have the best information to make the decision on what you need or want from your electrician. Let’s take a look.
Receptacle Wiring Best Practices
There are different opinions on this topic, so I want to give you the pros and cons of each method and show you the one I (and many electricians) think DIY homeowners should use.
For a little background on myself, back in 1999 my wife and I had a new home built. If you’ve read our “About Us” page you’ll see that I have some electrical experience. With that knowledge, I decided to do the electrical work for our new home. I did extensive research on the electrical code requirements and, more importantly, the “best practices” for home wiring.
Receptacle wiring is one of the areas that my “best practices” research affected how I did things when wiring our home. There are typically between 8 and 11 receptacles on a circuit, depending on the size of the circuit breaker and wire used. Let’s look at how the wire gets to each of these receptacles on a circuit and from there we’ll examine the different receptacle connection choices.
Electrical Work Safety
Before beginning any electrical work you must first turn off the breaker, secure it, and check for power at the device (receptacle, light switch, etc…). This is referred to as “Lockout-Tagout”. For more information on this safety practice, click on the link and read our article. It’s something every DIY’er should be aware of and use.
Most electrical work of this nature only requires a few basic tools. As with most jobs, having the right tools for the job is very important. The photo below shows the tools I commonly use for most small electrical repairs/work.
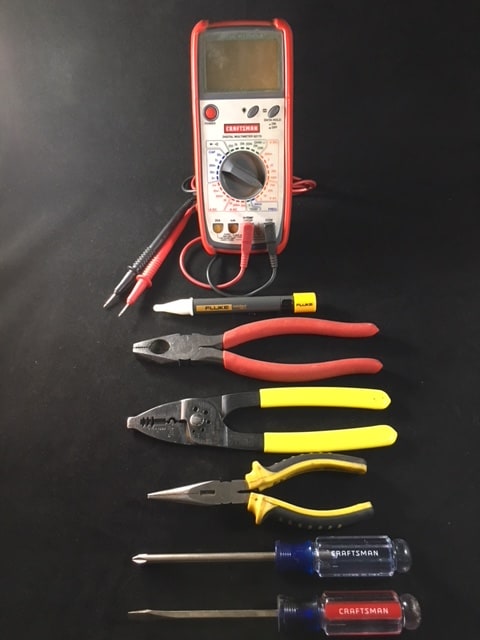
I have written an article covering the basic electrical tools that can help you make most electrical repairs around the house. Keep in mind some of the tools required are covered more in-depth in our basic homeowner’s toolkit article. I recommend reading both so you are better prepared for repairs you may face around your home.
Common Receptacle Box Wiring
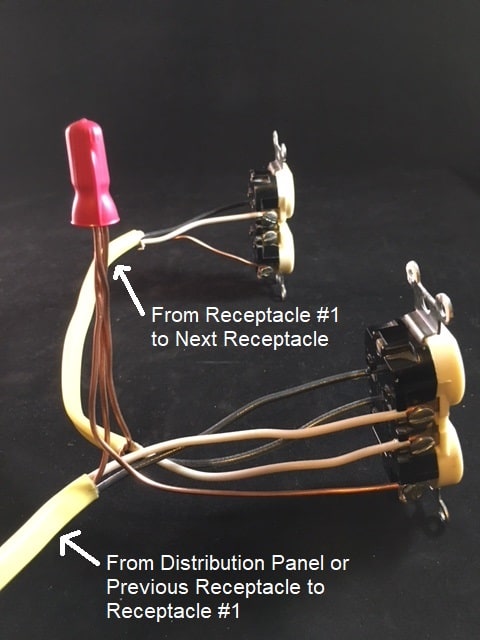
For all receptacle circuits, the wire from the distribution panel will run to the first receptacle box in that circuit. It should come in and be sticking out of the receptacle box 6 to 8 inches, which is a code requirement (check your local code).
The second wire sticking out of the receptacle box will be running to the next receptacle in the circuit. This will carry power to the next receptacle box on the circuit. Obviously, the last box on the circuit will only have one wire coming in.
Carefully strip the outer insulation off each of these wires exposing the inner conductors (wires). The black conductor is the “hot”, the white is the “neutral”, and the bare copper conductor is the “ground”. At this point, you’re ready to begin connecting your receptacles. Let’s take a look at your options.
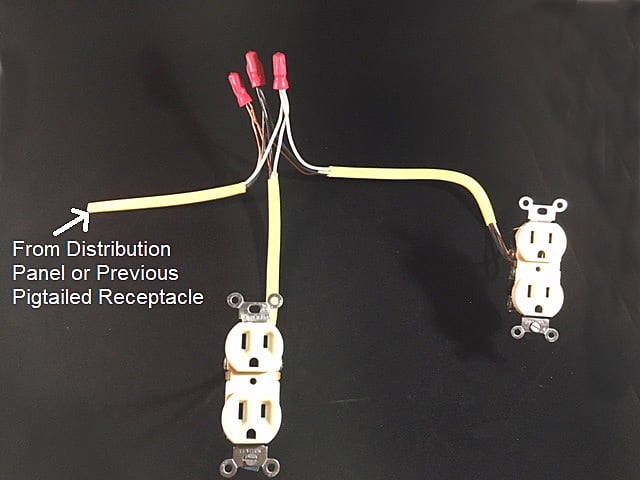
Pigtail Connection
The pigtail connection is what I consider to be the preferred method for wiring a receptacle. In all my research and conversations with electricians, nobody has ever disputed the quality of the pigtail connection. As DIY homeowners, this is what we should be looking for in all of our projects, the best quality! What I like about the pigtail connection is all the electrical current for the circuit flows through the wire nut connection, which we’ll cover below.
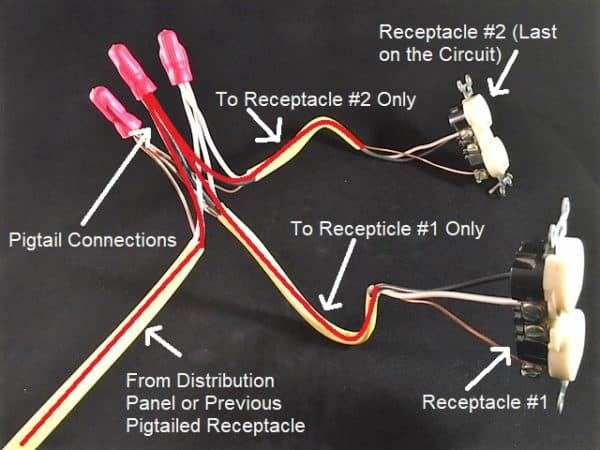
How to Make A Pigtail Wiring Connection

Pigtail Wiring Connection Pros and Cons
Pros
Cons
Screw Terminals Connection
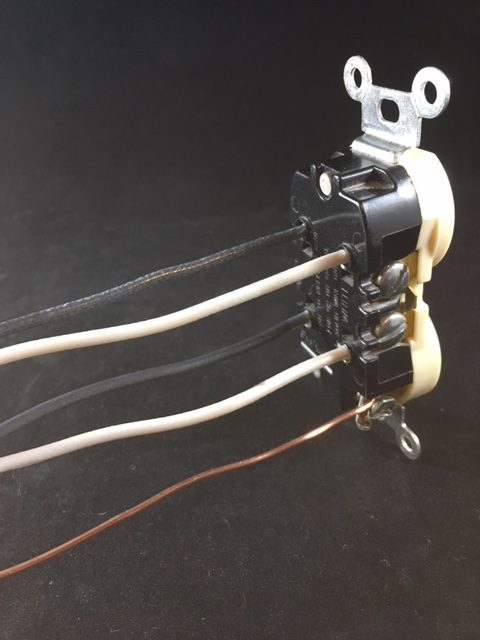
Screw terminal connections are one of the most commonly used methods for wiring receptacles. It is the method that was used on my mother-in-law’s receptacles. The “hot” and “neutral” wires from the circuit breaker are attached to one set of the screw terminals on the receptacle. The wires going to the next receptacle are attached to the other set of screw terminals. Because there is typically only one ground connection on a receptacle you’ll need to “pigtail” the ground wire to the receptacle, as described above.
If a large electrical load is plugged into the last receptacle on the circuit, all that electrical current flows through every screw terminal on each receptacle in the circuit. That increases the chances of trouble on the circuit significantly.
How To Make A Screw Terminals Wiring Connection
Additional Screw Terminal Wiring Connection
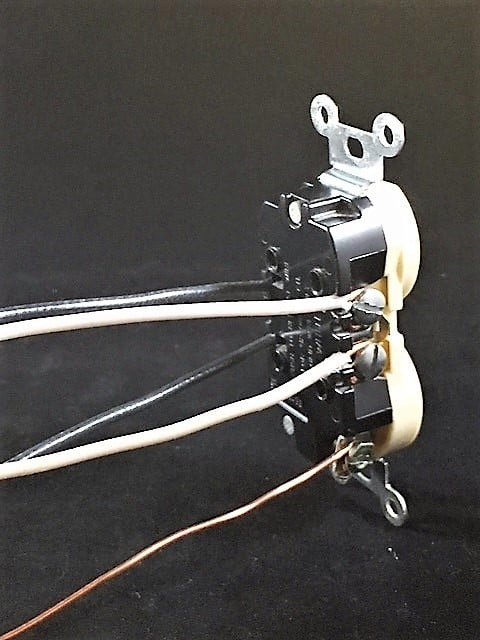
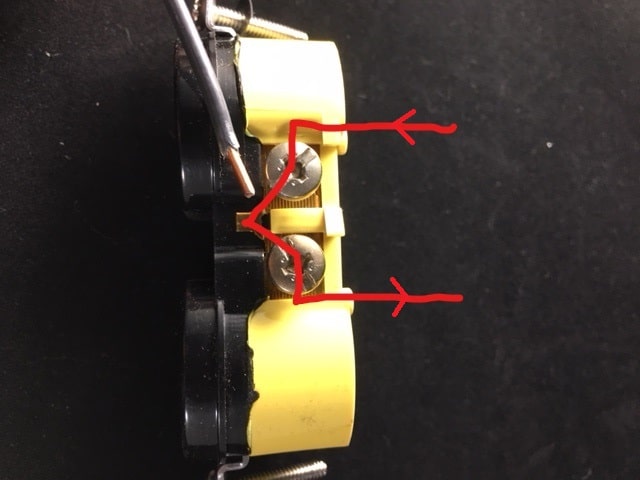
There is a screw terminal connection that is becoming more common. It is used almost exactly the same way as the above screw terminal connection, except the “J” shaped bend is not made on the conductor. It is left straight and it slides in under a special plate on the backside of the screw. For this article, I will call it the “modified screw terminal”. The picture below shows an example of this type of connection on a GFCI receptacle. Although I would consider this a better connection than the backstab connection, which I’ll cover next, It’s probably not as secure as the typical “J” screw connection above. The “modified screw terminals” can still be wired with the “J” wire connection and I would recommend that over the straight, insert connection for strength purposes.

Screw Connection Pros and Cons
Pros
Cons
Backstab Connection
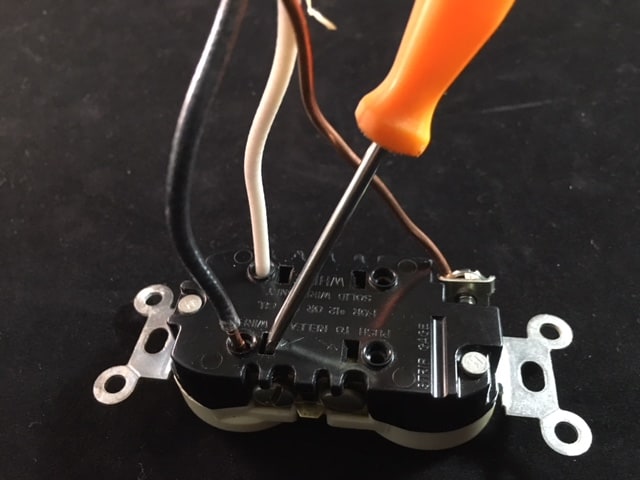
The third method is the backstab connection. In this method, the wires are routed and connected to the receptacle similar to the screw terminal connection. But instead of securing the ends of the conductors under the screw terminals, the receptacles have special holes on the back that the conductors can be plugged into. The holes have a spring-loaded keeper, so the conductor cannot be pulled back out. The screw terminals are typically still on the receptacle, but the backstab connect is easier to use. However, they are notorious for not making a very good/secure connection inside the receptacle.
To remove the wire from the receptacle requires a small screwdriver to be inserted in the spring release. If you have to remove the wire once or twice, the keeper can become weaker, making the connection even worse. To run all the electrical current through the backstab connections can be risky. I have never heard anyone recommend using the backstab connections in that way. The poor connections could lead to excessive heat, which increases the chance of fire.
How To Make A Backstab Wiring Connection
Frankly, in good conscience, I can not recommend using this connection. I would rather have you use one of the two (three) previously mentioned connection methods above. This is truly one method that could help prevent electrical fires.
Backstab Connection Pros and Cons
Pros
Cons
Final Thoughts
This information should help you make the decision on what’s the best way to wire a receptacle and help prevent electrical fires. As a DIY homeowner, your first choice for any home repair shouldn’t be about what is easiest or cheapest. Your first question should be what is the best and safest choices available. The cost-savings come from you being willing to complete the task yourself. Even if you don’t do the work yourself, knowing what is the best and safest for your family should be worth paying a little extra for.
If you need more information on getting ready for a DIY home electrical project, click this link and read our article on preparing for electrical projects. It contains some really good ideas and electrical wiring resources.
A couple more good resources are the books Tauton’s Wiring Complete or Ultimate Guide: Wiring, by Creative Homeowner. I’ve looked through both of these books and they show the types of connections recommended in this article, and much more.
If you suspect that you have a potential issue, either check it out or hire an electrician to investigate. Don’t delay! By following your local electrical codes and using sound electrical “best practices”, you’ll be sure to keep your family and home safe!
If you have any comments or questions, you can leave them in the comments section below or you can email us at [email protected]. FYI, we do not collect or share email addresses. We will only use them to reply to your comments or provide answers to your questions. We are also required to let you know that some of our links are “affiliate links”. This means if you click on a link and make a purchase, we could make a small commission, at no extra cost to you. This helps offset the cost of maintaining our website. So, if you like what you’ve seen, please be sure to give us a “Like” and “Share” on Facebook and Instagram too. Thank you for reading and good luck with all your home projects!
Glad you liked it!
Such a helpful guide!
I agree. If someone is uncomfortable working with electricity, then by all means hire an electrician.
Good guide! Thank you for sharing. But I also want to remind all homeowners that if you are not skilled enough in this, it’s better to entrust everything related to wiring to a pro. Of course, it’s cheaper to do everything yourself, but remember that the current is very dangerous for you. Additionally, it can cause a fire, the damage from which is enormous.
You’re absolutely correct. A DIY’er should only take on projects that they are comfortable with doing.
Thank you for sharing such helpful content! But I still believe that electricity is a thing that should be trusted to pros. After all, taking it with inexperienced hands poses many risks to health and property.
Certainly agree with just what you said. Your explanation was certainly the simplest to comprehend. I tell you, I usually get annoyed any time folks discuss issues that these people obviously dont know about. You were able to hit the nail on the head and spelled out the whole thing with out complication. Perhaps, folks could take a signal. Will likely be back to obtain more. Appreciate it Have you considered promoting your blog? add it to SEO Directory right now 🙂 http://www.links.m106.com