
I have been welding as a hobby for over 30 years and have enjoyed it immensely. It has helped me save time and money on many home repairs. I would love to share with you a few tips so you can learn how to start welding too.
I’ve made repairs on many tools and pieces of equipment that most homeowners have and us. I’ve also completed a few projects that I am proud of and that have served me well for years. These are all things you can experience by investing in a welder and a little practice.
I am not a professional, or experienced, welder; I am truly a self-taught, hobby welder. You might be wondering “why do I need a welder? What would I use it for? What kind of welder would I need? In this article, I’ll answer those questions, give you some practical examples, and much more.
In this article, we will be providing you with a few links to some products for pricing and informational purposes. We are required to let you know some of these links are “affiliate links”. This means if you click on a link and make a purchase, we could make a small commission, at no extra cost to you. This helps offset the cost of maintaining our website. Now, let’s get started.
Why Do I Need A Welder
Table of Contents
If you are anything like me, the reason is simple. You have tools or equipment that are broken or damaged and are unsafe to use. Instead of paying to have this equipment repaired or replacing it, you can make the repairs yourself. Once you learn how to start welding many of these repairs can be made easily right at home.
I live in rural Michigan, on a small parcel of land, so I have many of the “toys” and equipment you might expect. I have a garden tractor that is used all year long. It’s equipped with a lawnmower and snowblower, which many homeowners typically need. I have a lawn cart that gets used from early spring until late into the fall.
Then there’s our 4 wheel ATV, which we use the lawn cart with more than the garden tractor. We also have a snowmobile, leaf vacuum, and a wood splitter, along with a host of other smaller tools and equipment.
Oh yeah… did I mention it’s all old stuff? Why is it old? Because I have been able to make most of the repairs needed to keep it all running. By being able to make these repairs, you can save yourself time and money.
When something breaks or is not safe to use, everything comes to a halt. You either need to buy something new or get it repaired. In many cases, the equipment can easily be repaired, but first, you need to find someone who can make the repairs.
Then you have to schedule a time to take it in to be fixed, remove the part or load up the equipment to haul it in. This process could take several days! Hobby welding can reduce this time to less than an hour in some cases.
It’s like making the decision to buy any tool. Most of the time you buy it for a specific project, but once you have it, it can be uses for lots of future projects. Investing in welding equipment is exactly the same. I can honestly say the savings on parts, repairs, and not having to replace equipment has easily paid for all of my welding equipment.
What Are Some Hobby Welding Uses
This can vary greatly with each individual and your particular circumstances. I think the best way I can answer this question for you is to tell you about some of the projects I’ve been able to make and to list some of the equipment I have made repairs to.
Hobby Welding Projects

I’ve made many brackets and adapters over the years, but there are two projects I have done that I use often. The first project was the lawn cart I mentioned above. It’s a nice, heavy-duty, tilt bed cart that I use constantly! It has taken everything I’ve loaded on it. Recently I’ve added removable sides, which makes it even more versatile.
The second piece of equipment I made was a driveway drag. We have a fairly long driveway and in the spring it gets rutted up and needs to be smoothed out occasionally. This drag is a scrapper type drag, which I incorporated some adjustable teeth, to tackle even the roughest driveway. My goal is to get these two projects up on the website soon, so please check back and take a look at them.
Hobby Welding Repairs

Damaged Leaf Vacuum Housing Repaired Leaf Vacuum Housing
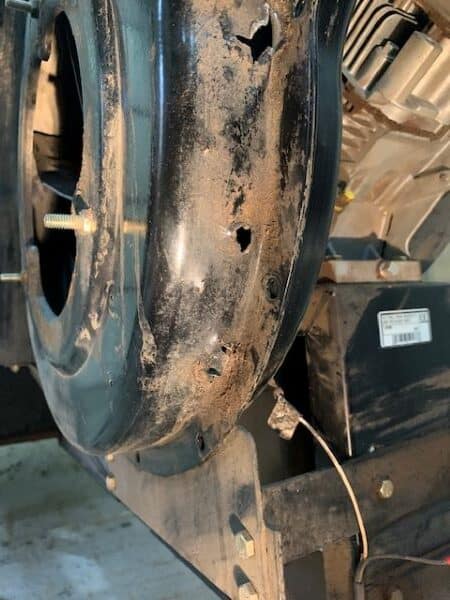

As for repairs, check out the list of items I’ve been able to make repairs on. I’m sure I’ve even forgotten a few! I’ve included a couple of links below to articles I’ve written on some of the repairs. Check them out for more ideas on how you might be able to use a welder. Being able to make my own welding repairs has saved me a lot of grief over the years and it can help you too.
Then there is “metal art” that can be created using your welding equipment. The options are endless! You’re only limited by your imagination. Just go to Pinterest or Google and type in “hobby welding projects”. You’ll wonder why you didn’t have a welder sooner! There are all kinds of projects and many of them make great gifts.
What Kind Of Welder Do I Need To Get Started Welding

There are several types of welding equipment available. For the average beginner welder to get started, I would suggest starting with either a stick welder or a “flux core” welder (MIG or wire style), or both!
Stick Arc Welder
My first welder was a basic Lincoln 225 AC stick welder, which I still use today. This welder uses an electrode (welding rod) that has a flux coating on the outside of the rod. The flux melts during the welding process to coat and protect the molten metal from air and contaminates. Stick welders work better on thicker metals (1/8″ or larger).
The one downside of getting started using most stick welders is they require a 220v, 50amp electrical circuit to power them. It’s definitely one thing to consider. However, I am fairly confident you will recoup the costs of installing the electrical circuit with just one or two repairs.
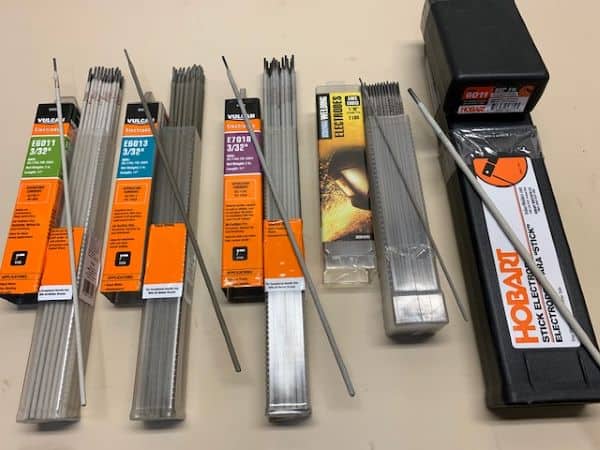
Most repairs and projects I’ve worked on are on thinner metal. So when using a stick welder, a smaller diameter rod works best. This allows you to turn the amperage (heat) down, so you don’t burn through the metal. I normally use a 6011 or 6013 rod, which are both good general purpose rods for getting started.
I like using a 3/32″ diameter rod for any metal less than 1/8″ thick and go up to a 1/8″ rod for most everything else. If welding on 1/4″ steel, or greater, you could go up to a 5/16″ rod. I found the welding rod selection chart below on the internet. It has worked well for me, but don’t be afraid to experiment with the amperage settings, different rod types, and rod sizes. That’s the best way to learn.
| Electrode Diameter (thickness) | Amperage Range | Metal Thickness |
| 1/16″ | 20 – 40 | Up To 3/16″ |
| 3/32″ | 40 -125 | Up To 1/4″ |
| 1/8″ | 75 – 185 | Up To 1/8″ |
| 5/32″ | 105 -250 | Up To 1/4″ |
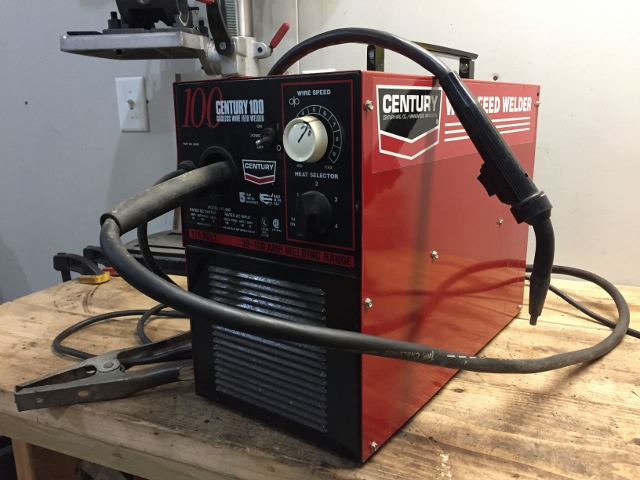
MIG “Wire” Welder
The other welder option is a MIG (metal inert gas) welder. The MIG welder has a continuous wire electrode, which is fed out of a gun style handpiece. Normally the MIG welder has a “shielding gas”, that is fed out of the handpiece as well. This provides the same protection as the flux does on the stick welder.
As mentioned above, for beginners getting into welding, a “flux core” welder may be a better option. They are basically like a MIG welder, but they do not have the shielding gas. Instead, they use a special wire with a “flux core” center. These machines are normally smaller, less expensive, and work better when welding thinner metals than a stick welder.
Besides being less expensive, most flux core welders will operate on your home’s normal 120v power receptacles. Just plug it in and you’re ready to get started.
If you happen to come across a MIG welder at an auction or garage sale and can get it for a good price, you may want to snap it up. MIG welders can be used with flux core wire too, without having to use the shielding gas. Just be sure to see what power is required to run the welder. Many MIG welders do operate on 240 volts.
To use flux core wire on a MIG welder, you will need to change the polarity of the welder leads. In most cases, this is just a simple swapping of the cables inside. In an article from the Weldinginsider, the how to do this and provide other useful information about the differences and uses of both the MIG and flux core welders.
Additional Helpful Welding Related Equipment
Along with your welding equipment, there are a few other tools that will help in cutting and preparing your metal for welding. A metal hacksaw will work to cut steel, but a quicker method is an angle grinder with a cut-off wheel. These are a thin grinding wheel designed for cutting metal.
The second item is a regular grinding wheel for your angle grinder. They work much faster and easier at preparing your metal for welding than using a file. They can also be used in places that a bench grinder can’t be used.
And the third item is a buffing wheel for your angle grinder. A hand-held wire brush can be used to prepare your metal and remove the slag in between beads, but they are not as effective as a power buffing wheel.
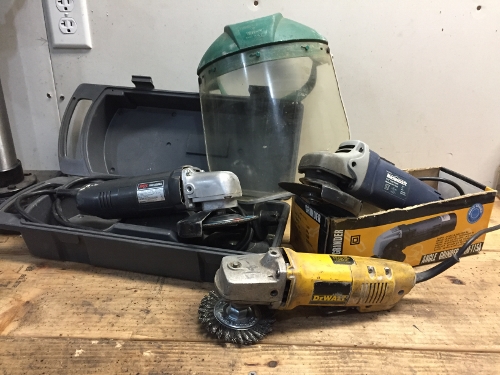
I actually have 3 separate angle grinder equipped with each of these different wheels. This is a huge time saver. You can get some fairly inexpensive angle grinders that work great for the cut-off wheel and the buffing wheel. I find that the one with the actual grinding wheel gets a pretty good work out at times, so I opted to stick with a better quality grinder.
Angle grinders produce small flying particles, have the potential to get tangled in loose-fitting clothes, and can jump while grinding. Always read the manufacturer’s instructions and operate them according to their recommendations.
I’ve written an article about the practical uses for many of the angle grinder uses for homeowners. I hope you take a few minutes to read through it. It could save you time on your next home project.
Welding Safety
Welding has been around for a very long time and is safe to do as long as you follow a few simple rules. As with any power tool, always read the manufacturer’s instructions and operate them according to their recommendations. Let’s look at a few of the most important items.
Tips On How To Start Welding
As I mentioned earlier, I am not a professional welder. Therefore, as a hobby welder, you must understand and recognize your limitations! There are some things you should always have made or repaired by a professional. Repairs to trailer hitches, vehicle frames, or heavy-duty equipment need to be repaired by professionals.
With that said, you will be amazed at how strong a weld you will be able to make. At first, it might be a little shaky, but it will get better with time. Below is a list of the top tips for making better welds.
Conclusion
If you have been thinking about learning how to start welding, I hope this information was enough to convince you to give it a try. Having the ability to make repairs on my own equipment has been a great benefit over the years! I’ve literally made dozens of repairs on my own stuff and have been able to help family members out as well. I recommend giving it a try. You will be happy you did! Let me know how you make out and good luck with all your future welding projects!
If you have any comments or questions, you can leave them in the comments section below or you can email us at [email protected]. FYI, we do not collect or share email addresses. We will only use them to reply to your comments or provide answers to your questions. We are also required to let you know that some of our links are “affiliate links”. This means if you click on a link and make a purchase, we could make a small commission, at no extra cost to you. This helps offset the cost of maintaining our website. So, if you like what you’ve seen, please be sure to give us a “Like” and “Share” on Facebook and Instagram too. Thank you for reading and good luck with all your home projects!
I thought you made a good point when you mentioned that it is important to wear personal protective equipment when welding. I would think that it would be important to make sure that the gear you are wearing is heat resistant so that you can’t get burned. Purchasing the gear from a reliable welding supplies store seems like a good idea.