
Have you ever had a garden tractor or other piece of lawn and garden equipment break and need to take it in to have some welding done on it? That can be a real pain! Did you know there is a simpler solution? Many of these issues can be fixed by doing your own DIY welding repairs. It’s not as difficult as you might think it is and can save you time, money, and lots of frustration.
In my first article “How To Start Welding” I discussed reasons why someone should consider taking up welding as a hobby. It covered some of the equipment and tools you’d need and it offers helpful tips on how to get started.
In that article, I also pointed out one of the biggest benefits of hobby welding was being able to make welding repairs on my aging lawn and garden equipment. Well, guess what… that scenario reared its ugly head again. Let me tell you how my welder saved the day again.
FYI, I have included a few links in the article for informational and product pricing purposes. I am required to let you know that some of these links are “affiliate product links”. This means if you click on a link and make a purchase, we could make a small commission, at no extra cost to you. This helps offset the cost of maintaining our website. With that out of the way, let’s get started.
The Problem
Table of Contents
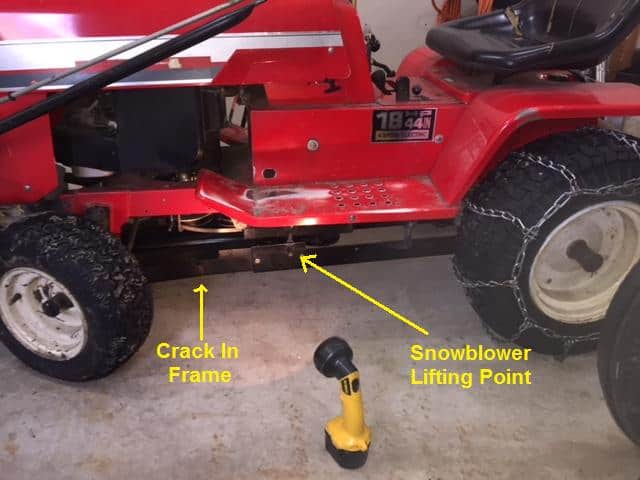
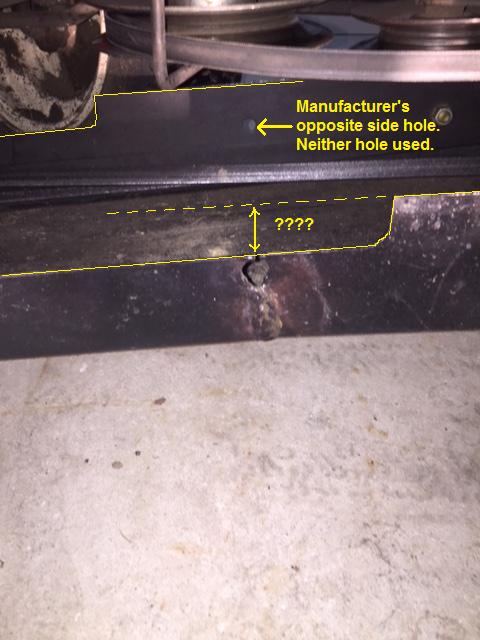
Due to what I would consider a minor design flaw, the frame on our snowblower cracked. If you look at the photo of the crack area below, you’ll notice that the crack occurred near a hole. You’ll also notice that on the side that cracked (closest side) there is less metal above the hole. This effectively makes this a weak point in the frame. Why? I haven’t a clue, but it’s mine to deal with now.
The snowblower is considered a front mount, but the frame physically attaches to the rear of the tractor. There are lifting arms that attach approximately in the middle of the frame that runs the full length under the tractor. The crack occurred between the lifting point and the auger head.
It’s a 42” snowblower, so the auger head has considerable weight to it. The auger head would twist and sag to the ground when the snowblower was raised to the up position. This put excessive force on other points of the frame and affected the tension of the auger drive belt. It could not be used as it was.
The Solution
I actually noticed this crack two years when I was taking the snowblower off for the summer. At that time I welded the crack and it has worked for two years. However, with the weight of the auger head and the repeated lifting and use, it cracked again. In order to make a permanent repair, the frame needs to be strengthened at the point where it is cracking.
Preparation For Welding
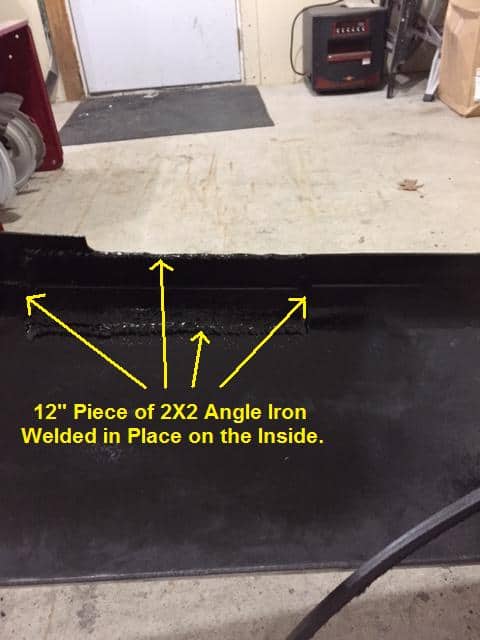
To make this DIY welding repair I decided to remove the snowblower and reinforce it from the inside. I used a 12” long piece of 2” angle iron to make the repair. The angle iron was cleaned and ground, so it fit tightly into place.
The paint was buffed off the frame where the welds would be made. Once the material and area were prepared I used “C” clamps to secure the angle iron in place before welding. This also helped straighten the frame and get it back into its normal alignment.
Making The Welding Repair
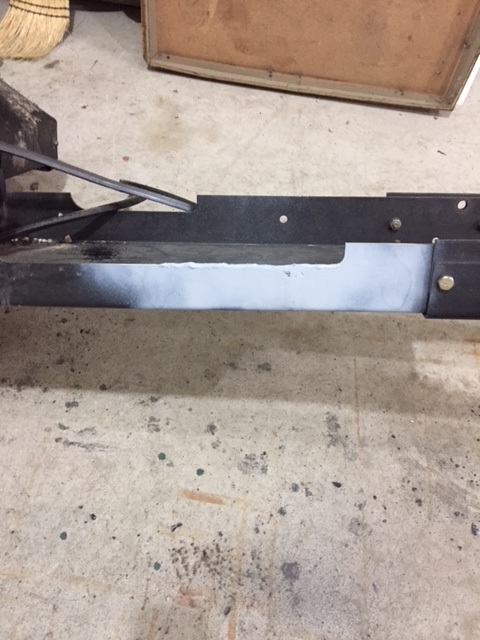
To make the welding repair I used my Lincoln AC stick welder. The stick welder was a better choice than my flux core wire welder because the snowblower frame was made of 1/8” steel. It provides better penetration on the heavier metal and would make a much stronger repair. I used a 3/32” 6011 welding rod on this project and primarily at the 75 amp settings on the welder.
The angle iron was secured to the frame by welding all the edges. I used a 4” angle grinder with a buffing wheel on it to clean the slag off where the welds overlapped. I also welded the crack on the outside surface and filled the existing hole that was in the frame. Then I ground the surface smooth and primed and painted the entire repair.
Angle grinders are extremely useful and can be used on many other home projects in the future. I would also like you to consider reading my article on safety for home projects. There are a lot of tips to help prevent injuries when using power tools and other equipment!
Cost Savings Of Making DIY Welding Repairs
Because I’ve never had to hire a welder to make such a repair I had to do some searching to find the cost of having something like this welded for this article. I talked to the welder where I work and did some searching on the internet and found that rates could be anywhere from $60 to $80 an hour.
And if the welder comes to you, in many cases there is a minimum charge of two or three hours. The cost of one or two welding repairs can help offset the cost of purchasing your own welder!
Other Benefits Of Do It Yourself Welding Repairs
The actual repair on my snowblower only took me a couple of hours to complete. That included removing the snowblower and re-install it. If I were to have someone else make the repair, I could have probably been waiting a few days.
During a snowstorm, that time and the convenience are huge! These two things are more important to me than spending $70. First, you have to find someone to weld it. Then you have to load it up and take it to them. In this case, the snowblower weighs well over 200 pounds. With luck, their schedule will allow them to make the repair right away, otherwise, you could be waiting a day or two.
Here are a few more good examples of other types of DIY welding repair projects I’ve been able to do. And I’m confident, with a little practice, you can too!
Conclusion
The snowblower works great with the repair that was made. My welds may not look perfect, but I am confident this repair will outlast the tractor and me! Don’t be afraid to give hobby welding a try! It can save you time, money, frustration and give you a great sense of accomplishment. Good luck with all your projects!
If you have any comments or questions, you can leave them in the comments section below or you can email us at [email protected]. FYI, we do not collect or share email addresses. We will only use them to reply to your comments or provide answers to your questions. We are also required to let you know that some of our links are “affiliate links”. This means if you click on a link and make a purchase, we could make a small commission, at no extra cost to you. This helps offset the cost of maintaining our website. So, if you like what you’ve seen, please be sure to give us a “Like” and “Share” on Facebook and Instagram too. Thank you for reading and good luck with all your home projects!