How many times have you broken something made of plastic and had to buy a replacement part? Instead of just throwing the part away, spending good money on a replacement, and waiting days to have it shipped to you, there is another possible alternative? Try using a 2 part epoxy glue for plastic repairs yourself. It’s faster, can save you money, and very effective in many cases.
Look around you and see how much stuff in your everyday life is made of plastic. Plastic parts are light, easy to make, and, when used properly, are actually quite strong. However, in our disposable society when something plastic breaks most of the time we just throw it away and buy new.
It’s true that in some cases it’s not possible to repair some parts. However, making epoxy repairs on some plastic parts is a very fast, cost-effective option. And many of these repairs you make can last for years.
I’m going to share with you a few epoxy repairs I’ve made in the last few months that have saved me at least $100 and several days of waiting and or doing without.
In this article, we will be providing you with a few links to some products for pricing and informational purposes. We are required to let you know some of these links are “affiliate links”. This means if you click on a link and make a purchase, we could make a small commission, at no extra cost to you. This helps offset the cost of maintaining our website. Now, let’s get started.
What Is Epoxy Glue?
Table of Contents
Before we move on to the repairs it’s important for you to know what epoxy is and what are some of your options are. There are several different types of epoxies, but most of them consist of two components. The epoxy “resin” and the “hardener”. Mix the two components together and a chemical reaction takes place that produces an adhesive and/or patching material with extraordinary strength when fully cured.
There are epoxies for all kinds of materials. From wood to concrete to steel. In this article, I am going to focus mainly on making plastic epoxy repairs. We will also look at some of the important items you need to consider in order to make a successful repair.
Wikipedia can provide you with all the epoxy technical information you’ll ever want to know, but for the average person, including myself, all you need to know is what types of epoxies are available, how to use them, and to know that they work!
Epoxy is more than just an adhesive. When the two components are mixed together it provides a material with a host of different properties depending on the type of epoxy you choose. It’s important to know that some epoxies are stronger than others. Yet others are able to be molded and shaped when others cannot.
Types of Epoxy
In order to make a successful repair, you need to look at what type of repair you need to make. In most cases this will determine the type and strength of epoxy you’ll need. Are you sticking two pieces of plastic together or are you filling a gap in or between two pieces? What kind of force will the repair be subjected to? Will the epoxy be subjected to any materials or chemicals that could potentially degrade it?
Once you’ve identified your needs you can begin to look at the available products to select what will work for your application. The strength of epoxy is normally expressed in a “PSI” (pounds per square inch) rating. But repaired objects can be exposed to forces in many different ways. The website epoxysetinc.com does a great job of explaining those stresses and what to consider when selecting an epoxy to make a repair.
Below is some basic information on the two main types of epoxy I have worked with. Both types have their strong suits, so you will need to determine which product will work best for your application. Note: keep in mind that in some cases it may be unwise or unsafe to repair certain items. Epoxy is a great product, but it certainly has its limitations.
Liquid Epoxy
As a rule, liquid epoxy is still fairly thick once mixed, but will slowly flow and self-level on the surface it is applied to. It will work better as an adhesive for sticking two pieces of plastic together. A thin coat of epoxy between two pieces of plastic will fill any cracks or defects in the material surfaces and securely bond them together.
Liquid epoxy can also be spread over a crack in plastic to prevent air or fluid leaks. It works well for fixing a leaking tank. Note: make sure the epoxy you choose is suitable for the type of fluid you are sealing.
Putty Epoxy
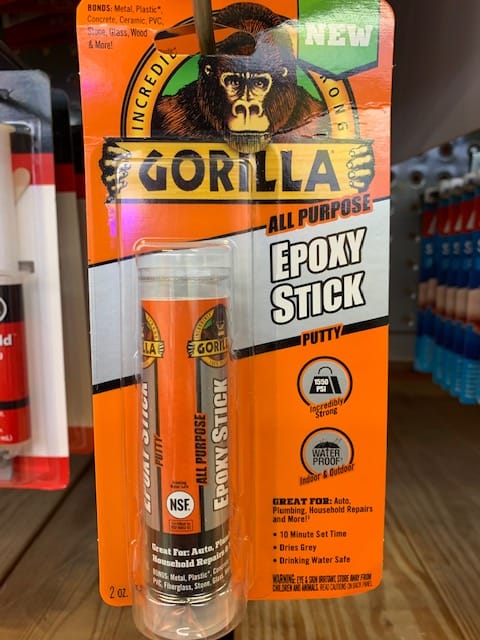
This type of epoxy has the consistency of clay or “silly” putty. Both the resin and hardener are in this form and need to be “kneaded” together before using.
Typically putty epoxy doesn’t have as high of a strength rating as the liquid does and is not as effective at bonding two pieces of plastic together. It does have one significant advantage over the liquid epoxies. Putty epoxy is moldable! Much like clay, you can shape it any way you need to. You can also fill cracks or holes in materials and the putty will stay in place on its own until it sets and cures.
Tips For Working With Epoxy Glue
In order to complete a successful epoxy repair, it is important to follow the manufacturer’s instructions first and foremost. I’ve also included a few items below to consider before getting started. Let’s take a look.
Select The Correct Epoxy

High Strength Epoxy Automotive Epoxy Putty Epoxy Liquid Epoxy


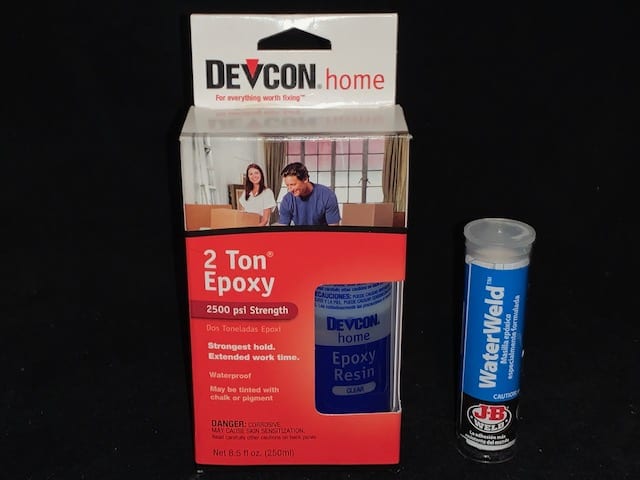
We’ve basically covered much of this above. If you’re joining two plastic pieces together, you’re going to want to use a liquid epoxy with a fairly high strength rating. I’ve had good luck with a 2,500psi rated epoxy, made by Devcon, for making most of my repairs (see below).
I’ve had repairs that may be exposed to gasoline, so I had to make sure it was resistant to gas. The Devcon epoxy I have been using resists salt solutions, unleaded gasoline, mineral spirits, oil, and antifreeze. Make sure your epoxy is suitable for the repair being made.
Know The Epoxy Glue Working And Curing Times
There are actually three different times you’ll want to be aware of. They are the handling (working) time, the set time, and the curing time. Be sure to know and follow the manufacturer’s recommendations for the product you’re using.
Once the two epoxy components are mixed, the handling time is how long you have to work with and apply the epoxy. Depending on the product you’re using the handling time can be anywhere from 5 minutes to 30 minutes or more.
The set time is how long it takes the epoxy to set to a fairly firm consistency. For most products, the bond is far from being at its strongest, but it should be somewhat stable.
The cure time is how long it takes the epoxy to fully harden and reach its maximum strength. This could be anywhere from a few hours, up to 24 hours or more.
Tips For Making A Plastic Epoxy Repair
Besides selecting the correct epoxy for your type of repair, surface preparation is going to be one of the most important things to get right for a good repair. Cleaning the surfaces and preparing them to accept the epoxy it critical for a good plastic epoxy repair.
Most epoxy manufacturer’s directions will give you the basics needed, but I’d like to share with you some of the specific preparations that I use and have had very good success with. Most of the epoxy repairs I’ve made have been with liquid epoxy, but these same preparations will work with other types of epoxies.
Preparing Surfaces For A Plastic Epoxy Repair
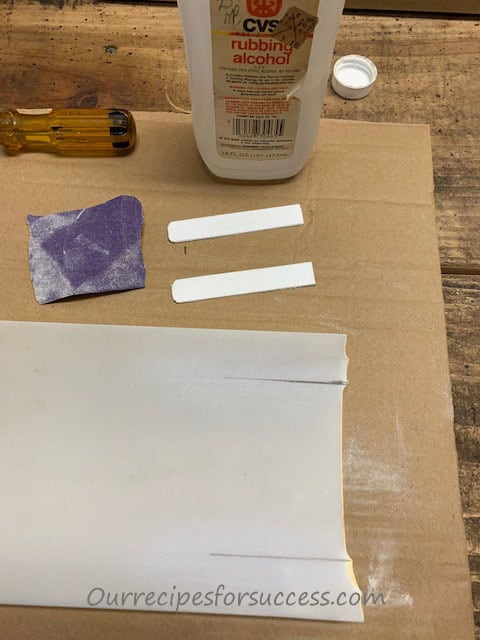
As the manufacturer’s instructions will tell you the surfaces must be clean and dry for a secure bond. Don’t scrimp on this step! If your parts have any type of oily film on them, a great place to start is to simply wash them in hot soapy water and rinse them thoroughly with hot water.
It’s best to determine exactly where the epoxy will be coming into contact with the surface(s). Then I use rubbing alcohol on a lint-free rag to clean those areas. Alcohol will help cut most of what may be left behind and it dries with little or no residue.
Note: using harsher cleaners like brake cleaners or acetone can cause damage to some types of plastics, so avoid using those types of cleaners or solvents.
Once the surfaces are clean you should roughen up those same areas using a few strokes of 120 grit sandpaper. Although the roughness may seem minor, the peaks, valleys, and texture created increases the surface area and gives the epoxy something to securely bond to.
I then like to go over the sanded area one more time with alcohol to remove any loose plastic or debris that may have been created from the sanding. Allow it to thoroughly dry and you’re ready for the next step.
Mix Two-Part Epoxy Glue Thoroughly
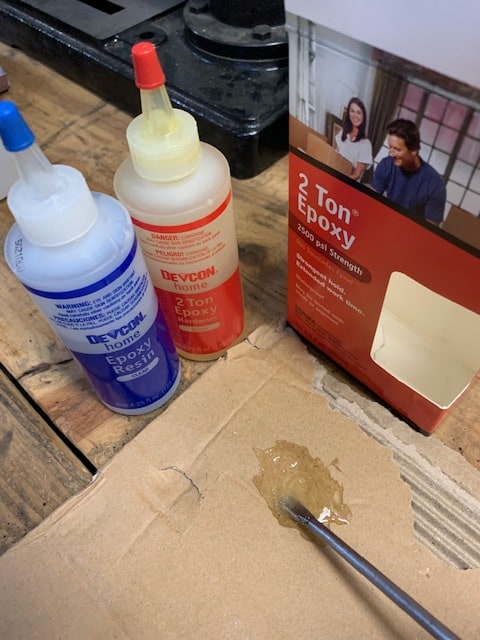
When mixing epoxy in most cases you’ll need to mix equal amounts of the resin and the hardener. If you’re using liquid epoxy, squeeze the two components onto a clean dry surface until you have enough material to make the repair. A small piece of clean cardboard works well for this then you can just discard it when you’re done.
Mix the components thoroughly using a craft stick (popsicle stick), stiff piece of cardboard, plastic, or other similar items. This is very important or you’ll have weak spots in your repair.
With putty type epoxy the two components are normally different colors. Knead the two components until it is one uniform color. There should be no streaks!
It’s good practice to wear a pair of nitrile rubber gloves when working with epoxy. It will help keep the epoxy from coming in contact with your skin and it also prevents any of the oils from your skin from getting into the epoxy. Especially when kneading epoxy putty.
Applying Epoxy Glue
Remember, once the two components are mixed you’ve started the timer on the “setting time” for the epoxy. Begin applying the epoxy immediately to the prepared surfaces. Using a lighter coat between two surfaces that are being joined works best. This is the application method used in my light shield repair below.
If covering a crack in a plastic part, extend the epoxy out at least a 1/4” on both sides of the crack, if possible, and try to maintain about 1/16” to 1/8” of epoxy over the crack itself. This may not be an extremely strong type of repair, as it’s just applied to the surface, but it works well for sealing a leak. This is the type of repair I used on the filter box below.
Epoxy putty can be formed into shapes and allowed to dry. It can be used to fill cracks or to repair chips or chunks that have broken out of a surface. I used epoxy putty to repair the swimming pool light fixture below.
Secure Parts Being Joined
I would say this mainly applies when you are joining, or adhering, to pieces together. As described above, apply a thin layer of epoxy between the two pieces being joined. You need just enough epoxy to cover and fill the roughened surfaces, then firmly secure the pieces together while the epoxy cures. Be sure to wipe any excess epoxy that may have been squeezed from the join. It can be sanded smooth after drying, but it’s much easier to just wipe the bulk of it away with a paper towel or rag.
You can secure the pieces a couple of different ways. On flat pieces, you can carefully set a weight of some sort on top of them. Just be sure there is no excess epoxy coming out of the joint or your weight could stick to the plastic pieces being repaired. I would recommend covering the area with some Saran Wrap, or other plastic wraps, before setting the weight on top of the pieces. This will help prevent the weight from getting stuck to the parts.
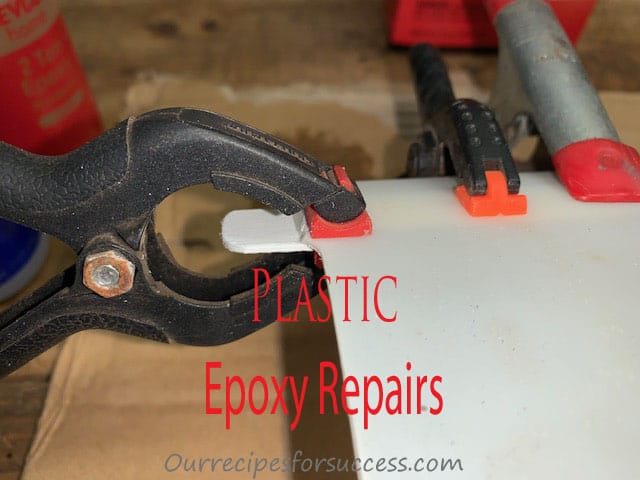
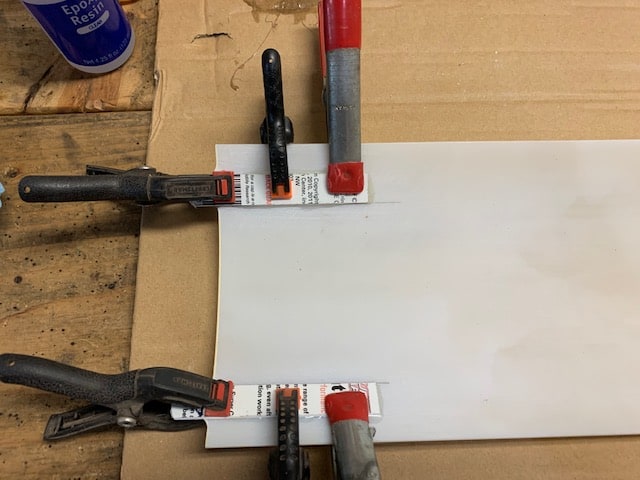
The second way of securing the parts is with clamps. When it comes to clamps there are so many options. Find what works best for your application. On my refrigerator light shield repair below I used several spring clamps. It allowed me to attach each piece individually and I was able to visually make sure that each of them did not move.
Allow Epoxy To Fully Cure Before Using
This next step can sometimes be the hardest one to do. BE PATIENT! Whatever the full cure time for the epoxy you’re using is, use that as your minimum time. In many cases, the manufacturers recommend 24 hours to fully cure epoxies. The message here is not to take short-cuts at this stage of the game.
You must also remember that temperatures can affect the curing times. The cooler it is, the longer it will take for most products to fully cure. So be sure to follow the manufacturer’s recommendations.
Successful Plastic Epoxy Repairs I’ve Made
By following the steps outlined above, I’ve been able to make several plastic epoxy repairs in just the last 5 to 6 months. I didn’t document all of them, but I wanted to share them with you so you can see what kind of repairs you can start making and the savings you can take advantage of.
Wood Splitter Carburetor Air Filter Box Repair


I bought a used wood splitter that had a small crack in the carburetor air filter box when I got it. Although it was just a fine crack it posed a couple of problems. The first issue was a small amount of air could bypass the air filter, which allows dust and dirt to get sucked into the engine. That is not good for the engine.
The second issue was the “primer bulb” did not work due to the location of the crack. This made it very hard to start the engine when it was cold. Most of the time I would have to remove the air filter and spray gas directly into the carburetor to get it to start.
Originally I was able to seal it using some silicone and it worked fine for quite a while. However, because it was subjected to gasoline, the silicone didn’t hold up.
I repaired the crack in the air box using a liquid epoxy that is resistant to gasoline, so the repair should last a very long time. When making a repair like this there are a couple of things to be aware of. The epoxy should not interfere with any gasket sealing surfaces or areas where screws or other fasteners may come into contact. If needed you can use epoxy to repair these types of areas, you just need to leave them smooth and level when you are done. A small fine or a Dremel tool works great for this.
By making this repair I didn’t have to spend the $28 for a replacement airbox and I didn’t have to wait the 4 days for it to be delivered. I had the splitter back up and running in less than 24 hours. The best part is, with the primer working, the engine starts with only 2 or 3 pulls even in cold weather.
Refrigerator Light Shield Repair

Light Shield Missing Repaired Light Shield Installed

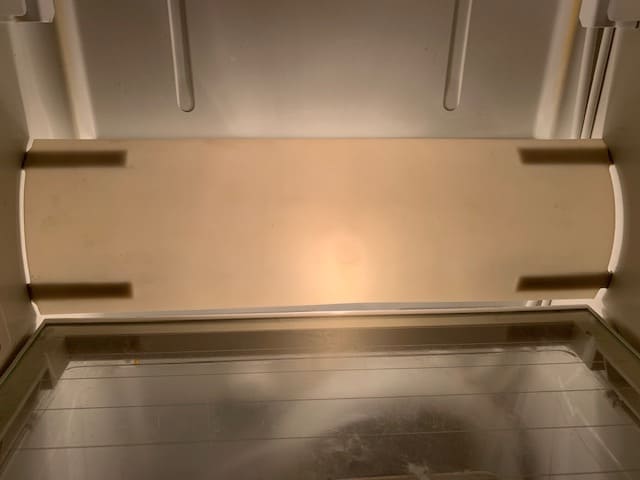
Our model of refrigerator has a plastic shield that covers the light located at the back of one of the middle shelves. Actually this guard does more than just a light cover. It covers about a 2-1/2” gap along the entire back of the shelf, that is open down to the bottom of the refrigerator. The small plastic tabs that held it in place broke off and the light shield along with other refrigerated items began disappearing. We were removing the bottom drawer of the fridge every few days to retrieve items that had fallen into the “pit”. It was very frustrating.
However, I was shocked when I went online and found a replacement for a Whirlpool refrigerator light shield. This thin sheet of plastic costs a little over $30 to replace and it would take almost a week to arrive. That’s when I decided to break out the epoxy glue.
I was fairly certain there was no way to just attach little tabs to the end of the shield. They would never have enough strength to take the abuse that broke the original tabs off. So I cut four strips 2-1/2” long out of a used plastic container with roughly the same thickness. I would attach them to the back of the light shield with the ends sticking out about 1/2″. That would give me a good 2” of surface area to epoxy the strips to the light shield.
After preparing the surfaces, securely clamping the pieces together, and allow the epoxy to fully cure, the epoxy repair was a success! Not only did we save $30, but it has prevented a week’s worth of trips to the “pit” retrieving items and cleaning up spills.
Laptop Computer Hinge Repair
Left Epoxied Laptop Hinge Right Epoxied Laptop Hinge
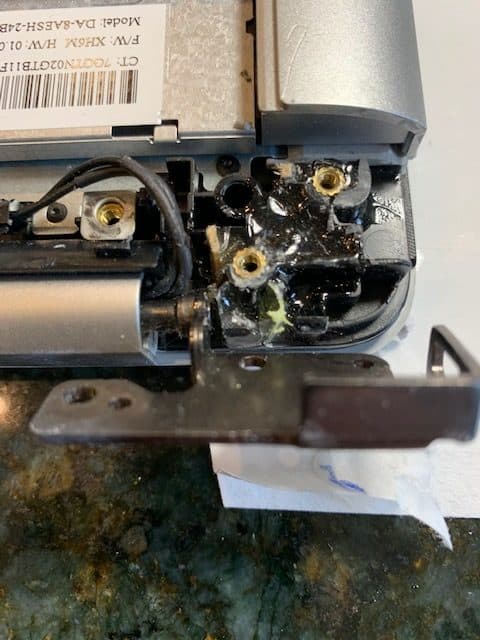
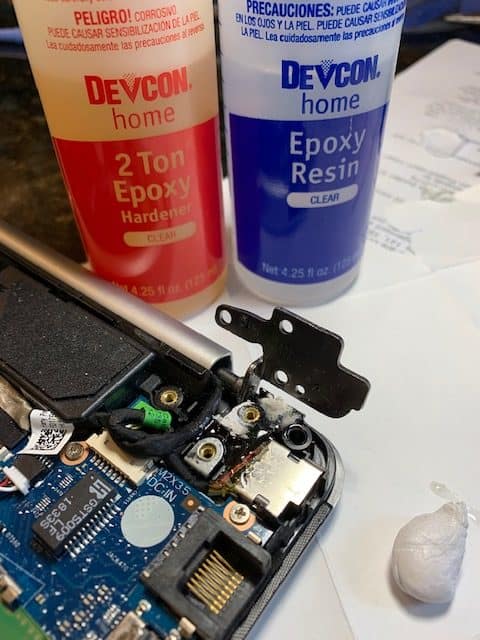
One evening when closing my laptop for the night the unthinkable happened. One of the hinges on my laptop screen broke loose. My worst suspicions were confirmed after removing the back cover. The plastic supports that the laptop hinges attached to had broken.
As it turns out, these supports are part of a main plastic framework for the entire laptop. It appeared that all the internal components (hard drive, boards, fans, etc…) are attached to it. I am fairly certain to have the hinge repaired would require sending the laptop in to have this main plastic framework replaced. I’m sure it would be a costly repair and I could potentially be without the use of my laptop for a week or two.
Epoxy to the rescue. This was a fairly tedious repair and unfortunately, I didn’t think to take any pictures to document it. I will do my best to describe the repair, but my goal is to emphasize the potential uses for epoxy and demonstrate just how strong it can be.
The hinge supports are made of metal inserts, that the hinge screws attached to, embedded in a plastic honeycomb-like structure on the main framework described above. There were several small pieces of the honeycomb structure that I found and was able to fit most of them into their original locations. I used just enough superglue to hold them into place.
I then filled all the open honeycomb sections around, and near to, the metal screw inserts with liquid epoxy. One benefit I didn’t realize at the time was a few small fragments of the honeycomb was missing. This allowed some of the epoxy to come into direct contact with the metal inserts. This may have played a big role in the overall success of this repair. I allowed the epoxy to cure for a full 24 hours before reassembling.
So far the repair has been working just fine. You’d be surprised at just how stiff the hinges on a laptop operate. It’s amazing that plastic can withstand the forces.
Suitcase Wheel Repair
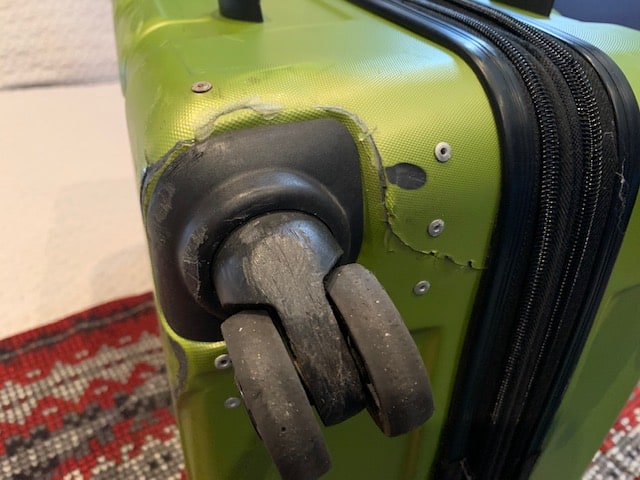
During one of our airline trips a couple of years ago a wheel on one of our suitcases was nearly broken completely off. I’m not sure how that could happen, as baggage handlers are usually so careful with your luggage. 😉
This was not just a little crack! Where the wheel attaches to the suitcase almost completely broke out. The suitcase was a hard sider and fairly new so I hated to just throw it away. So I decided to try and repair it, even if it was only usable for local road trips by car.
I used some steel hanger strap to reposition and hold the wheel in place and used a few pop rivets to secure the strap. It held it fairly good but it was not completely rigid and the cracks were not watertight.
I wondered what would happen if I filled in all the cracked areas and the metal strap with epoxy, on the inside of the suitcase. I covered the entire cracked area with epoxy and was able to cover approximately 50% of the metal strap with close to 1/8″ of epoxy.
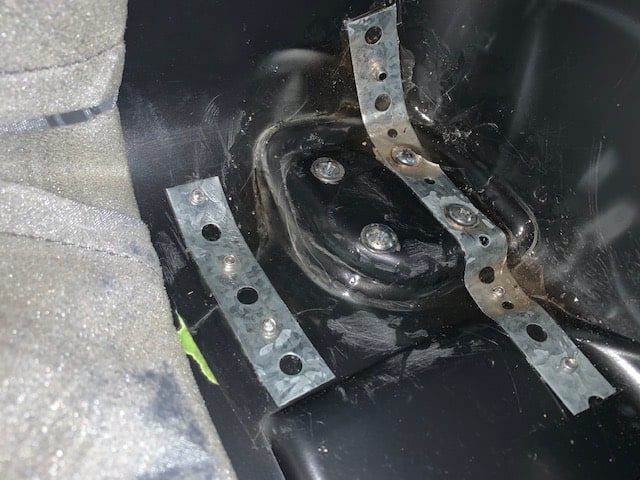
The finished repair was amazing. The wheel is solid, not even a little wiggle to it. The epoxy fused the metal strapping and the entire area together making a very strong, solid repair. We have been using it for a couple of years now, including air travel. The repair was well worth the effort.
Cracked Swimming Pool Light Niche
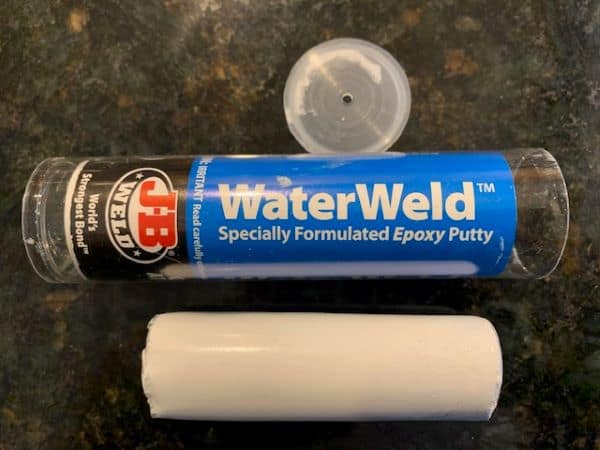
We have been battling a slow leak in our swimming pool for the past few years. While investigating I found what appeared to be a crack in the pool light niche (socket). Unfortunately, I do not have any pictures to document this repair either. It is another good example of the epoxy options available to you for making repairs that could save you money.
For this repair, I used an epoxy product called “Water Weld” made by JB Weld. The unique thing about this putty epoxy is it will cure underwater. There was no need to lower the water level in the pool to make this repair.
I thoroughly kneaded the two components and then packed it into the crack. You should overlap the epoxy onto the surrounding area by about 1/2”. It cured to a hard finish and held securely. This type of epoxy would be perfect for repairing water fountains and other types of tanks.
Conclusion
When it comes to plastic epoxy repairs as you can see, the possibilities are endless. It can save you money and reduce the time spent waiting on many replacement parts. Once the epoxy is fully cured it can be sanded. Additional coats can be applied to help further strengthen the repair too. It can also be sanded and painted if desired.
Although this article focused on plastic repairs, there are epoxies that can be used on countless other materials. There are epoxies made for specific materials and with a variety of strengths and properties. There is an epoxy available for almost any home repair out there. So the next time you have a cracked or broken household item don’t just throw it away. Break out the epoxy and save yourself some time and money.
If you have any comments or questions, you can leave them in the comments section below or you can email us at [email protected]. FYI, we do not collect or share email addresses. We will only use them to reply to your comments or provide answers to your questions. We are also required to let you know that some of our links are “affiliate links”. This means if you click on a link and make a purchase, we could make a small commission, at no extra cost to you. This helps offset the cost of maintaining our website. So, if you like what you’ve seen, please be sure to give us a “Like” and “Share” on Facebook and Instagram too. Thank you for reading and good luck with all your home projects!
Thank you. Glad you liked it.
A precise & well-wrtitten post. Thanks heaps for sharing it.