As a hobby welder, I’ve been able to create many useful projects and make several repairs that have saved me time and money. On one occasion I was able to use my welding equipment to help out a family member with a “small” welding repair on a snowblower pulley.
As a result, I got a “big” thank you! To
The Issue
Table of Contents
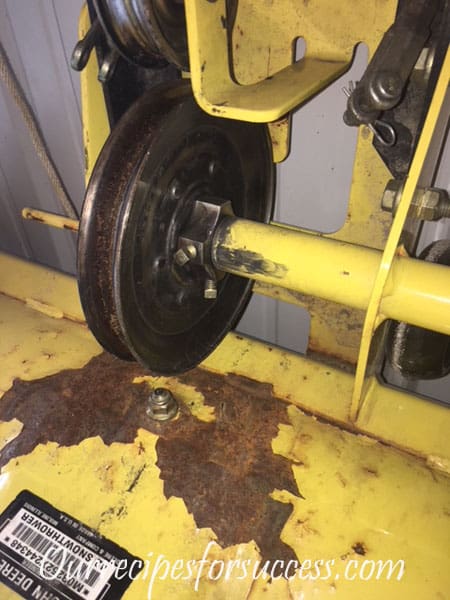
My brother in law has a garden tractor with a snowblower mounted on the front of it. While blowing snow one day he had a belt break. So like many of us, he purchased a new belt, installed it, and began snow blowing again.
However, after snow blowing a while longer he blew the new belt. He could see nothing obvious, but he knew something was wrong. I offered to help him investigate.
We started by checking to see if all the bearings were ok. I wondered if a bearing was seizing up and causing the problem. But after checking them out all the bearings seemed fine.
However, during the process of inspecting the bearings, we noticed something that wasn’t right. The main shaft that the drive pulley is mounted on was moving side to side about a 1/4”. With the pulley all the way to one side, it looked like the alignment was off far enough to allow the belt to come in contact with the edge of an idler pulley.
Once we pulled the drive pulley off the shaft we clearly saw the issue. The drive shaft runs inside a tube that supports it. At the other end of the shaft is a chain sprocket that drives the auger.
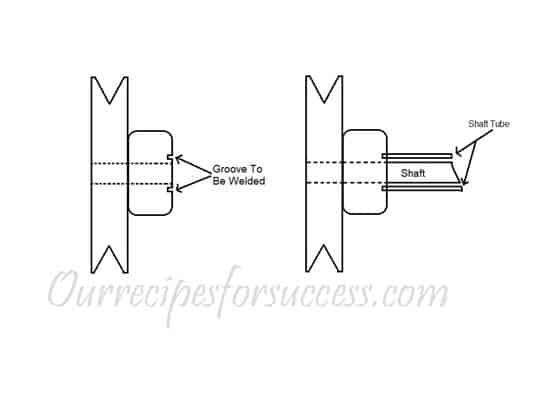
Over time the end of the tube, supporting the shaft, had worn into the pulley creating a fairly deep groove. Increasingly getting worse until the belt started hitting the edge of the idler pulley. Unfortunately, I didn’t get a before picture of the pulley with the groove in it, so I made the below illustration to try and show the issue.
The repair seemed fairly simple. Buy a new belt and pulley and install them. They were able to find a replacement pulley but at a cost of $75-$80. Ouch! And it would take a few days to get it. With all this in mind, I offered to see if I could repair the pulley with my welder.
Welding Repair Challenges
Before we get started I must point out that it’s very important to know that the pulley being repaired is made out of steel. Pulleys made of cast iron or aluminum require special welding equipment that is not covered in this article. And any repairs to the pulley surface that comes in contact with the belt itself should be evaluated by a professional welder. Some pulleys turn at a very high rate of speed and any failures can be dangerous. Always error on the side of caution.
With that said, this is the perfect type of repair to illustrate how useful hobby welding can be. It wasn’t a repair to any kind of structural support or critical assembly. All I had to do was fill in the groove that been worn into the pulley.
The groove was far enough back from the inside diameter for the shaft, except for where the keyway was located. I was going to have to be careful in that area. Otherwise, all I had to do was fill the groove in with the welder and grind it flush with the original surface. It should be pretty easy, right? Not quite.
It turned out to be a little more of a challenge than I thought it would be. The groove was deep enough and narrow enough to make it difficult to get the welding rod to the bottom of the groove. It kept wanting to arc to the sides of the groove.
At the time I made the repair I had ⅛” welding rod. I believe a 3/32” rod may have been able to reach the bottom of the groove a little easier. I would have been able to turn the amperage down and may have had a better chance of getting the rod tip to the bottom of the groove. This may have made the repair a little easier and cleaner, but with a little work it came out pretty good.
How The Welding Repair Was Made
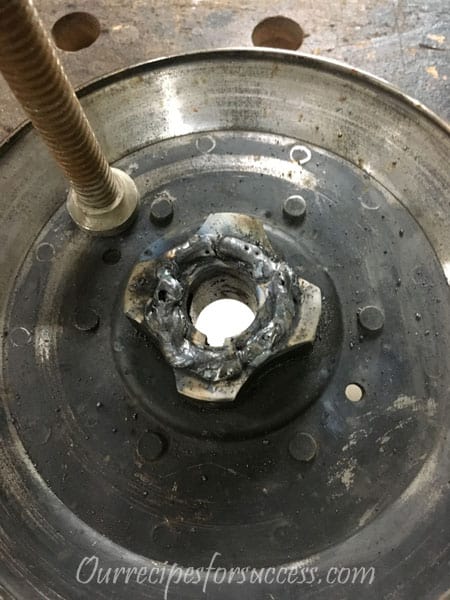
My goal was to simply fill the groove in using my welder. I put the rod tip as far as I could into the groove and was trying to fill the groove from the bottom up with several small passes. I did need to make sure I didn’t create enough heat to damage the inside diameter of the pulley, where the shaft goes, and the keyway slot.
The main issue I had was because of the larger rod the arc would also jump to the side of the groove instead of the bottom, as mentioned above. I have to admit this made for some very ugly welds on my first few passes.
You should always try to make strong, nice-looking welds, but in this
Between each pass, I carefully cleaned and wire brushed as much of the welding slag as I could get out of what remained of the groove. I would then grind the weld down until it was flush with the original surface to make sure there were no hidden pits or holes under it. If there were I would again clean as much of the welding slag out to prepare for the next pass.
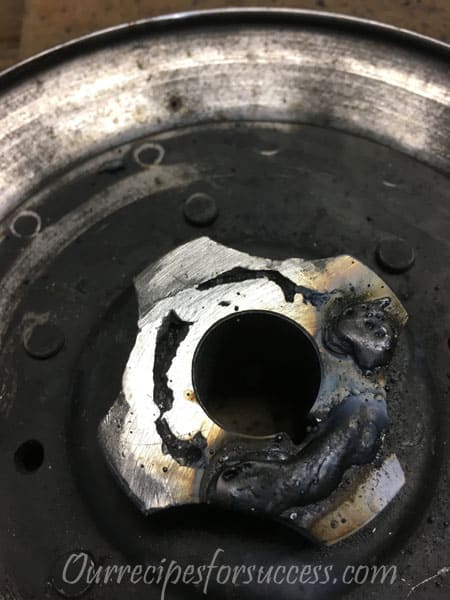
On the next pass, I would apply another small bead trying to fill the grooves, pits, and holes that were left from the previous pass. Then once again, between each pass, I would grind the weld smooth and clean out all the slag. I repeated this step probably 5 times before I had the groove completely filled and was happy with the way it looked.
The angle grinder is an integral part of this welding project. Whether it was used for prepping, cleaning, buffing off weld slag, or smoothing a finished project, the angle grinder was the perfect tool for the job. For more information on angle grinder uses and safe operation, check out this article we published.
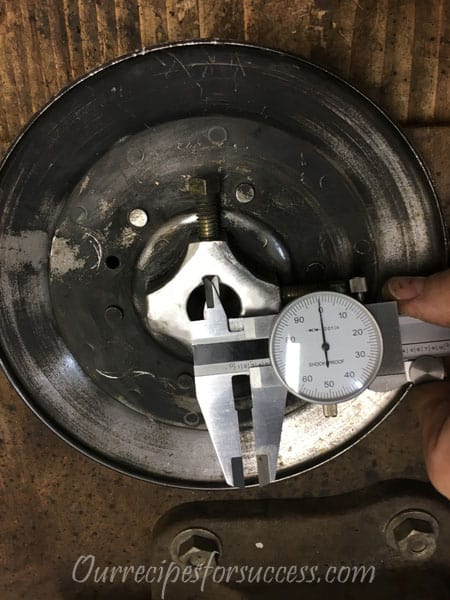
I did have to take a small, fine metal file and clean up the keyway slot a little. You could use a piece of key stock to make sure it fits into the keyway slot properly too.
I didn’t have the key stock with me, soI checked the keyway slot dimension with my calipers to make sure it was good. Calipers are a great tool to have in your workshop. This link will give you further information and pricing on calipers.
Repaired Pulley Successfully Installed
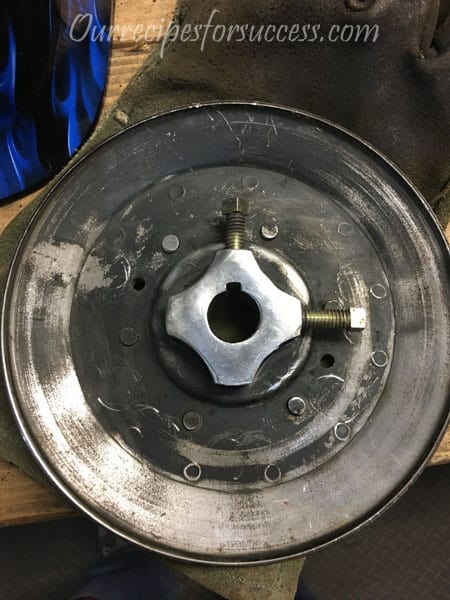
Once the repair was made the pulley was installed and the alignment of the pulleys was checked. The two drive pulleys were properly aligned and the belt was not hitting on the edge of the idler pulley anymore. It was a success! Since then, the snowblower has been used several times with no issues.
Being able to make a repair like this is more than just saving the $80 for the cost of a new pulley. Although that’s always nice too. It allows you to make many of these types of repairs when you need them. This repair could have been completed in a couple of hours. You could be back blowing snow the same day. No waiting for parts or hauling it somewhere to be repaired.
Welding is actually an enjoyable hobby. If you think hobby welding might be for you, read my article How To Get Started Welding. It provides information on what equipment you’ll need to get started and also some helpful tips. The projects, crafts, and repairs you can use a welder for are endless. Give welding a try. It’s very rewarding.
If you have any comments or questions, you can leave them in the comments section below or you can email us at [email protected]. FYI, we do not collect or share email addresses. We will only use them to reply to your comments or provide answers to your questions. We are also required to let you know that some of our links are “affiliate links”. This means if you click on a link and make a purchase, we could make a small commission, at no extra cost to you. This helps offset the cost of maintaining our website. So, if you like what you’ve seen, please be sure to give us a “Like” and “Share” on Facebook and Instagram too. Thank you for reading and good luck with all your home projects!
It may be possible to replace the bearing, but if the pulleys themselves are worn I doubt think they can be repaired. What make, model and year of vehicle do you have that the replacement pulleys are not available?
I have done pulleys that are worn out and will not hold the belts. The belts turnover. Can you repair. Can no longer purchase new pulleys