Do you like gardening but don’t have the time or space to do so? Have you ever thought of downsizing your garden? Our DIY raised garden bed plans just might be the solution to your problem.
Not having enough time or the room are only a couple of reasons for not having a garden. Other common problems are not having an area that gets enough sunlight. Or the issue of having a poor soil type where you live.
Raised garden beds are a great way to work around all of these problems. They can be used for growing flowers, herbs or vegetables. Garden beds provide the gardening experience on a much smaller scale.
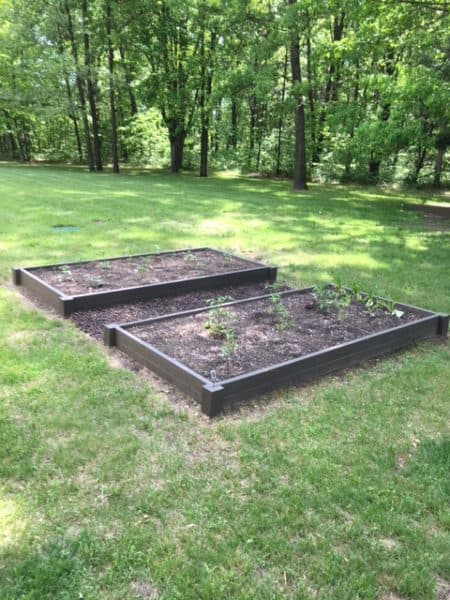
Our home is built in the woods and we suffer all three of the limiting factors listed above. Besides limited space and lots of shade, our soil is pure sand once you get through the first 6 inches of topsoil. But our love of fresh tomatoes and a few other vegetables convinced us to give raised garden beds a try. It works for us and I’m confident it can work for you!
Benefits Of Raised Garden Beds
Table of Contents
Where To Put Garden Beds
Placement of your garden beds takes a little thought. If you consider the few basics below, you’ll be off to a good start.
Ample Sunlight
You will want an area that gets a decent amount of sun throughout the day. A good average is 6 hours of sunlight. I’ve read that tomatoes do better with a little more, but other leafy vegetables like carrots, peas, and lettuce can do with less.
If you are going to grow just one type of plant, be sure to do your research on what it requires. Otherwise, the 6-hour average should work just fine.
Plenty Of Water
You will also need a handy source of water. In other words, make sure your garden hose will reach it so you don’t have to carry water. Raised garden beds typically require a little more water. The exposed sides absorb more heat and the beds warm up quicker leading to a little more evaporation.
Some garden bed designs have better drainage than others too. Plants like tomatoes require 1-2 inches of water per week. Do your plant research here too and be prepared to have plenty of water handy.
Keep Them Level
Once you know what you’re going to plant, and what their sun and water requirements are, it’s time to pick a suitable location. We chose a fairly level location because it makes building and installing the garden beds a little easier. They can be installed in an area that’s not level, but you’ll still want to keep the top of the garden somewhat level. Otherwise, water and rain run-off could cause erosion, which can damage plants and wash away some of your soil.
DIY Raised Garden Bed Plans
Raised garden beds can be made from many different materials. You can use cement blocks, decorative landscaping bricks, but typically you’ll see them made from wood. Most of the time treated lumber is used or wood with some natural preservative properties, such as cedar, so the beds will last longer. Wood is primarily used because it is lighter and much easier to work with. We went with treated lumber on ours, so let’s take a look at what was needed.
By sticky with wood you’ll need just a few basic tools that most homeowners should already have. If you’re a DIY’er, you may want to purchase a few tools that can be used for this project and future projects too. Our article on “Basic Carpentry Tools For Homeowners” will cover most of the woodworking tools needed for this project. The design of the garden bed can change some of the tool requirements for the project too.
The design we chose below, with the mitered inside corners, required us to use our table saw. The table saw did a good job of removing the inside corner material which received the mitered sides. We also chose to use stainless steel screws to hold it together. We did this because the screws were installed on the inside of the bed and would be in contact with the soil.

With all that said, the overlap design using a hammer and nails will work just fine and give you many years of trouble-free gardening. Below is a list of tools that are required to complete this project. As you can see it’s a small list and it covers a couple of different installation options.
Tools
Anytime you’re using power tools be sure to wear eye and hearing protection! I would like to recommend you take the time to read our article on personal protective equipment (PPE). It has some good ideas on how to complete home projects safely!
Materials
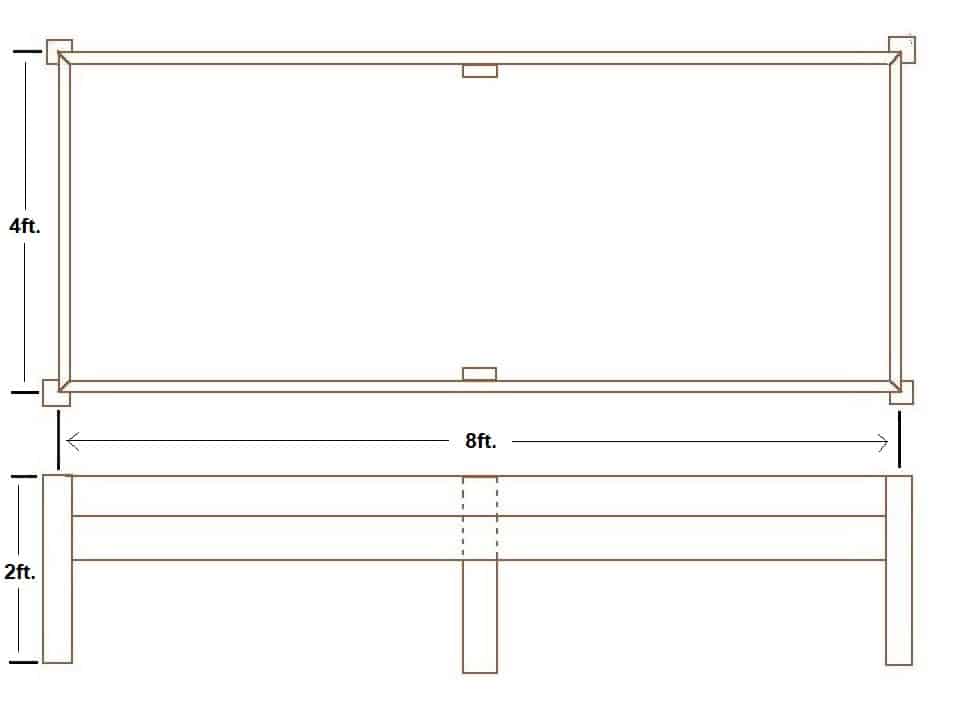
Raised Garden Bed Design
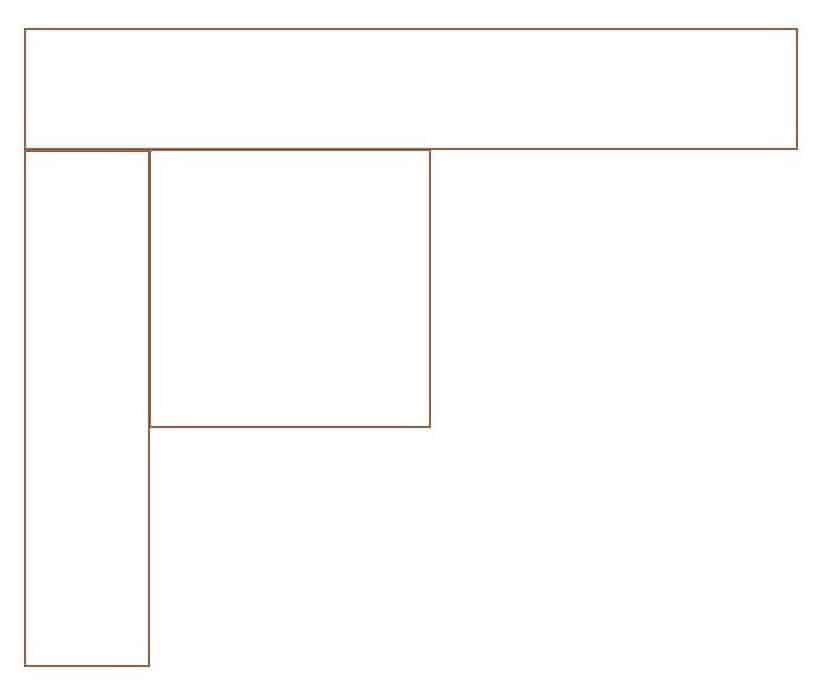
There are countless designs, ideas and materials out there for garden beds. We kept ours relatively simple, with the exception of the mitered inside corners. Below is the design we used. We included the overlapping outside corners above just in case you wanted to keep it simple.
When building the beds it’s actually easier to put them together upside-down, on a level surface, with the 4×4 corner posts and center supports sticking up in the air. Then flip them over, mark where you want the corner posts and center supports, dig the holes, and drop them in. We also worked up the topsoil inside the garden bed frame to allow for better drainage and root growth.
Time To Fill The Bed
Good dark soil can be used to fill the garden bed. We used Dairy Doo potting soil to fill ours. For those who are not familiar with Dairy Doo, it’s a local business in the central lower peninsula of Michigan that makes some good compost soil mixtures for your gardening needs. We add a bag to our garden beds each year to help keep them full. They also have a calculator to help with how much soil you’ll need to fill your garden bed. This is handy whether you use their product or not.
Time To Plant
Because you are limited in space, we recommend planting bush type veggies whenever possible. Vine type plants can take over a raised garden bed. You might want to plant larger plants along one edge so some of the branches can spread outside the bed. Get your tomato cages on early and use garden trellises. Try to keep as many plants as possible growing vertically, not spreading out.
That’s all there is to it! Pick a location that gets 6 to 8 hours of sunlight per day. Have access to plenty of water. The building of the beds is actually pretty straightforward. Then dig the holes, set them and fill them with soil. You’re ready to plant. Once you have all the materials this project can be completed in a few hours. Give it a try!
If you have any comments or questions, you can leave them in the comments section below or you can email us at [email protected]. FYI, we do not collect or share email addresses. We will only use them to reply to your comments or provide answers to your questions. We are also required to let you know that some of our links are “affiliate links”. This means if you click on a link and make a purchase, we could make a small commission, at no extra cost to you. This helps offset the cost of maintaining our website. So, if you like what you’ve seen, please be sure to give us a “Like” and “Share” on Facebook and Instagram too. Thank you for reading and good luck with all your home projects!