If you are driving a 2008 – 2012 Ford Escape or Mercury Mariner and it’s not riding as smooth as it used to, you’re going to want to read this article. When you hit a small dip in the road does the back of the vehicle keep bouncing and swaying for several seconds? That is definitely one of the signs your shock absorbers may be worn out. It’s probably time for a rear shock absorber replacement. Issues like these should be taken care of as soon as possible. Not only is the vehicle ride not as nice, but this can lead to vehicle control issues as well.
The good news is replacing rear shocks on your Escape or Mariner is an easy DIY repair you can make. All it takes are a few basic hand tools right in your own garage. In this article, we’ll look at other symptoms of failing shock absorbers and cover the tools and steps required to make this repair yourself and save money.
Cost To Replace Rear Shock Absorbers On a Ford Escape Or Mercury Mariner
Table of Contents
Are you wondering how much it costs to have the rear shock absorbers replaced on your Escape or Mariner? I’ll break down what I had invested in the repair on our Mariner. I purchased the replacement shock absorbers from a local auto parts store for a cost of $60 each. Using just a few handtools I was able to replace both shock absorbers easily in a couple of hours. I didn’t even need to jack the vehicle up.

To have the shocks replaced at a local repair shop you will still have the cost of the shock absorbers, however you’ll have to add the labor costs to install them too. I estimate the labor costs would be a minimum of $150. Using these numbers I estimate the replacement for two rear shock absorbers to be roughly $250-$300 at a repair shop.
The money savings is only half of the equation though. You also have to either take your vehicle to the shop and wait for the repair or make arrangements to have someone pick you up from the repair shop and leave your vehicle.
I realize you’ll still have your time invested in making the repair yourself. But at least you’re not inconveniencing someone else or sitting and waiting wasting precious time. You can make the repair when it’s convenient for you. I also have to mention there is a great feeling of accomplishment when you make repairs like these yourself.
When should I replace shocks on my vehicle?
Shock absorbers are mechanical devices. And like all mechanical devices, they have a limited life. Things like road conditions and driving habits can affect the life of your shocks. Many articles you’ll see suggest changing shocks every 4 to 5 years, or about 50,000 miles. On vehicles with mainly highway miles, it’s not unheard of to get 10 years on a set of shocks.
For this reason, it is always good for the vehicle owner to have their vehicle checked out if something has changed in how your vehicle handles or sounds. Below are a few of the symptoms you might notice when shock absorbers begin to fail.
Bad Shock Absorber Symptoms
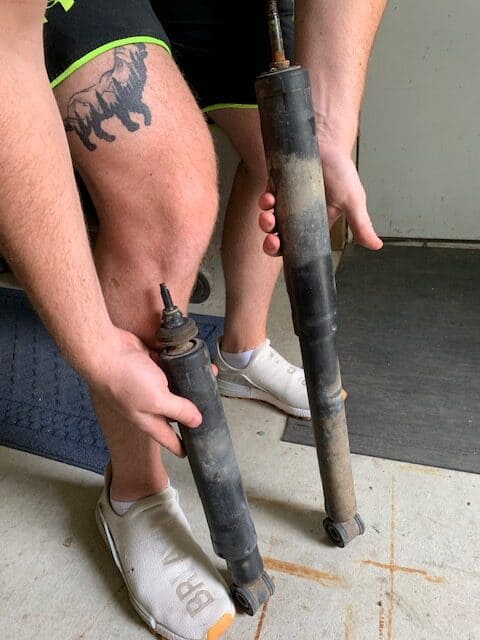
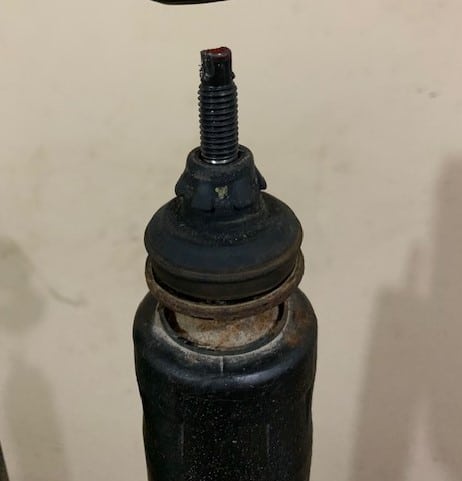
The failed shock absorber in the picture above is out of our 2009 Mercury Mariner. It was starting to exhibit some of the below signs that we had a problem. Don’t ignore them!
Excessive vehicle bouncing, swerving, and handling problems – This is more noticeable when driving over rough and uneven road surfaces.
Oil leaking – If a shock has an external oil leak, this is a sign of a seal failure, or other physical damage (crack, rusted out, etc…). In either case, that shock has failed and is no longer operating properly.
Clunking or rattling noises – New noises under your vehicle can indicate failing or broken shocks. I had a shock absorber piston rod break on a car when I hit a large pothole in the road. And in states where road salt is used rusting can cause the top protective cover or mounting brackets to fail too.
Clunking noises under a vehicle can also be caused by common issues that are easily repairable. Check out our article on “Troubleshooting Sway Bar Problems” for more helpful information on diagnosing unwanted noises under your vehicle.
Why do I need to replace my shock absorbers?
Shock absorbers are a very important part of your vehicle’s suspension system. Let’s look at a few of the benefits of keeping your shocks in top operating condition.
Smoother ride – This is the thing that the majority of people value most. A vehicle that handles well and can go over rough and uneven surfaces without bouncing all over the place is what everyone wants.
Better vehicle control – A vehicle with good shock absorbers will help keep the tires in better contact with the road. This is important because it improves the vehicle’s steering and braking performance.
Reduce tire wear – Excessive tire bounce can cause “cupping” wear on tires, reducing the overall tire life. It also contributes to the vehicle handling issues mentioned above. Not to mention making more road noise while driving.
Reduced wear on other suspension components – Ball joints, tie rod ends, sway bar links, and sway bar bushings will all be affected by bad shock absorbers. Wear on these components can contribute to poor handling, swaying, and noises from under the vehicle as well. And of course, this can lead to additional repair costs if not taken care of promptly.
Tools Needed For Ford Escape / Mercury Mariner Rear Shock Absorber Replacement
As mentioned at the beginning of this article you only need a few hand tools to complete this job. If you read our articles on basic homeowner’s tool kit and basic carpentry tools you’ll find all the tools you’ll need for this job and many other home repair projects.
I was able to replace the shocks on our 2009 Mercury Mariner comfortably without having to jack the vehicle up. I listed it below as a reminder to always use jack stands when working under a vehicle on a jack. Another must use item is a pair of safety glasses. You will almost always have dirt and debris falling when working under a vehicle.
Tools and Equipment Needed
Below Is a list of tools you’ll need for replacing the shocks on the Ford Escape and the Mercury Mainer. I’ve included a few links below for additional information and pricing. Keep in mind that when you invest in tools, it prepares you for future repairs and cost savings.
I am required to let you know that some of the links in this article are affilated links. This means that if you click on a link and make a purchase I could make a small commission. These commissions help us support our website and allow us to provide this free, helpful articles.
Shock Absorber Replacement Preparation
Once you’ve determined you need to replace your shock absorbers, there are a couple of things you can do to help ensure an easy and successful job. Below are two items I highly recommend when replacing shocks.
Replace both shocks – If you are replacing your shocks because of age, then this probably goes without saying. However, if you find that one shock is damaged or leaking, don’t replace just the one shock. It’s best to have two identical shocks that operate the same. This helps ensure the vehicle’s sway bar and suspension components are all working together.


Wire brush and lubricate bolt threads in advance – This is something I try to do on any mechanical repair I make involving threaded fasteners. It makes it easier to break the nuts and bolts loose and it also helps prevent damage to the threads.
Shock Absorber Removal
Replacing shock absorbers is actually a fairly easy job for the average vehicle owner to tackle. However, there are a couple of parts of the job that it’s nice to have a helping hand. The extra help is good for breaking nuts loose, aligning the new shock when it’s being installed, and tightening the upper mount nut. Let’s take a look at the steps to replace your worn-out shocks.
Clean bolt threads – To get started I like to re-clean and spray the threads and nuts again on the lower shock mount bolt before beginning. We want to be sure those nuts break loose and come off easily.
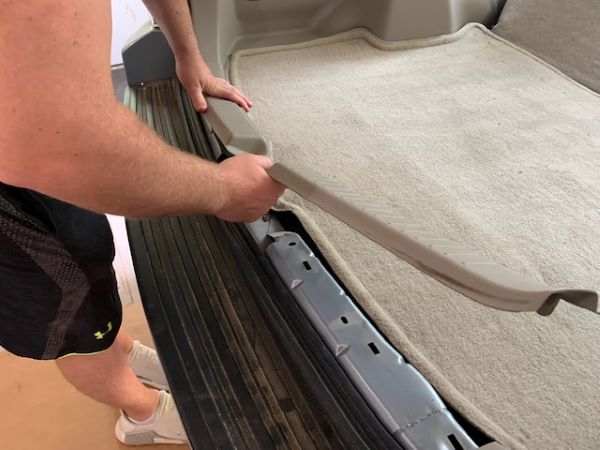
Remove plastic trim on liftgate opening – On the bottom of the liftgate opening, you’ll see a short piece of trim that will need to come off. Start at one end and grab the trim and firmly lift up popping the fasteners loose. You may need a screwdriver to help get it lifted up, so you can get your fingers underneath. Once you get it started, work toward the opposite end carefully lifting and popping the fastening clips straight up. This allows you to be able to remove the side panels in the next step.
Remove cargo area side panels – Carefully pull the side panel loose to allow access to the nut on the top of the shock. Start at the bottom of the liftgate opening. Grasp the side panel and firmly pull out, similar to the previous step. The fasteners should pop loose. Working up the side panel firmly pulling and losing the fasteners. Continue until you have the side panel pulled out far enough to comfortably access the nut on the top of the shock absorber. I’ve seen some videos that call for completely removing the side panel, but that requires a little more work. You have to pull the back seats and remove more trim around the back door. Truthfully, I found it very easy to do the work by just pulling the side panel back far enough to access the shock absorber nut. You also don’t run the risk of breaking fasteners that hold the side panels, which occasionally will happen.
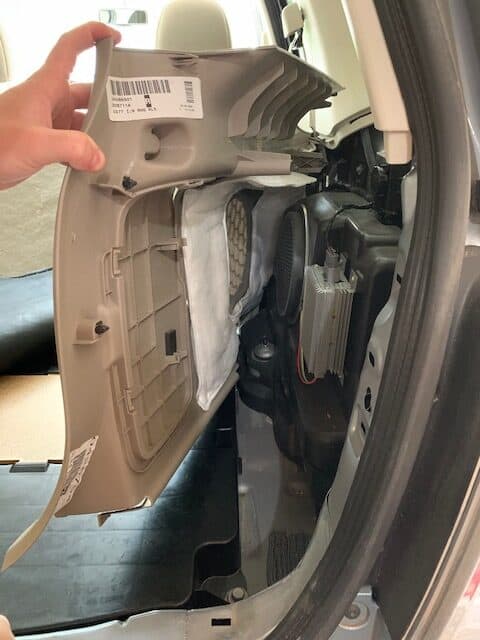
Remove the top nut – To break the nut loose you will need to hold the top of the shock absorber shaft. If you don’t hold the shock shaft, there’s a very good chance that the whole shaft will turn. A crescent wrench can be used to hold the shaft. I used a pair of vise grips to hold the very end of the shaft to break the nut loose and it worked well. Be careful to not damage the threads on the end of the shaft or you will have trouble getting the nut off.
Once the nut is broken loose you can typically screw it off easily. Occasionally you may have to hold the shaft until the nut is backed off far enough so it’s not compressing the rubber bushing. If you have a helper, many times they can reach inside the fender well, from outside the vehicle. Hold the top section of the shock and you can break the nut loose and screw it off too.

Remove the shock from the lower mount bolt – Typically the shocks on the Ford Escape and the Mercury Mariner are gas-filled, so they may be under some downward pressure. Use a pry bar to lift up on the bottom of the shock absorber and work it off the bolt. The old shock will drop down easily at this point, so be sure to have a good hold of it.
That’s all there is to removing the old shock absorber from the vehicle.
New Shock Absorber Installation
Once you have the old shock removed you can begin the installation of the new shock. But before you crawl under the vehicle there are a couple of things you need to do first. Let’s look at those items and then the rest of the installation steps.
Prepare the new shock for installation – New gas-filled shock absorbers are usually shipped with a strap that holds the shock absorber in the compressed position. Remove the strap and allow the shock absorber to fully extend. This should take up to 30 or 40 seconds. Most manufacturers recommend compressing the shock two or three times, holding the shock in the upright position. This helps get the oil distributed properly and to verify the proper operation of the shock.
You will also need to install one of the upper-end mount washers and rubber bushings that are supplied with the new shock. They’re typically in a separate package inside the box. Install one washer and one bushing onto the shock absorber shaft. One side of the bushing will have a raised face that fits into the upper shock mounting hole on the vehicle. Make sure the raised face is facing upward. It helps center the shaft in the mounting hole.
Note – the raised face on the bushing can come in different sizes and shapes depending on the manufacturer. The one in the picture above is the original bushing that had a larger raised face.
Clean lower mount bolt threads – If you had any issue removing the nut on the lower mount bolt, now is the perfect time to clean all the threads on the bolt and nut. This will make the reinstallation easier and will help when torquing the nut.
Install shock absorber upper end into the vehicle – Here’s another good time to have a helper for the job. From under the vehicle put the upper end of the truck absorber shaft into the upper mount hole. Have your helper guide it into place making sure the rubber bushing is centered in the mounting hole. Have your helper continue to hold the shock in place while you prepare to install the lower mount bolt into the shock.
Install shock absorber onto lower mount bolt – Because it’s a gas-filled shock, it will be fully extended at this point. Press up firmly on the shock absorber to compress it, until it aligns with the lower mount bolt. It does take a little effort to collapse the shock, but I think most individuals will be able to do this. If you are having trouble compressing the shock, you can use a jack and lift the frame of the vehicle until the whole lower mount is aligned with the bolt and slide it into place. Just remember when working under a vehicle on a jack to use a set of jack stands to help protect yourself.
Once the bolt is started in the lower shock mount, use a pry bar to push up the shock to align the mount and the bolt. After the shock is in place, install the washer and nut on the bolt. Tighten the nut to hold the shock absorber in place.
At this point you can install the second rubber bushing onto the top of the shock absorber shaft in the washer and nut run the knot down on the shaft, compressing the rubber washers. There is a good chance you will need to hold the top of the shaft to keep it from spinning. You could also have your helper hold the shark in the wheel well while you tighten up the top nut.
Tighten both upper and lower mount nuts – Once you have the upper and lower mount nuts installed and tightened up. That completes the installation of your new shock absorber on one side. Repeat the above steps on the other side of the vehicle to replace the second shock.
Note: If you have access to a torque wrench, it is best practice to finish up by tightening the nuts to the final torque values listed below.
Re-attach the side panel and liftgate trim – With both new shock absorbers installed you can attach the side panels. Align the plastic fasteners and firmly press the panels into place. With both side panels in place, you can re-install the trim piece at the bottom of the liftgate area.
Congratulation, your rear shock absorber replacement is complete. Job well done!
Conclusion
There are many vehicle repairs and maintenance items that the average vehicle owner can easily do. This rear shock absorber replacement on a Ford Escape or Mercury Mariner is certainly on that list of items. It can easily save you at least 50% on the cost of the repair at your local garage. With the added benefit of doing the work when it fits your schedule. Not on the repair shop’s schedule.
We have a few other articles on other vehicle maintenance you can easily do yourself as well. So don’t shy away from the opportunity to grab your toolbox and dig in. The cost savings, convenience, and the self-reward you experience will make it all worthwhile.
If you have any comments or questions, you can leave them in the comments section below or you can email us at [email protected]. FYI, we do not collect or share email addresses. We will only use them to reply to your comments or provide answers to your questions. We are also required to let you know that some of our links are “affiliate links”. This means if you click on a link and make a purchase, we could make a small commission, at no extra cost to you. This helps offset the cost of maintaining our website. So, if you like what you’ve seen, please be sure to give us a “Like” and “Share” on Facebook and Instagram too. Thank you for reading and good luck with all your home projects!