Many homebrewers eventually switch from bottle their beer and go into kegging. It can take hours off the brewing process by eliminating the cleaning and sanitizing of the bottles and bottling your beer.
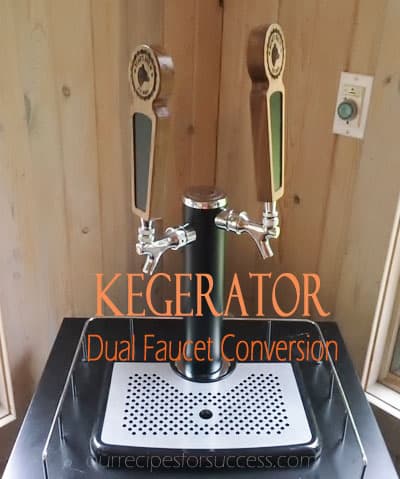
The downside is buying a multi-tap kegerator can be expensive. This dual faucet kegerator conversion can help you save money once you decide to take the leap into kegging.
In this article, we will be providing you with a few links to some products for pricing and informational purposes. We are required to let you know some of these links are “affiliate links”. This means if you click on a link and make a purchase, we could make a small commission, at no extra cost to you. This helps offset the cost of maintaining our website. Now, let’s get started.
Why Many Kegerators Have A Single Faucet
Table of Contents
The majority of the kegerators you’ll come across in your travels are made to hold the single, larger diameter kegs that most U.S. domestic beer comes in. Domestic kegged beer in the U.S. typically comes with the Sankey type “D” tap connection. If you find one of these kegerators in good condition, and at the right price, they are perfect for the homebrewer wanting to get into kegging.
The reason they’re perfect is you’ll need to keep your kegged beer cold and these small kegerators do a good job. Most of these kegerators are able to hold two of the 5-gallon corny kegs most homebrewers use, along with the CO2 tank.
The downside is it probably only comes with one faucet. That’s where this dual faucet kegerator conversion comes in. With just a few hand tools you can easily add a second faucet to the existing beer tower. This is much less expensive than buying a dual tap replacement beer tower or buying a complete dual tap kegerator.
So if you’re ready to ditch the bottles and start kegging, check out our article on homebrew kegging systems and start looking for a used kegerator you can put to good use.
Dual Faucet Kegerator For Sankey Taps Too
This article was written with the homebrewer in mind and lays out the materials needed for converting to corny kegs. However, any beer lover can use this kegerator conversion and have a couple of good cold beers on tap at home too.
The 1/6 barrel keg is basically the same size as the corny keg. The only difference is they are typically equipped with the Sankey tap connection. Many of these single faucet kegerators can hold two of the 1/6 kegs of your favorite beers too.
To stay with the Sankey taps, you’ll need to get another tap and the beer and CO2 tubing lines. I would recommend duplicating the size and lengths of the existing Sankey tap tubing lines that came with your kegerator. All the below faucet and CO2 components and modifications to the beer tower will be the same.
One area to check is the size of the CO2 lines you’ll be using and the connection size on the new CO2 manifold. My Sankey tap had a smaller CO2 line connection. Be sure to work with your homebrew supply store to get the correct size adapters and/or gas lines.
What Size Of Kegerator Do I Need?
According to the folks at the website kegeratorzone.com, the full-size home kegerator is about 24 inches in height and 16 1/8 inches in width or diameter. They are designed to hold the standard half barrel.
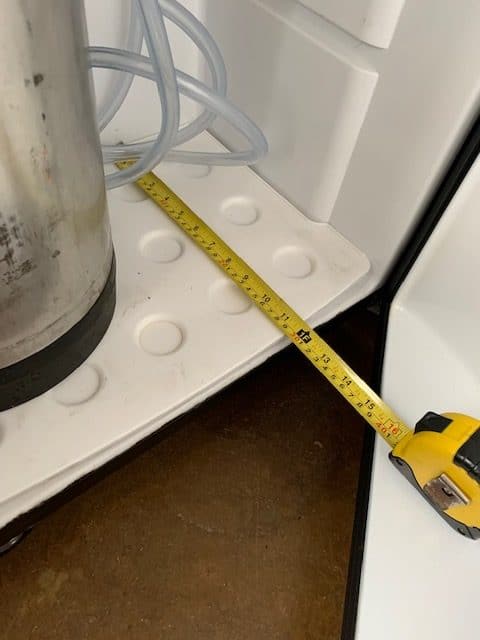
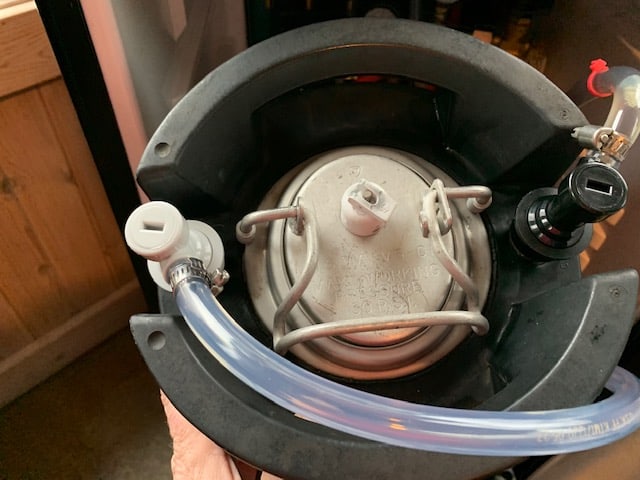
My Nostalgia kegerator fits this description and measures 26 inches in height and 16 inches wide, inside dimensions. I can comfortably fit two “ball lock” corny kegs in this kegerator. The ball lock corny keg dimensions are 8.5 inches in diameter and 25 inches tall.
The “pin lock” corny keg and the 1/6 barrel keg are both a little larger in diameter but are a little shorter. According to the website kegworks.com, the pin lock is 9″ by 23″ and the 1/6 barrel is 9-1/4″ by 23-3/8″. By spacing my ball lock kegs out to estimate the dimensions of these other two kegs, two of either of these kegs would easily fit in my kegerator.
Be sure to measure the inside of the kegerator you’re looking to buy to make sure your kegs will fit. Looking at the picture of my Nostalgia kegerator below you can see that the inside depth at the bottom of the kegerator is only about 12″ deep. But if you look at the door, it has a convex shape (about 5″) to allow for the half barrel keg. If you find a kegerator with similar dimensions, you should be good.
Materials Needed For A Dual Faucet Conversion
To make the conversion you’re going to have to replace all the existing tubing lines from the CO2 regulator, the existing faucet, and the Sankey keg tap. It’s a great idea to keep the Sankey tap. If you choose, you can adapt it to fit one of the new beer lines for future use.
Below is a list of all the hardware and tubing you’ll need to complete the conversion. The hardware will need to be purchased from a homebrew supply store. I recommend buying all your tubing from a homebrew supply store too. They sell high quality, beverage grade tubing. FYI, not all vinyl tubing is the same.
If you’re looking for a good online supplier, try Northern Brewer. I’ve purchased lots of ingredients, kits, and equipment since I’ve started brewing back in 2009. I’ve never been disappointed.
You can purchase the materials from Amazon as well. Local homebrew supply stores are great resources too. They can answer specific questions and show you exactly what you need. Below is a list and description of the materials you’ll need for the conversion.
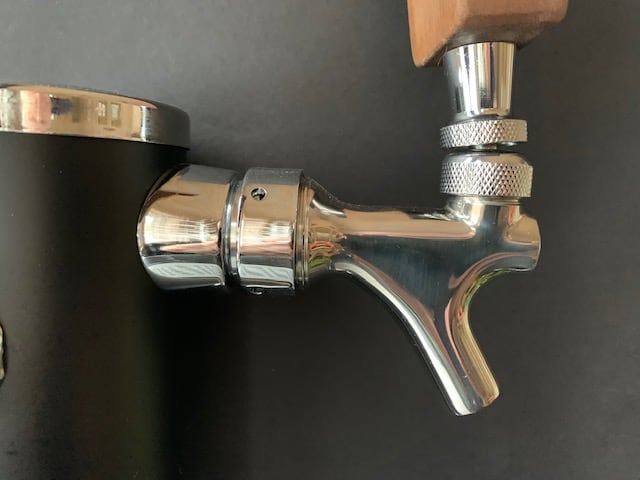
Faucet – The faucet is actually where the beer comes out of, as you would imagine. I would recommend going with a stainless steel faucet. You will need to purchase one of these for this project.
Elbow shank assembly – The elbow shank is the assembly that actually is installed in the beer tower. The beer lines attach to it inside the tower and the faucet attaches to it on the outside of the tower. You will need to purchase one of these for this project.
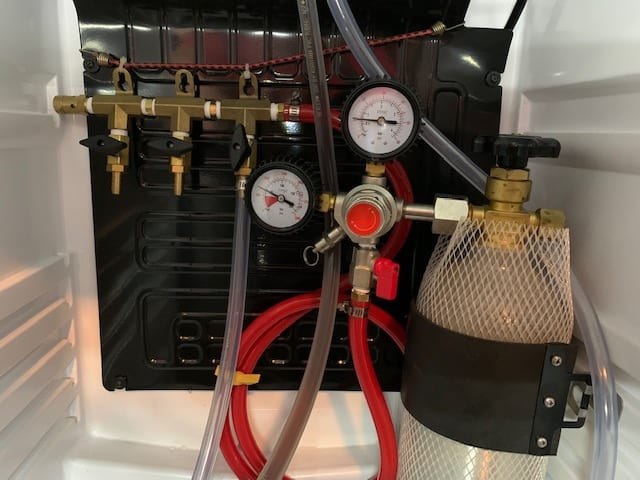
CO2 manifold – The manifold splits the CO2 out of your regulator to supply gas to both of your kegs. The barbed fittings on the manifold are typically 5/16” in diameter. A manifold with at least 2 outlet fittings is needed for this project.
Liquid (beer) Hose – The normal size for the beer line is 3/16” or 1/4” tubing. If you do any reading, you’ll see there is a lot of discussion on this topic. Tubing diameter and length play a big role in how much foam is created when dispensing your beer. I currently have 10 feet of 1/4” tubing (recommended by my local brew shop) and dispensing a maple porter at 10psi with absolutely no issues.
If you choose to go with 3/16” tubing, you should only need 5 or 6 feet of tubing, for each keg (10 to 12 feet total). The 3/16” tubing is definitely going to be cheaper and less bulk to deal with inside the kegerator.
Here is a link to a “Beer Line Length Calculator” I found at kegerators.com. Just input a few specifics about your system and it will get you in the neighborhood. Try my numbers above with a “flow rate” of 5. This will help with your beer line selection.
Gas (CO2) Hose – The normal size recommended is 5/16” tubing. Like the beer lines, there are lots of discussions here too, which I cover more in-depth below. To keep this brief, here are my recommended tubing sizes and quantities.
Between the CO2 regulator and the manifold, you’ll want about 3 feet of 5/16” tubing. That length gives you a little flexibility to move the CO2 tank.
From the manifold to the gas connectors for the kegs, you’ll want 3 to 4 feet of 1/4” tubing for each keg (6 to 8 feet total). The length of the CO2 tubing is not critical. Remember, this tubing will be cold and somewhat stiff. The extra length makes it nice for getting the kegs in and out of the kegerator.
Clamps – The easiest route is to go with 9/16” worm screw clamps. This size clamp fits all the tubing (3/16” to 5/16”) involved in this project. And they are small enough to fit inside the beer tower. You’ll need a total of 10 clamps for all the gas and liquid connections made in this project.
Gas fitting – The gas fittings are either ball lock or pin lock fittings that fit your specific type of keg. For this conversion, I opted to use the 1/4” barbed tubing connections. You’ll need one for each keg (total of 2)
Liquid fitting – The liquid fittings will be either ball lock or pin lock fittings that fit your specific type of keg. For this conversion, I opted to use the 1/4” barbed tubing connections. You’ll need one for each keg (total of 2).
Tools required
Here is a list of the tools you’ll need for this project.
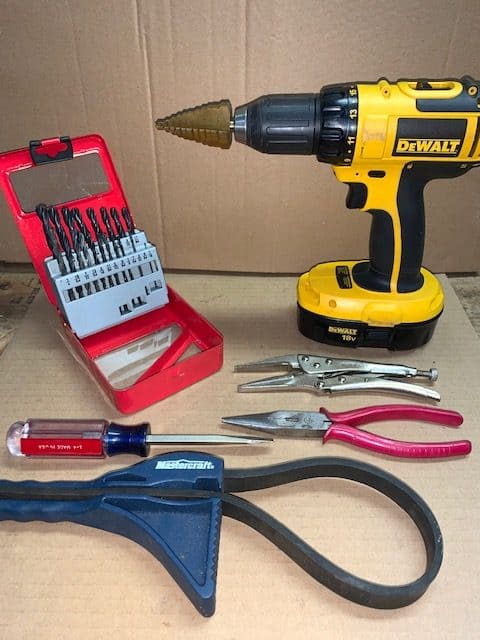
Drill – An electric or battery-operated drill or drill press.
Drill bit – The shank assembly I installed required a 7/8” hole. Be sure to get the proper size drill bit for the shank you purchase. A “step bit” works great for this application. I have a few more tips on drilling the hole below.
Screwdriver, flat blade – Most hose clamps require a screwdriver to tighten them. There are some that don’t have the screwdriver slot and will require a small socket or nut driver.
Needle nose pliers – These work nicely for reaching the shank nuts inside the beer tower. I used a small pair of needle nose vise grips which I think worked great. You don’t need as much grip strength to firmly grab the nut and tighten it. If you don’t have a pair, they’re a very good tool to invest in for your DIY toolbox.
Strap wrench (optional, for beer towers with 1/4” turn base) – My kegerator is a Nostalgia, which has a 1/4 turn beer tower adapter. This made it very easy to remove the tower and adapter without scratching or damaging the tower. There’s more on exactly what the adapter is below.
Kegerator Conversion Instructions
To get started disconnect the tubing lines inside the kegerator from the keg tap fittings and remove the kegs for ease of access. If you’ve already converted the single faucet to fit your corny kegs, you can just disconnect it from the keg as long as it is of adequate length. If the beer line is shorter, I recommend replacing it with the longer lines described above.
This needs to be done so the beer tower and existing faucet can be repositioned. Later you will have to remove the beer lines and faucet so the hole for the new faucet can be drilled. Let’s get started.
Step #1 – When finished the two faucets will be 90° apart and facing out toward the front of the kegerator. That requires rotating the existing faucet 45°. There are a couple of ways to do this.
The Nostalgia kegerator’s beer tower has a 1/4 turn adapter that the beer tower is screwed to, which attaches to the kegerator. If you firmly grasp and rotate the beer tower counter-clockwise 1/4 turn, the beer tower can be lifted out of the kegerator. The strap wrench works great for this and won’t scratch the tower surface. Rotate the beer tower 180° and re-insert it back into the kegerator and turn it 1/4 turn clockwise to secure it to the kegerator again.
The existing faucet will now be facing toward the back of the kegerator, but it will be at a 45° angle. From here you’ll need to remove the four screws from the flange that attaches the beer tower to the 1/4 adapter and rotate the beer tower 180° so the faucet is facing toward the front of the kegerator, but it will be at a 45° angle. The short video below demonstrates how it’s done.
For now, secure the beer tower to the kegerator with a couple of screws. This will help you visualize the alignment and mark the location of the second faucet. It is best to remove the tower for drilling the new hole.
If your kegerator does not have the 1/4 turn fitting, the other option is to drill new holes for the screws that connect the beer tower to the top of the kegerator. They will need to be drilled at a 45° offset. With towers having four screws holding them, it’s relatively easy. Mark a spot exactly halfway between each of the existing holes on the flange of the beer tower and drill new holes. This will allow you to rotate the tower 45° putting the existing faucet to one side.
Step #2 – After the existing faucet is oriented to one side you’ll need to mark the location for the new faucet 90° from the existing faucet on the opposite side. The easiest way I found to do this was to use a protractor. This will get you very close, but it doesn’t have to be exact.
Next, find and mark the center of the tower, so you can center the protractor’s “origin” mark on it. You can do this by placing a strip or two of tape across the top of the open beer tower. Using a small ruler, find the widest part of the beer tower and make a small mark in the middle of the tape. Do this in two directions. The resulting “X” from the crossing lines will mark the center of the beer tower.
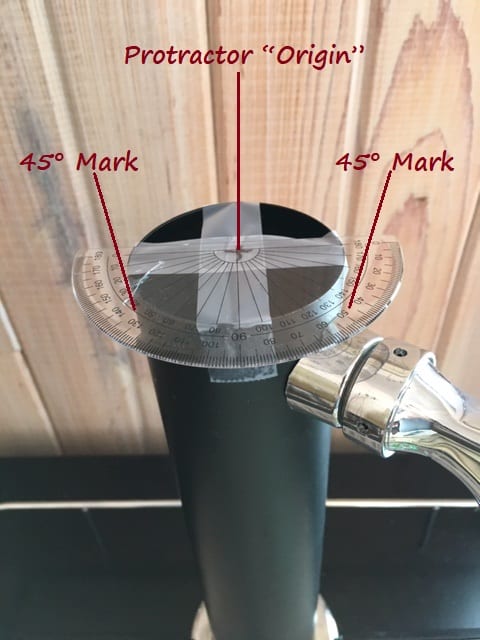
Place the protractor “origin” on that center mark and align the right hand 45° mark on the existing faucet. On the opposite side of the tower mark the location of the protractors other 45° mark on the side of the tower using a pencil. This will give your finished product a nice uniform look.
With the angle marked you’ll need to mark the height for the new faucet on the tower. The majority of the time single faucet kegerator towers are only 2” in diameter. Unfortunately, this makes it impossible to place both faucets at the same height.
I recommend lowering the location of the new faucet 1” below the height of the existing faucet. This will give you enough room for the faucet shank nuts and the tubing and hose clamps for both faucet shanks inside the tower.
To mark the location of a hole you normally want to mark the center of a hole. That mark is the exact location you’ll place the drill bit when drilling. Next, from the top of the beer tower measure down to the center of the existing faucet. Take that measurement and add 1” to it. Below the new 45° mark made earlier, measure down and make a mark. This mark is where you will be drilling the hole for the new faucet.
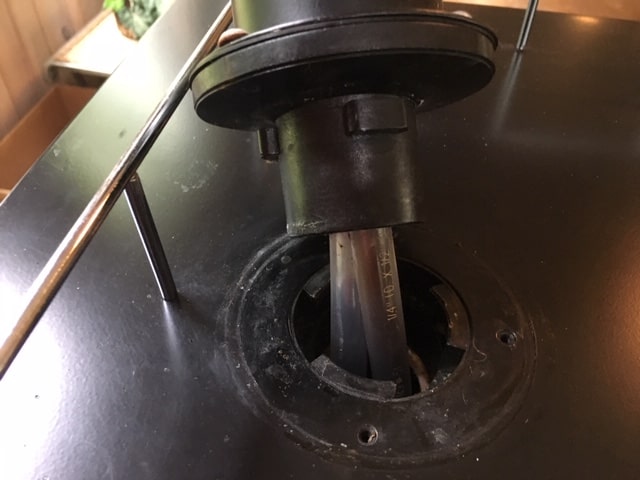
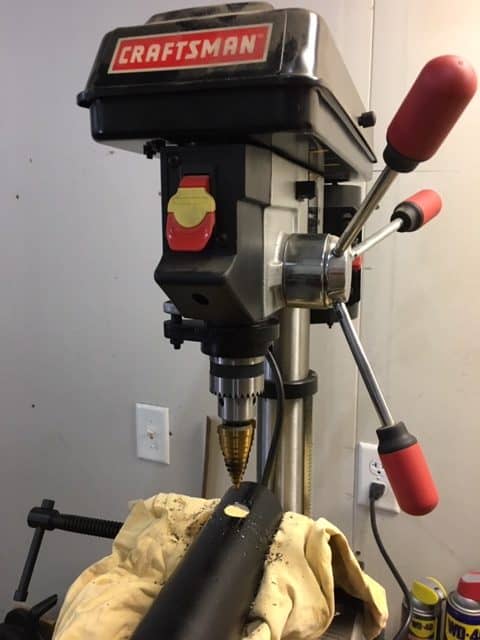
Step #3 – It’s time to drill the hole. Take the beer tower off the kegerator and remove the existing beer faucet. This will prevent damaging the existing beer line and it’s much easier to drill the tower with it removed and secured in a vise.
I used a small drill press to drill mine, but you can just as effectively use a vise and a hand drill. FYI, to help prevent scratching or marring the tower, line your vise jaws with some rubber or even an old T-shirt. And don’t over-tighten the vise or you can easily bend the tower as well.
When drilling holes in round material (the beer tower) it can be tricky to get the hole started. The drill may try to “run” off the mark and down the side. To avoid this use a center punch and hammer on the mark where you want the hole. This will help get the hole started exactly where you need it.
For other tips on drilling holes check out our other helpful blog article. It can help with bit selection, among other things.
My new faucet shank required a 7/8” hole. A “step drill bit” works great for this application. A “mandrel hole saw” can be used too. I cover both of these bit options in the above-mentioned article. As mentioned above, I highly recommend center punching and drilling a pilot hole to help prevent the drill bit from running and scratching the surface of the beer tower.
Step #4 – With the hole drilled it’s time to install the faucet shank. Start by removing the nut and washer from the shank. Attach the new beer line to the shank’s barbed fitting using a hose clamp. Mark the keg ends of the tubing line so you know which faucet shank each is attached to. That will make it easier to identify the tubing lines after they’ve been dropped down into the kegerator.
Now insert the opposite end of the beer line into the newly drilled hole just far enough that you can put the shank’s washer and nut over the end of the beer line. Holding the nut and washer continue feeding the rest of the beer line into the tower.
Slide the shank threads into the hole and install the washer and nut and tighten. It can be a little tricky to reach but a pair of long needle-nose pliers will work. I used a small pair of needle nose vise grips, which worked great. Get the vise grips properly adjusted and they require no grip strength to hold the nut while turning it.
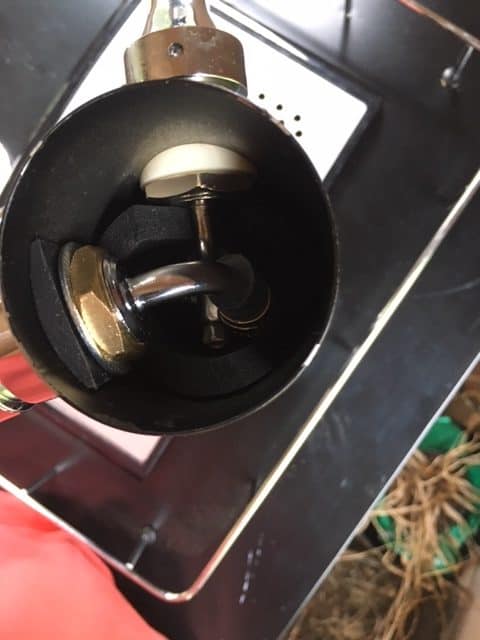
With the new faucet shank in place now you can re-install the original faucet shank. Follow the same steps you used for installing the new tubing and shank. After both shanks are in place, and tight, make sure to re-install the foam insulation in the beer tower that goes around the beer lines. You will have to trim the insulation to fit around the new shank.
Now just reattach the beer tower to the kegerator with the screws and the hard part of the job is done. Now attach the faucets to the shanks and install the insulation and cap on the top of the tower. That completes the beer tower modifications.
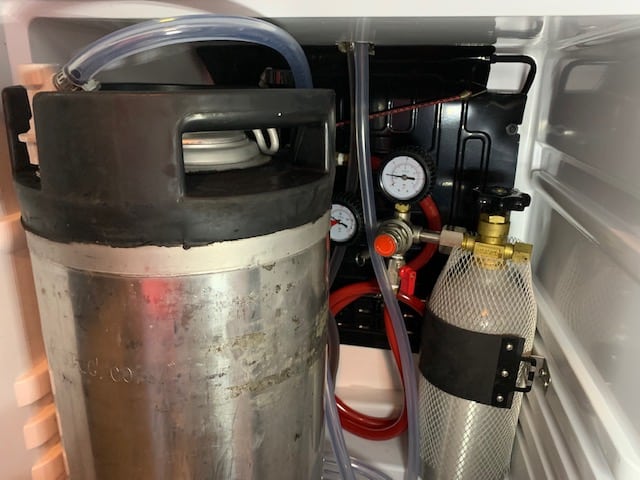
Connect Kegerator CO2 Equipment And Beer Lines
With the new faucet installed and the towel mounted on the kegerator, all that’s left to do is to attach the new keg connectors to the beer lines and begin assembling the CO2 equipment and lines. Whether you’re using “ball lock” or “pin lock” connectors, the black connector is for beer and the gray connector is for gas.
Beer Connections – This is relatively easy to do. Find the ends of the two beer lines coming down from the faucets and attach the beer out connectors (black) to each of the tubing lines using hose clamps.
Each beer line should be 8 to 10 feet long, with that in mind, it really helps to coil up each line and securing it with a zip tie. Do each beer line separately and be sure to leave at least 3 feet of tubing loose on the keg end. This makes it much easier for getting the kegs in and out of the kegerator.
CO2 Equipment – The original single faucet setup only required one CO2 line connection, but now you’re going to need another CO2 line for your second keg. There are a couple of ways of doing this. Let’s look at what option might be best for you.
The first is to buy a second regulator and connect it to your existing CO2 regulator and tank assembly. Most regulators are designed to be connected together and use the same CO2 tank as the source. Each regulator can supply a separate keg.
I believe this is a little overkill, as a beginner, not to mention the more expensive route. It is rare that you’ll need two separate pressures for a significant length of time.
The second option and the route I chose is to install a “Y” splitter or a multi-tap “manifold” in the outlet of the existing regulator. This allows you to supply the same CO2 pressure from the regulator to two, or more, different kegs. Regulators are about twice the cost as well.
Should you simply love kegging and decide to invest in buying or making a larger kegerator/keezer, both of these options can be used to expand your new system. The manifold route allows you to keep the costs down until you make that decision. And if you need to sell this kegerator to help fund your new one, keeping the costs down may help it sell easier and quicker.
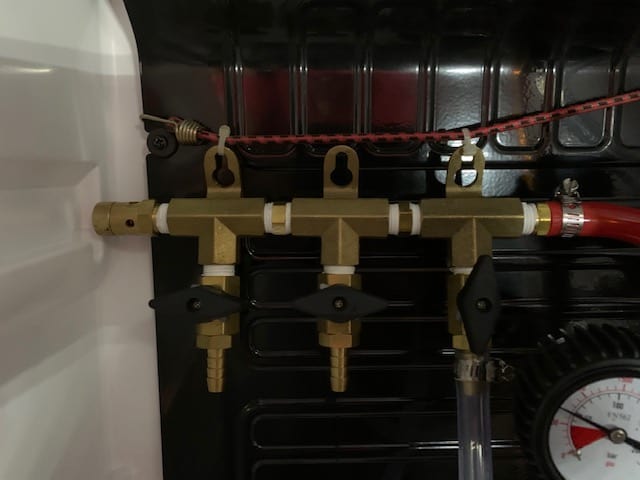
I ended up opting for a three-outlet manifold for my system. Two of the outlets will be dedicated to supplying CO2 to my kegs and the third one is for other potential uses.
One example is to use it for a “beer gun”, which is used to fill growlers or bottles. That gives you the ability to take your homebrew with you to parties, give some away as a gift, or submit some of your beers into a competition. I don’t have a beer gun yet, but for a few extra dollars, I chose to go that route and be prepared.
Each manifold outlet should be equipped with a valve so you can shut in one keg while you raise or lower the CO2 pressure for something you need to do to the other keg.
Most beers have overlapping desired CO2 pressure ranges for proper carbonation and beer dispensing. So you need to find the happy medium for both styles of beer in your kegs.
CO2 Lines Connections – To complete the conversion you will need to connect the regulator to the inlet of the CO2 manifold. This is usually made with 5/16” tubing and secured with hose clamps. Most of the time regulators and manifolds use 5/16” barbed fittings, so the 5/16” tubing called out above works perfectly.
However, the connections from the CO2 manifold to the corny keg gas fitting (ball or pin lock) was another story. The keg gas fittings typically come with a 1/4” barbed fitting. The 5/16” gas line seemed quite loose to me. I was afraid I would not be able to tighten the clamp tight enough to get and keep an airtight seal. Keep in mind good quality tubing for homebrewing has a fairly heavy wall thickness.
I had some extra 1/4” tubing I was using for the beer lines, so I decided to use that between the manifold and the keg gas connectors. Since then I’ve read that if you warm the 5/16” tubing in hot water and then clamp it you can get a good seal.
I’ve also read that many others have used the 1/4” line instead of the 5/16” from the manifold with no issues. The 1/4″ line has worked fine for me so far and I don’t have to worry about CO2 leaks, so 1/4” line it is.
It’s always good practice to pressure all the CO2 lines and check for leaks. Just use a little soapy water and a small paintbrush and dab each hose clamp, manifold connections, and regulator fittings. Any leaks will cause bubbles.
If you find any leaks, be sure to redo that connection or you could lose all your CO2! Any beer line leaks will show up as beer leaks, so keep an eye out for drips.
Tap handle – The tap handles screw onto the faucet and is “pulled” to dispense the beer. They are sold separately and come in a huge variety. Amazon has a large selection of tap handles to choose from. Click this link to see what they have to offer.
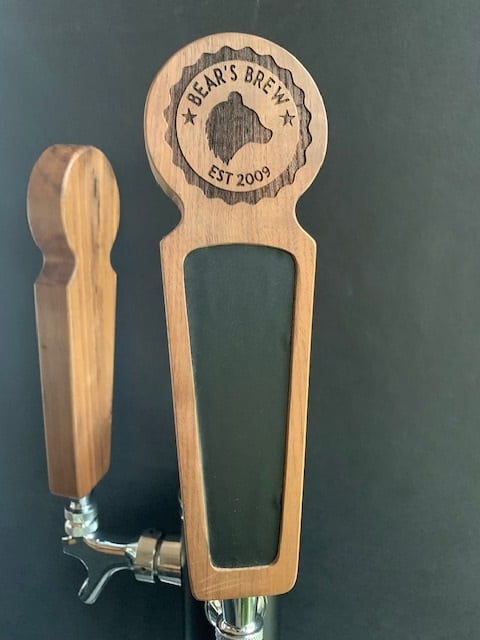
Another fun option is to have custom tap handles made. My wife had the above tap handles made with our own design on them. Our tap handles have a chalkboard inset to write the style of beer on tap, but there are several options available. It makes a great birthday gift for the homebrewer.
Conclusion
There you have it. Those are all the steps you’ll need to follow to take a single faucet kegerator and make a complete dual faucet kegerator conversion. It’s easy to do and only requires a few basic hand tools to complete.
If you can find a good deal on a single faucet kegerator, buy it and make the conversion. Then you can enjoy a couple of your favorite cold homebrews anytime you like. Enjoy!
If you have any comments or questions, you can leave them in the comments section below or you can email us at [email protected]. FYI, we do not collect or share email addresses. We will only use them to reply to your comments or provide answers to your questions. We are also required to let you know that some of our links are “affiliate links”. This means if you click on a link and make a purchase, we could make a small commission, at no extra cost to you. This helps offset the cost of maintaining our website. So, if you like what you’ve seen, please be sure to give us a “Like” and “Share” on Facebook and Instagram too. Thank you for reading and good luck with all your home projects!
Having two homebrews on tap is really nice. And having the flexibility to switch between the two different styles of taps could be handy at times too. Let me know how it turns out.
I need to try this. I started homebrewing and I still buy the occasional commercial keg. I don’t want to buy a whole new tower.