Do you have a broken torsion spring on your garage door? This repair on a residential garage door, or pole barn door, is actually pretty straightforward and fairly easy to do. Let me walk you through how to make a broken garage door spring repair safely. It requires just a few basic hand tools, that most homeowners already have, and you can easily save yourself between $100 – $150!
Garage door springs really do have a lifespan. The research I’ve done suggests that the average life of the typical torsion spring is approximately 10,000 cycles. It also claims that the average door cycles per day are about 4. Using those numbers the average door spring should last approximately 7 years. Obviously, the number of cycles per day plays a significant role in the life of the springs but so does keeping your door well maintained.
The message here is that it is not unheard of to have a spring break. The good news is you can safely replace a broken spring and save some money in the process. In this article, you’ll find all the tools you’ll need for the job and the necessary steps to follow to complete the job safely.
In this article, we will be providing you with a few links to some products for pricing and informational purposes. We are required to let you know some of these links are “affiliate links”. This means if you click on a link and make a purchase, we could make a small commission, at no extra cost to you. This helps offset the cost of maintaining our website. Now, let’s get started.
Things To Consider Before Starting Your Torsion Spring Replacement
Table of Contents
Before jumping right in let’s take the time to look at a few items that will help keep you safe and that could potentially save you time and money right now and in the future.
Safety First
When working on any DIY project there are always safety-related items you need to consider. The first three items can be applied to many home projects. We’ve written articles about each of them and encourage you to check them out for additional information. The fourth safety item here is specific to working with garage door torsion springs. Please take the time to read them.
Personal Protective Equipment (PPE)
Be sure to wear a pair of safety glasses and good snug-fitting leather gloves. Some of the garage door components may have sharp edges or a frayed cable can give you a painful puncture wound. Always protect yourself. For more safety-related ideas when doing DIY projects, please consider reading our article on Personal Protective Equipment (PPE).
Ladder Safety
Completing this repair requires working from a ladder. The ladder will need to be on solid, level ground, and secured. If possible, it is always a good idea to have someone hold the ladder steady. This is especially important when working with taller doors. They can help with dropped tools or get something you may have forgotten. Check out our article on ladder safety. It has tips and safe work practices when using ladders.
Lock-out/Tag-out (LOTO)
For anyone who doesn’t know, lock-out/tag-out involves securing all potential energy sources before beginning to work on a job or project. This certainly involves working on garage doors.
Be sure to turn the electrical power off to the automatic garage door opener. You definitely don’t want it to unexpectedly move during this repair.
In some cases, it involves identifying the potential energy sources and managing them. Like the energy stored in a torsion spring or the weight of an open, unsupported garage door (both items mentioned immediately below).
Please consider reading our article on Lock-out/Tag-out. It looks at many of the potential hazards you may face when working on home projects.
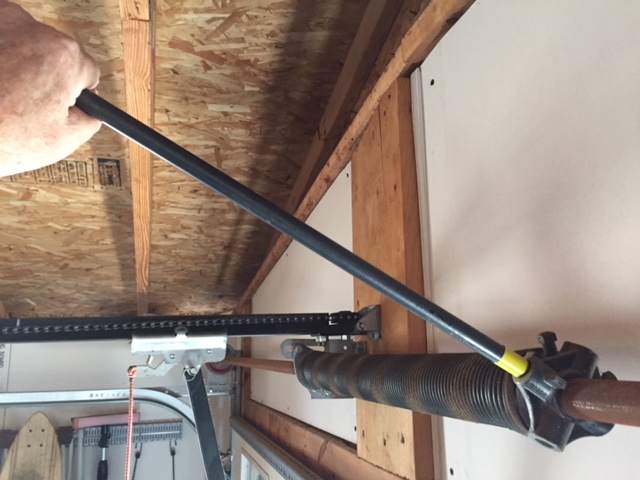
Safe Use Of Torsion Spring Winding Bars
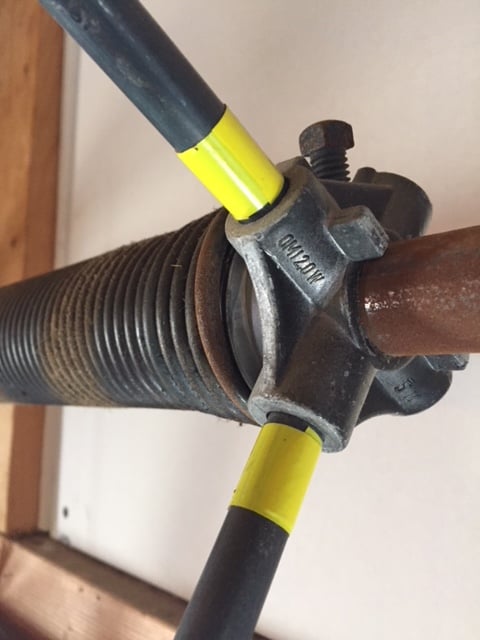
Using the winding bars is the most dangerous part of the job. If you take your time and fully engage your winding bars in the winding cones, you shouldn’t have any issues while releasing or adding tension to the springs. Under no circumstances should you ever try using screwdrivers or tapered pry bars on the winding cones! It’s to easy for them to slip out of the holes causing pinched finger and flying tools!
Before starting it is a good idea to insert the winding bars into one of the holes on the winding cone. With the winding bar fully inserted put a mark on it right next to the hub. A couple of wraps of light-colored tape works well. This gives you a quick visual reference that the winding bars are fully inserted. If you take your time and make sure you fully insert the winding bars, you should be fine.
Do You Have An Automatic Garage Door Opener?
If you have an automatic garage door opener and have a broken spring, you should stop using your door opener immediately! Garage door springs are used to offset the weight of the garage door, so they are easy to open and close. By continuing to use your garage door opener you run the risk of damaging the internal gears and parts of the opener.
Until the repairs can be made I suggest releasing the garage door from the opener and holding the door open with a pair of C clamps. Attach the C clamps to the garage door track under the fully opened door. You will most likely need a helper for this. Depending on the size and material of your garage door they can easily weigh in excess of 100 pounds.
Good Time To Replace Other Garage Door Components
Obviously, if your door only has one spring on it, and it breaks, the tension should be released. However, many garage door installations have two springs on them. In this case, you will need to release the tension on the spring that is not broken before disassembly. It is also recommended to replace both springs at the same time.
As mentioned above, torsion springs have a life expectancy of 10,000 cycles, so when one of them breaks the other may not be too far behind. Plus you will already have the tension released and many of the parts disassembled. It would be very easy at this point to replace the second spring.
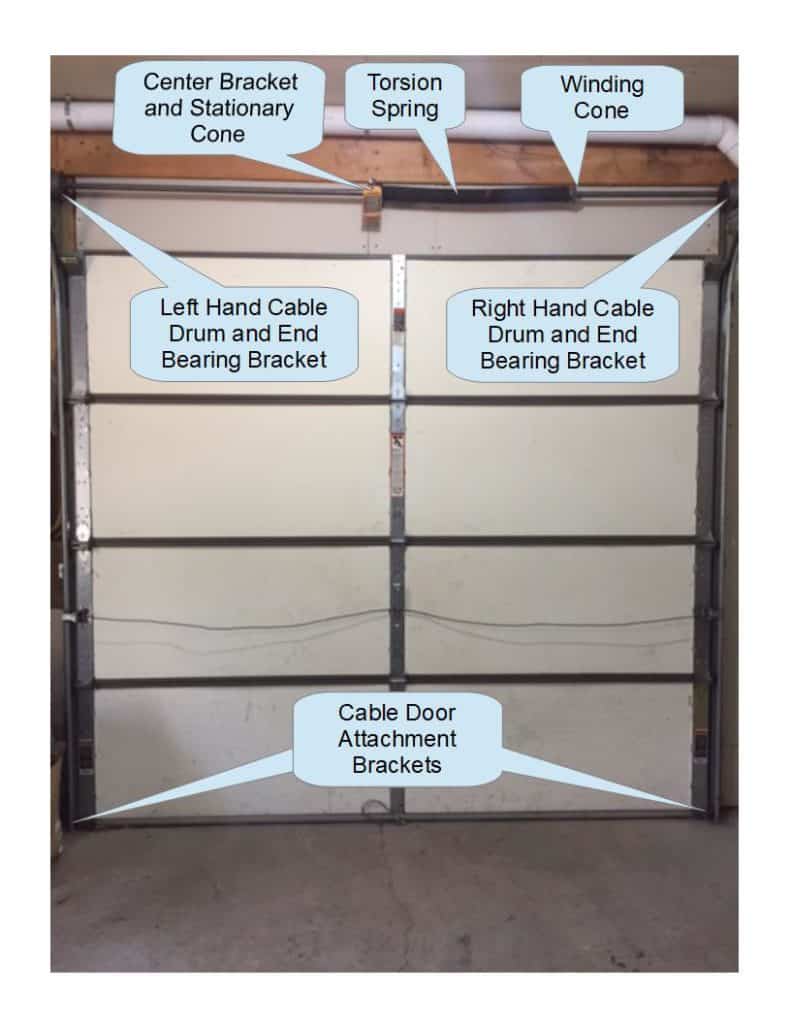
Tools Required To Make A Broken Garage Door Spring Repair
Most of the tools required to make this repair are covered in our “Basic Homeowner’s Toolkit” article. However, there are a few items not mention in that article. By adding the below tools to your toolbox you’ll be better prepared for your next project. Let’s see what you’ll need to install your new garage door spring.
How To Release The Tension On A Garage Door Torsion Spring
If you have a two spring system, then you’ll need to release the tension on the second spring before proceeding. With your PPE on and your LOTO in place, it’s time to begin.
Follow these steps to release the torsion spring tension on your garage door. Start with the door in the closed position and, if you have an electric door opener, make sure it is turned off (lock-out). This allows easy access to the garage door spring. Unfortunately, that puts the maximum tension in the spring, so take your time and work slowly.
Remember these springs have multiple turns and by releasing the tension ¼ turn at a time you will have to repeat these steps many times. Depending on the size and type of garage door you are looking at repeating the steps a minimum of 30 to 40 times. So, be patient!
Again, working with the torsion springs is the most challenging part of this job, but if you take your time it can easily be done. Make sure the winding bars are fully engaged, keep a firm grip on the bars, and slowly repeat the above steps. Trying to rush this part of the job adds the potential for bad things to happen. Be patient!
What Size Garage Door Spring Do I Need?
Another very important part of installing garage door springs is selecting a replacement spring. Spring selection can be done in a couple of different ways. You can either measure the broken spring and buy an exact replacement. Or you can select the correct spring based on the weight and size of the garage door. Below we walk you through both options.
When I had to replace our broken garage door spring, I ran into a unique situation that may have contributed to our problem. This required getting a different size replacement spring. I recommend taking the time to try both methods and see how they compare.
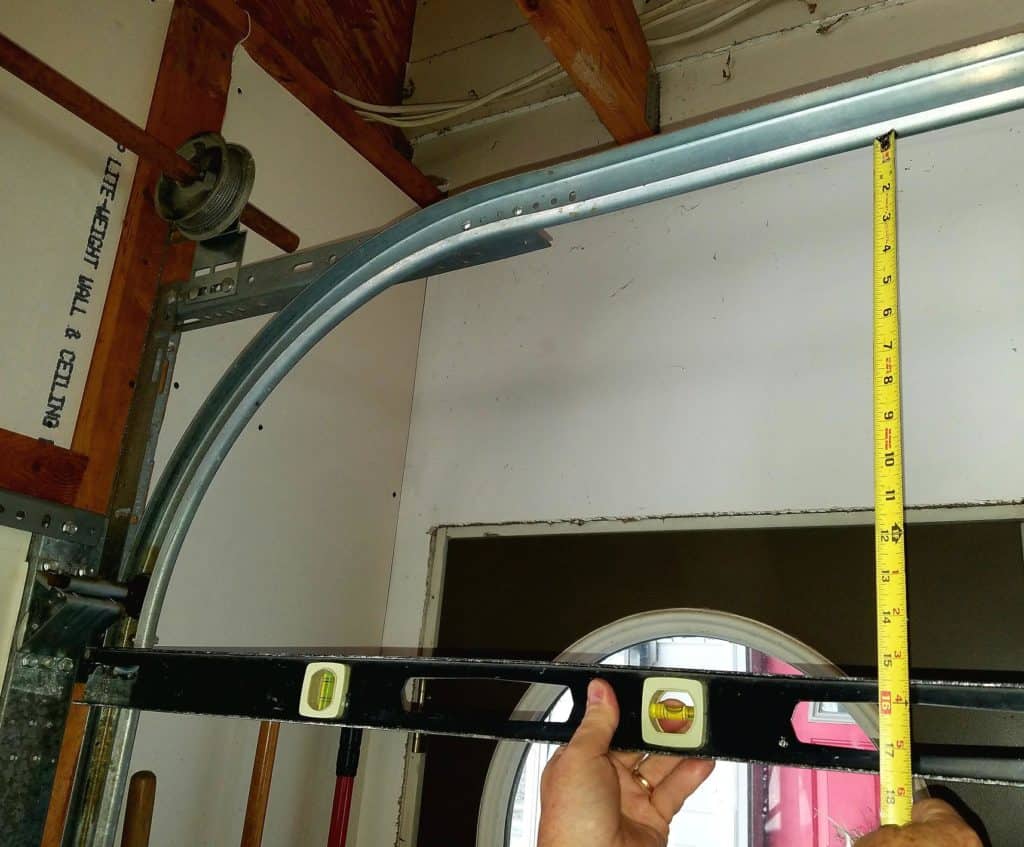
Garage Door Spring Sizing By Spring Measurements
The first method of selecting a replacement torsion spring is to take measurements of the existing spring and order the exact same spring. If you feel that your garage door spring truly died of old age then this is a fast easy way to replace it. Below are the measurements you’ll need to get off from your old spring. For example, I needed a spring that was approximately 28” long, 1 ¾” inside diameter, .218 wire size (as determined in the example below), and is LH wound. Using those measurements I was able to search for the exact spring I needed at Homedepot. It can be a good starting point for you to begin your search too.
Garage Door Spring Sizing By Door Size and Weight
The second method is to use the size and weight of the door to determine the spring size. This was another useful method I found at the DDM Garage Doors website. If you have reason to believe your spring may not be the right size, then take the time to check it with this method.
I have two garage doors exactly alike. The torsion springs on both doors were the same, but there was a difference in their installations. One door was installed with 12” radius bends in the track. On the one that broke 15” radius bends were installed. This was done to get the door track high enough to accommodate a “man door” into the garage. Not only has the spring broken on this door, but I’ve had to replace stripped gears in the garage door opener too.
In hindsight these two things made me wonder about the installation and balance of this door. And yes, it made me a firm believer in keeping up with my garage door maintenance too. I don’t know if the 15” radius played a significant role in the life of the spring, but this method of spring sizing takes that radius into account, so I used it. And it did specify a slightly longer spring than the 12” radius door.
Below is the information you’ll need to size your springs with this method.
Armed with the above information I’d recommend going to the DDM Garage Doors website. It has a great garage door spring database tool for finding the spring you need if you have doubts about your current spring. Click on the “Find By Door Weight” tab and enter the required information. Most garage door manufacturers can provide this information too on standard installations.
Ordering Parts
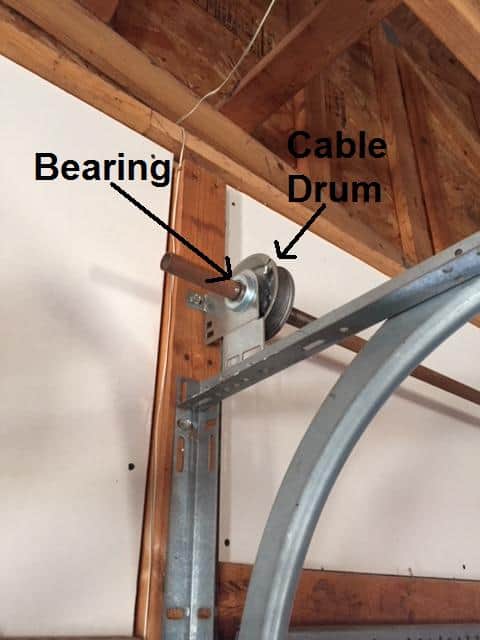
When ordering your new spring(s) I suggest purchasing them with the cones installed. It costs a few extra dollars, but it ensures everything is compatible and it will save you at least ½ hour (maybe more) of removing the old cones and re-installing them. Make sure your bearings are good and the drum and cables are in good shape. To replace any of these items later will require a total disassembly again. Now is the time to do it!! The bearings end brackets support the full weight of your door, so I replaced the two bearings when I did mine. For the cost, I thought it was a good investment. Oh yeah, if your single spring system failed and you don’t have a set of winding bars at this point, please consider ordering a set. They are the best way to ensure proper handling of the spring tension!
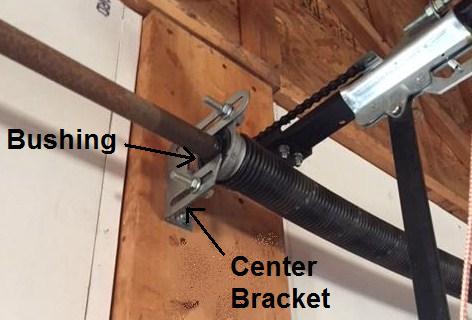
Steps To Remove And Install Garage Door Springs
With the spring(s) in the relaxed position, it is time to begin the disassembly. After giving the cables a quick inspection to make sure there is no fraying and they are in good shape, I like to put several wraps of electrical tape, or duct tape, over the cable. This keeps the cable on the drum and makes the re-assembly process a little easier.
Broken Garage Door Spring Removal
New Garage Door Spring Installation
Torsion Spring Tensioning
Note: I’ve seen ads for fishing rod holders and decorative panels that mount to garage doors. Keep in mind these types of things can add significant weight to your door. That impacts the door balance and could lead to premature failure of both the spring(s) and your automatic garage door opener.
Congratulations, your repair is complete! It is always a good idea to give the spring a light spray with a silicone-based lubricant. then m
Conclusion
Hopefully, you’ve seen just how easy it is to make a broken garage door spring repair yourself. It requires just a few simple hand tools and some patients. Working on your own garage doors gives you a better understanding of how it operates. It will better equip you to maintain them and keep them working smoothly for years.
For more tips on how to maintain your garage doors, click this link and read our article. There’s lots of good information on how to keep your garage door operating smoothly and trouble-free.
If you have any comments or questions, you can leave them in the comments section below or you can email us at [email protected]. FYI, we do not collect or share email addresses. We will only use them to reply to your comments or provide answers to your questions. We are also required to let you know that some of our links are “affiliate links”. This means if you click on a link and make a purchase, we could make a small commission, at no extra cost to you. This helps offset the cost of maintaining our website. So, if you like what you’ve seen, please be sure to give us a “Like” and “Share” on Facebook and Instagram too. Thank you for reading and good luck with all your home projects!
Glad it helped!
I really appreciate your help
Thank you!
Thanks for a marvelous posting! I really enjoyed reading it,
you’re a great author.I will ensure that I bookmark your blog and definitely will come
back very soon. I want to encourage yourself to continue your great work, have a nice morning!
Thanks for sharing this information. your blog is good and I got so much knowledge…
If you do not have the proper tools or are uncomfortable doing the work yourself, then hiring a professional is the way to go.
OMG! Thank you so much for your advice on just how important it is not to rely on screwdrivers to handle winding cones. My cousin has been experiencing some difficulties in controlling his garage door recently. I’ll ask him to look further into this option so that he would hire a professional immediately to fix the problem.
It’s a great point that the springs make the door look really light, but they are actually very healthy. My spouse and I are thinking about getting a new garage door this fall. We have noticed that our door is starting to make noises and show it’s age a bit more.
We’re glad it helped.
Thanks for the thorough explanation of everything. I was gonna call a garage door company because I couldn’t quite understand where to begin to start fixing this but this post broke everything down step by step.