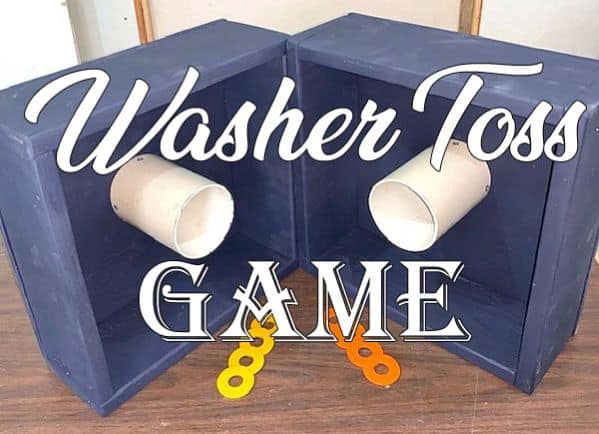
If you’re looking for a fun backyard game to play this summer, you need to try playing the “washer toss” game. This is a game that can be enjoyed by the entire family and you can take it with you anywhere. But before you rush out and spend $40 or $50 for a washer game at the store, here are some free DIY washer toss game plans to make a well-constructed game yourself.
If you’ve never played washers before, it’s played very similar to some of the old-time favorites like lawn darts and horseshoes, except you don’t have to throw heavy or dangerous items to play the game. Instead, you’re tossing some large washers and trying to land them into a wooden box. It’s very similar to cornhole, but actually a little easier to take with you to outings.
I must point out that the large washers being tossed in this game could pose a small safety risk to very small children! Nothing like horseshoes, but a risk all the same. When the washers hit the side of the box they do leave a definite mark, so care should be taken with small children running about.
If you have small children, a safer option might be a set of cornhole boards. It’s an extremely fun game to play and very popular for parties and tailgating. For a free set of cornhole board game plans, check out our article for the plans and how to put them together.
A Little About Washer Toss (Washer Pitching)
Table of Contents
If you go looking online to learn about the washer toss game, you are going to find several different game versions. Unlike cornhole, which seemed to have a little more of an organized presence, washer toss is more like the wild west of backyard games.
If you research cornhole you’ll actually find that it has a couple of organizations that govern their play. They have regulation board size requirements and very specific official rules regulating play and you can find tournaments all over the country.
When I started looking into washer pitching, I found a little different scenario. I did come across a couple of websites claiming to be an official washers game organization, but both were very different.
International Association of Washer Players
The game this organization represents is set up much like horseshoes. It has two pits at the end of the playing area with a 4-inch hole in each pit. The holes are spaced 25 feet apart and are installed flush with compacted earth around them and you try tossing 1” washers (2.5” OD) into the holes. If you had an area in your backyard you wanted to dedicate to the game it could be a great addition.
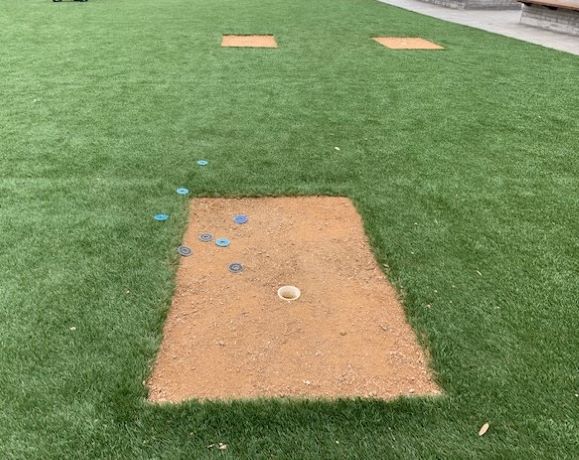
I actually think this version of the game could be installed flush with the ground and you could mow right over it when cutting your grass. It could make for a ready to go, low maintenance game. For more specific details visit their website.
American Washers Association of America
The second organization represents a portable 3-holed version of the game. This version consists of a portable box at each end of the playing area with three holes in each. The boards are only spaced 10 feet apart and you try tossing 1” washers into the holes. It certainly looks to be a fun alternative you could add to your backyard game collection. Visit their website for the rules and playing instructions.
DIY Washer Toss Game
Once you get beyond these two organizations the versions of the game open up quite a bit. For the pit type games, the size of the pits and the diameter of the holes frequently vary. I’ve also found versions of the three-holed boards that have different dimensions and some with carpeting on the tops. Some costing in excess of $100!
A very common form of the game consists of a square-sided box, with a cup in the center of it. These games can vary in size as well. I’ve seen boxes anywhere from 12 inches to 20 inches square and the side heights vary from 4 inches to 6 inches. The diameter of the hole (cup) inside the box can vary from 3 to 4 inches as well. Some of the boxes have carpet or sand in the bottom of the box to help reduce the chance of the washers bouncing out.
But that’s okay! These games were intended to be played for fun, so there are no hard and fast set rules or designs. That means you can turn any spare or scrap material in your workshop or garage into one of these games at very little to no cost at all! You could even use a couple of empty 32-ounce tin cans for the center hole.
Free Washer Toss Game Plans
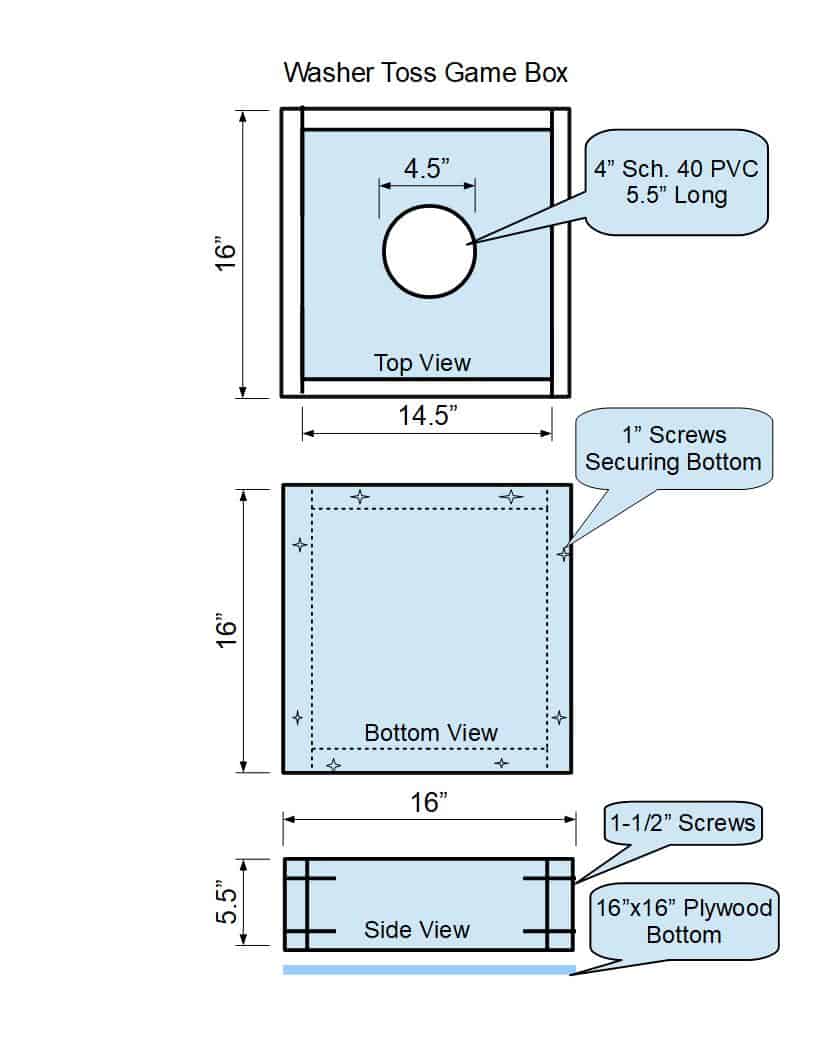
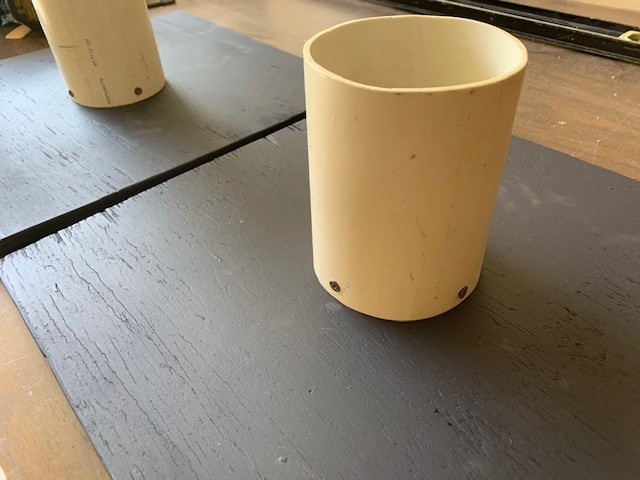
Our washer toss game plans are based on a game that was given to us by our friends and neighbors a few years ago (thanks again Tom and Penny!). It’s a simple design and is easy to put together. It is 16” square with 5.5” tall sides. The cup in the center is a 5.5” tall piece of 4” PVC.
We chose to stick with the 1” X 6” sides, instead of 2” x 4” sides, because the washers do bounce out from time to time. You can still add carpet to the bottom to help, but we haven’t done this with our games.
For a free set of washer toss game plans, click this link. It’s a complete set of instructions, along with rules on how to play the game. Share them with your friends.
Tools Needed To Make A Washer Toss Game
To put one of these washer pitching games together only requires a few basic carpentry tools. You’ll find most of them in our basic carpentry tools for homeowner’s article. In an hour or two, you can turn some scrap wood lying around the shop into a fun game for the entire family.
By adding one or two of these tools each time you work on a project is a great way to spread the cost out over time. It also helps prepare you for future projects too. Let’s see what you’ll need to get started.
I have included some links in the tool list below for informational and product pricing purposes. Most of the tools listed are well-known brands, they are reasonably priced, and should provide the average homeowner years of service.
I am required to let you know that some of our links are “affiliate product links”. This means if you click on a link and make a purchase, we could make a small commission, at no extra cost to you. This helps offset the cost of maintaining our website.
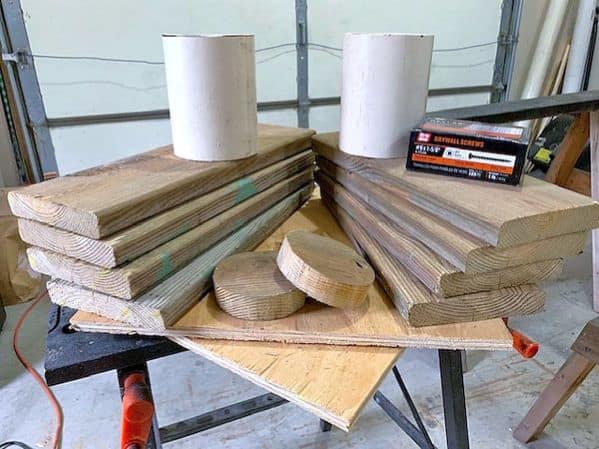
Washer Toss Game Plans Material List
Below is the material list for one game set. Keep in mind a lot of this material may be items you already have tucked away in the corner of your workshop.
Washer Toss Game Building Instructions
Now that you have your tools and materials gathered it’s time to get started building your game. They are easy to make and it should take you under a couple of hours to put together.
Cutting The Boards And PVC
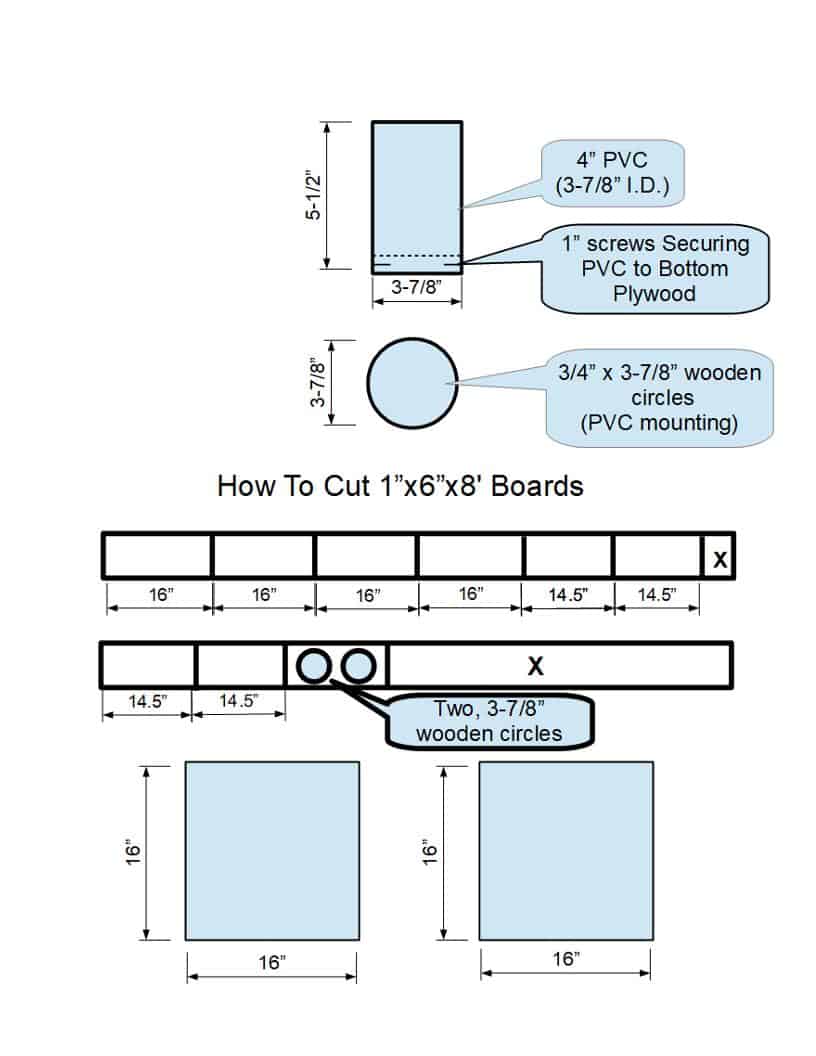
To get started you’ll need to cut the plywood bottoms and the side boards. This can be done with a circular saw or table saw. The below diagram shows how to cut the side boards to help cut down on waste.
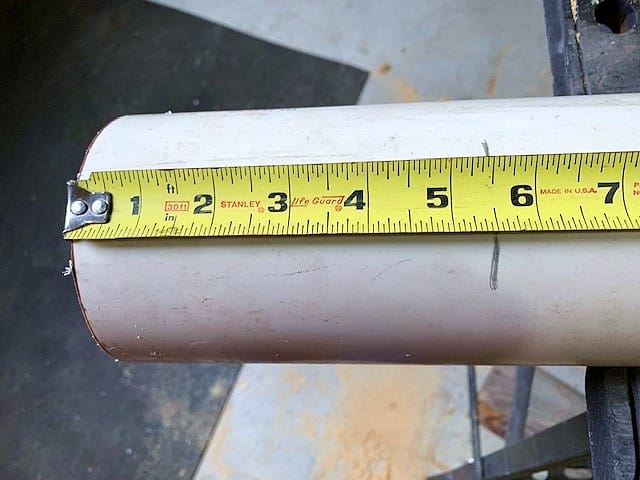
To cut the PVC you have a couple of options. The easiest would be with a bandsaw. That would give you a nice straight cut, but if you’re like me, there’s a good chance you don’t have one. You can cut them by hand, but it’s difficult to cut it square. It’s best to mark a line around the circumference of the PVC to help keep the cut fairly straight.
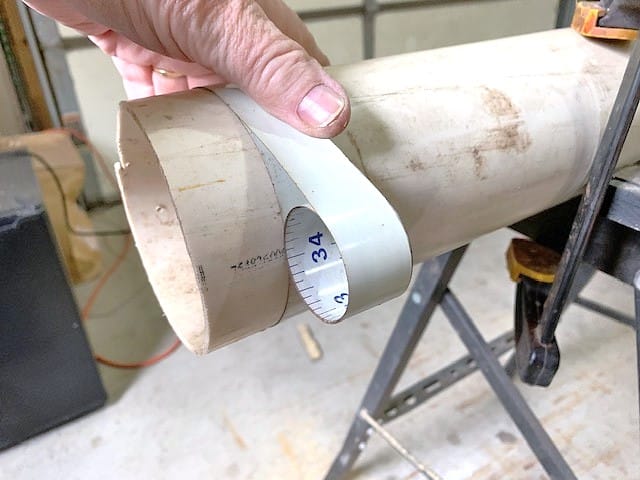
I like using a “flexible wrap around tape measure (pipe marker)” to mark a straight line on round material. Wrapping the tape measure around the material and aligning the overlapping edges of the tape measure will create a straight line parallel to the end of the PVC. Slide the tape measure to 5.5” from the end of the PVC and make a mark around the full circumference. That will give you a good mark to follow when cutting by hand.

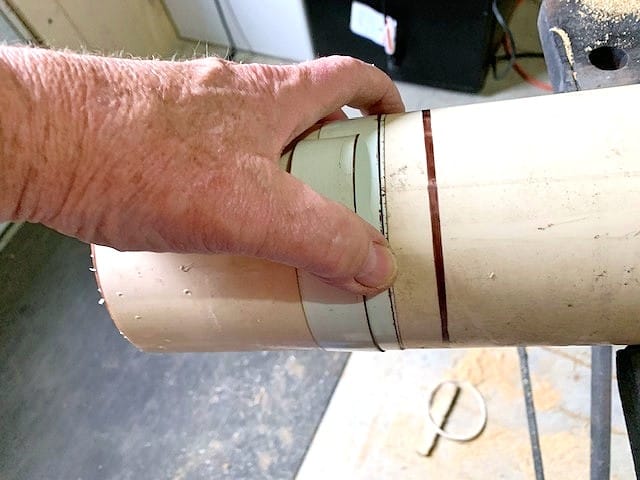
Starter Cut In PVC 
Jigsaw Blade Inserted Into Starter Cut
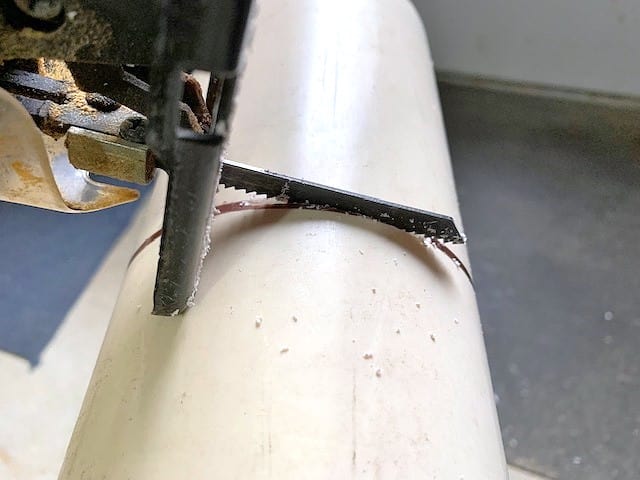
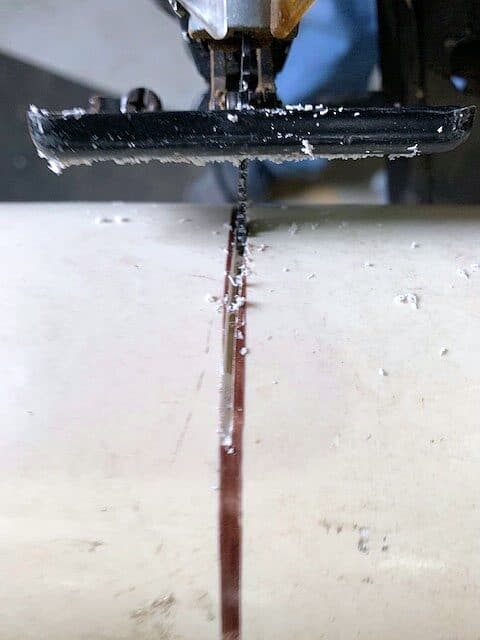
I like using a jigsaw to make this cut. If you hold the saw at an angle and slowly and carefully tilt the blade down, you can actually cut through the wall of the PVC pipe, before the end of the jigsaw blade starts hitting. As soon as the blade breaks through the PVC wall, stop the saw and insert the blade in the opening, Then begin cutting normally following your line, while rotating the pipe. This will give you a fairly straight cut.
No matter how you cut it, the edges of cut PVC can be sharp! You’ll want to wear a pair of gloves and carefully smooth all the edges of the PVC with sandpaper.
Marking Wooden Circle 
Cutting Wooden Circle With A Jigsaw
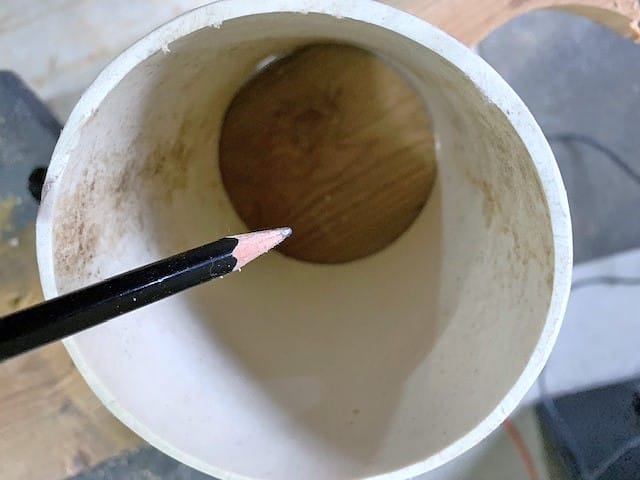
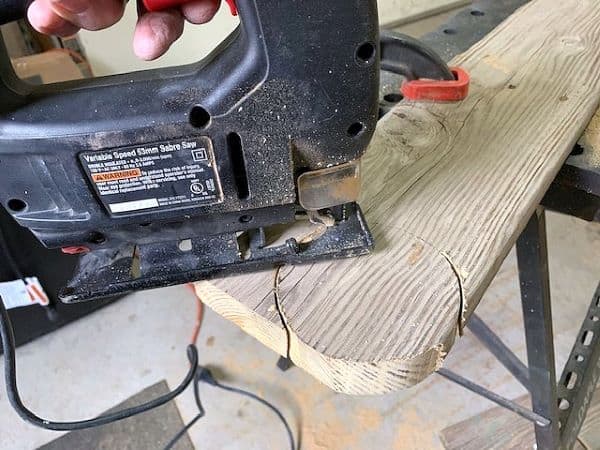
To cut the wood circles, set one of the PVC pieces on the 1” x 6” board and trace the inside diameter of the PVC. This gives you a nice mark to cut the circle using a jigsaw.
Assembling The Washer Game
With all the material cut you can give all the rough edges a quick sanding and begin assembly. If you plan on painting your game set, I recommend painting the wood pieces before assembly. I like leaving the PVC unpainted, so it’s a little easier to do before assembling the boxes. You may end up having to do a little touch up around the screws, but painting them helps seal the wood in case it gets left out in the rain.
Side Boards
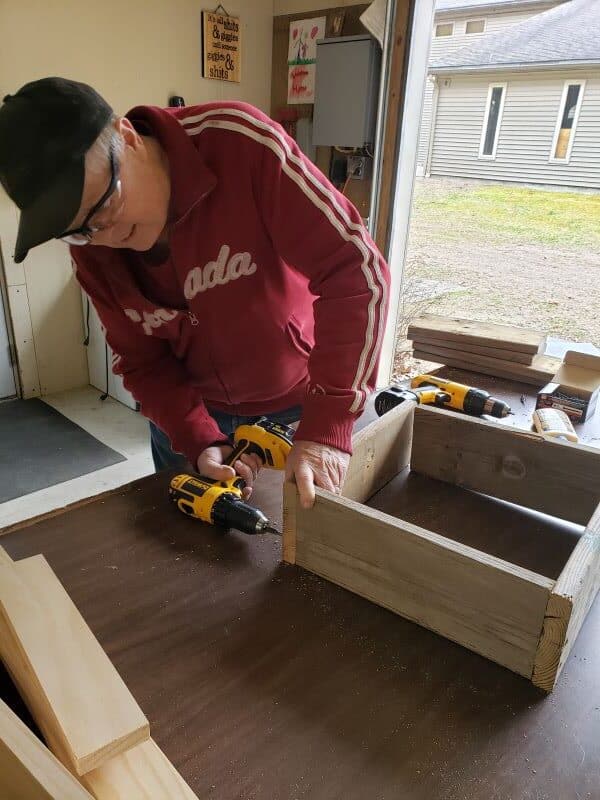
Start by screwing the side boards together to create the 16” x 16” box. I would recommend drilling clearance and pilot holes and countersinking the screw heads for a nice finish. If you need more information on these items, check out our article on drilling holes for more information. This is important to help prevent splitting the boards.
Attach Wooden Circles And PVC
Next, you’ll want to attach the wooden circles to the center of the 16”x16” bottom plywood boards. Start by setting one of the circles on your work surface and then place one of the 16”x16” bottoms on top of it. Slide a tape measure under the edge of the board until it touches the wooden circle. You will do this on all four sides and adjust the placement of the 16” square board until it is even on all for sides. On these plans that should be approximately 6 inches ((16”- 4”)/2).
Using 3/4” screws, screw down through the 16” board to secure the wooden circle. Again, I usually use clearance and pilot holes to make sure you get a good tight attachment and I recommend countersinking the screw heads.
Once the wooden circles are attached to the base, now you can install the PVC onto the circles. I recommend using four screws to secure the PVC to the circles. You will want to pre-drill the holes for the screws in the PVC before putting it onto the circle. Then place them onto the wooden circles and install the screws with a long screwdriver. That completes the base section.
Completing Washer Toss Box
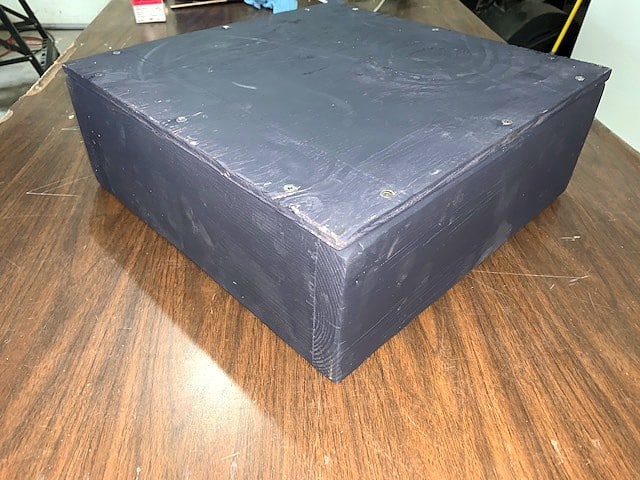
With the base completed, it’s time to attach it to the box section. Simply flip the box section upside down and set the base section on it with the PVC down inside the box. Attach the base to the sides using 3/4” screws. Again I recommend drilling pilot holes to prevent cracking and splitting. That completes the assembly of the washer toss game boxes.
Preparing The Washers
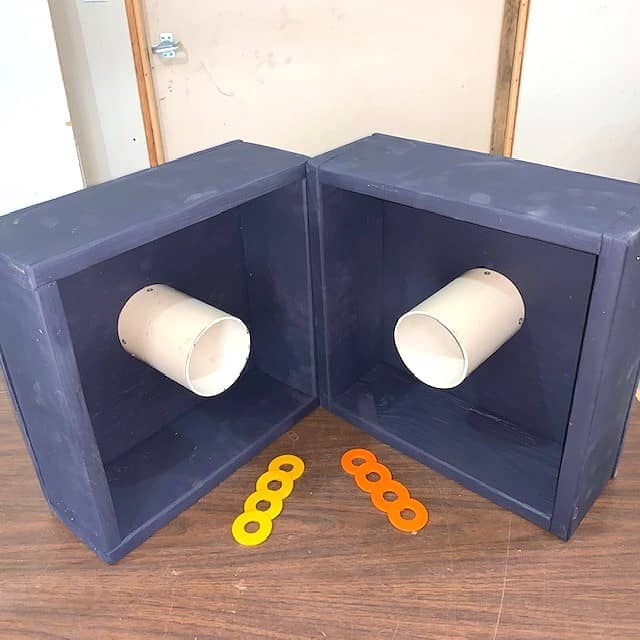
The only thing left to do is to get the washers ready to go. As shown above we use four washers for each team, for a total of eight washers. You have to be able to easily distinguish the washers from one another.
One of the best ways to do this is to paint them. You’ll want to use two different, brightly colored paints for this, so they can be easily found in the surrounding grass or dirt where the game is played.
You’ll want to roughen them up with a little sandpaper and then prime and paint them. Don’t be surprised if you have to repaint them occasionally. The washers take a beating hitting themselves, the box, and the surrounding area.
Another option I’ve seen is to stamp markings into the washers. If you have access to letter/number stamps for metal, you can mark them instead, or along with colors. For example, marking both sides of four washers with several “X”s and the other four with “O”s you can easily identify them as well. The best part is these marks will last much longer than the paint. If you play frequently, this could be a little easier. Either way that’s all you need to get started.
How To Play Washer Toss
We’ve talked about how there are several different versions of the game itself, so I am certain there are several different ways the game is played and scored. With that said, I will share the house rules that we, along with our family and friends, have settled on for play. The key here is to settle on your rules and scoring before starting.
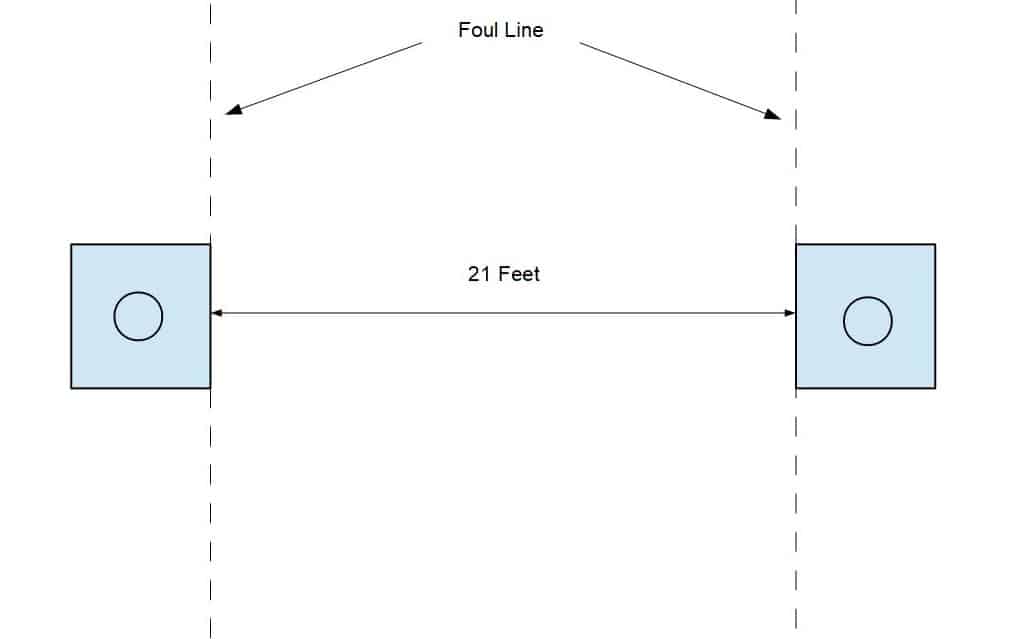
We place the boxes approximately 21 feet apart (7 paces). Each team has a player at each end of the play area.
To determine which team starts each team has one player toss a washer and the team with the closest washer to the box goes first. If you want to flip a coin or play Rock, Paper, Scissor, you can do that too if you like.
Once you have determined who goes first, the players at one end alternate throwing washers, one at a time until they’ve thrown all your washers. You must throw from behind the “foul line”.
Only one team scores per end (scoring is covered below). We feel there is an advantage of being able to see what you have to beat, so we play that the team scoring points throws last on the next throw.
How To Score Washer Toss
When it comes to scoring in washers, there are as many variations to scoring as there is to how the game is played and the boards themselves. The “house rules” we use are basically how we learned to play the game and how we play with our friends and family. The beauty of it is you can determine your own house rules and play the game how you like. I will mention a couple of other popular playing options below that you may want to incorporate into your scoring and rules.
In our version of the game, we can score either 1 point, 2 points, or 3 points. If you land a washer within 6” of the box, on the outside, you score 1 point. Get a washer inside the box, but not in the center PVC cup, you receive 2 points. If your washer lands in the PVC cup you score 3 points. This scoring is a little different than how some play. Some award 1 point for landing inside the box and 3 points for landing inside the PVC. Either way is fine, just get it established before play begins.
Games like washer toss and cornhole have a “cancellation” scoring method. Simply put, only one team score points per end. Using the point-scoring above, if the first team scores 4 points and the second team scores 6 points, then team two scores a total of 2 points for that end. The points from each end add up until one team reaches the winning score.
We play to a winning score of 21 points. However, we add a twist that not all folks do. We play that you have to hit 21 exactly! This makes the game a little trickier. That’s why we play with the three-point system mentioned above. It offers a little more flexibility when trying to hit that elusive 21.
If you go over 21, your team “busts”, your score goes back to 15, and you continue playing from there. This normally makes each game last a little longer and makes for good close matches.
If you have multiple teams playing and want to keep games a little shorter, you have a couple of options. You can eliminate the “bust” rule, so the first team to reach or exceed 21 wins. You can also play to a lower score. It’s not uncommon to play games that go to 11, 15, or 17 total points. You can make these kinds of adjustments to fit your needs.
Conclusion
That’s all there is to it. Now you’re armed with the everything you need to get started. So, if you’re looking for a fun backyard game this summer, this DIY washer toss game will definitely fit the bill.
It’s easy to make, often with leftover materials lying around your workshop, and fun to play. Yet it’s still a tough enough of a game for even the most competitive person. Use our free plans to make yourself a set or they make a great gift for others too. So get outside and enjoy a summer full of washer toss.
If you have any comments or questions, you can leave them in the comments section below or you can email us at [email protected]. FYI, we do not collect or share email addresses. We will only use them to reply to your comments or provide answers to your questions. We are also required to let you know that some of our links are “affiliate links”. This means if you click on a link and make a purchase, we could make a small commission, at no extra cost to you. This helps offset the cost of maintaining our website. So, if you like what you’ve seen, please be sure to give us a “Like” and “Share” on Facebook and Instagram too. Thank you for reading and good luck with all your home projects!
Glad to help! Enjoy!
Thank you 🙂 I am a DIY guy have have been looking for simple instructions on how to make a washer toss game, you need an engineering degree for most of the instructions on line but yours was perfect, thanks you very very much.
Bernie Matthews
Dartmouth, Nova Scotia, Canada
You’re welcome!
Thanks for the washer game that you made for us. We will enjoy it all summer long.