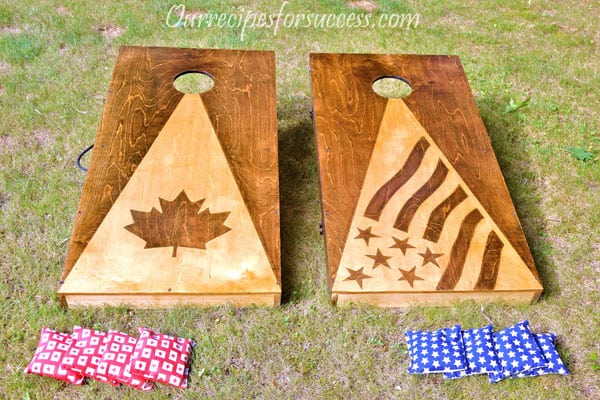
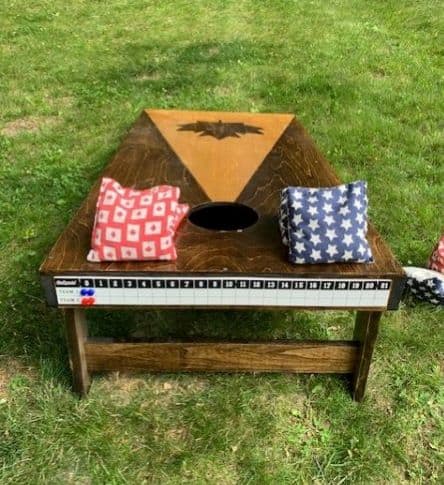
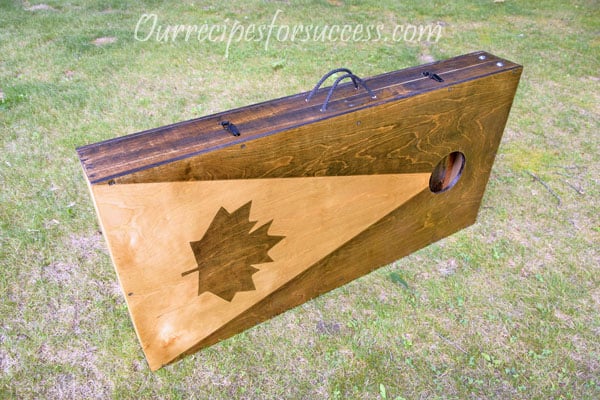
For anyone who is not familiar with the game of cornhole, welcome to planet Earth! Seriously, the cornhole game, sometimes referred to as the bag toss game, has become a very popular backyard and “tailgating” game. It has been gaining popularity in the U.S. since the early 1980s. This popularity has caused the price of cornhole boards to climb. Learn how to save money by making a set with our free DIY cornhole game plans.
Cornhole is a backyard game that can be enjoyed by all ages. It’s played similarly to horseshoes or the old game of “lawn darts”. However, instead of throwing heavy or dangerous objects at your target, you throw bags of corn (often bean bags) at a slanted board with a hole in it for a target. This makes the game perfect for young children too.
That, of course, is a very basic description of the game. The history of the game goes back hundreds of years. There are varying accounts of where the first was created and how it was played.
With that said, today’s game is popular enough there is actually a couple of organization/associations that regulate the playing of the game for the serious at heart. They hold sanctioned tournaments around the country and I’ve actually seen a couple of tournaments on TV. But, for many of us, this is just a great backyard game to enjoy with family and friends.
This article contains some links to products for information and pricing purposes. I am required to let you know that some of our links are “affiliate product links”. This means if you click on a link and make a purchase, we could make a small commission, at no extra cost to you. This helps offset the cost of maintaining our website.
Why Should I Build My Own Cornhole Game Boards
Table of Contents
Many of the Cornhole boards you can buy will cost you close to $100 and are made of cheaper laminated materials. You’ll be lucky if they last you a summer or two of use. If you buy a well built, regulation set of cornhole boards, you could spend as much as $200 – $400! Here is an example of such a cornhole board from Etsy.
Our cornhole board plans are a well built, solid design, that meets the dimensions required of both the American Cornhole Association (ACA) and the American Cornhole Organization (ACO). And did I mention, they are a lot less expensive to make.
The reality is that building your own cornhole boards is not that difficult. I estimate the cost of building one set of unfinished (no paint or sealer) cornhole boards would be in the neighborhood of $50. It only requires a few power hand tools and some basic carpentry skills to complete the project. Our article on “Basic Carpentry Tools for Homeowners” will cover most of the tools needed for the project. If you follow the instructions below, you shouldn’t have any trouble building a set of cornhole boards for yourself. They make great gifts too.
Cornhole Board Requirements
As mentioned above, our cornhole boards meet the dimensional requirements of both the ACA and the ACO. If you visit the rules pages of each organization linked to above, one of the first items they address is the board requirements.
Below are the regulation boards specifications for both groups, with the exception of item #2. The ACO requires a “cross-member” on their boards with ½” plywood tops, but the ACA does not make any reference to the cross member. Our design uses the cross member, which should satisfy the requirements of both the ACA and ACO.
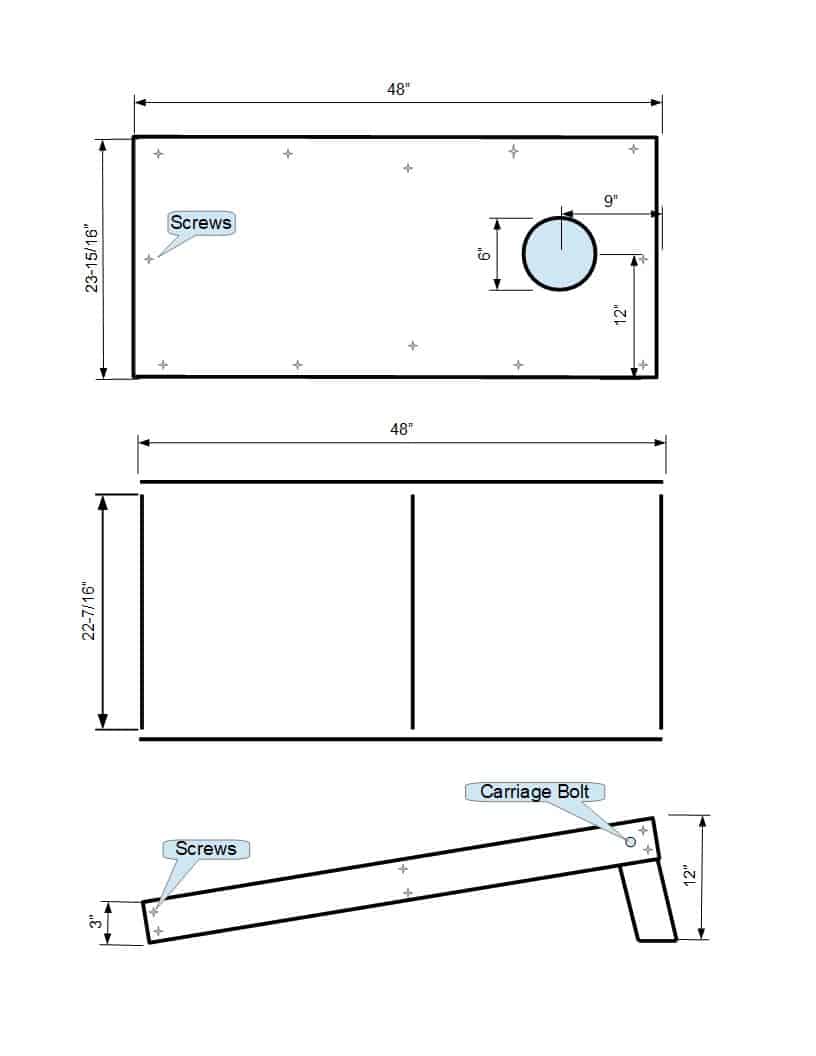
1. Hardwood plywood playing surface measuring 47.5” to 48” x 23.5” to 24”.
2. The playing surface has a minimum thickness of 1/2” with cross-section backing, or 3/4” with or without cross-section backing.
3. Each hole is 6” diameter, centered 9” from the top of the board and centered from each side edge.
5. The front of the board is 3” to 4” from the ground to the top of the playing surface.
6. The back of the board is 12” from the ground to the top of the playing surface.
7. The playing surface should be finished – sanded to a very smooth texture. There should be little to no blemishes in the wood surface that may disrupt or distort play.
8. The playing surface can be painted with a high gloss latex paint or varnish. The surface should allow bags to slide when thrown, but not be so slippery that the bags slide back down the platform.
Remember, these are the “official” regulation board requirements. If you are building a cornhole game to be used at your home for backyard barbeques, you can make slight adjustments as needed. For example, if you had a sheet of ⅜” plywood left over from a project, I believe it would work just fine for the top. I would definitely recommend using the cross member in that case. But, because of the overall construction of our board design, I don’t think it would affect the performance of the boards at all.
Free Cornhole Board Plans
Below are the plans for our cornhole boards. We’ve built a couple of sets now and are very happy with how they’ve turned out. We’re including a free link to a PDF version of the plans, complete with step by step instructions, with absolutely no obligation! So download them and share them with your family and friends.
Materials Needed To Make A Cornhole Game
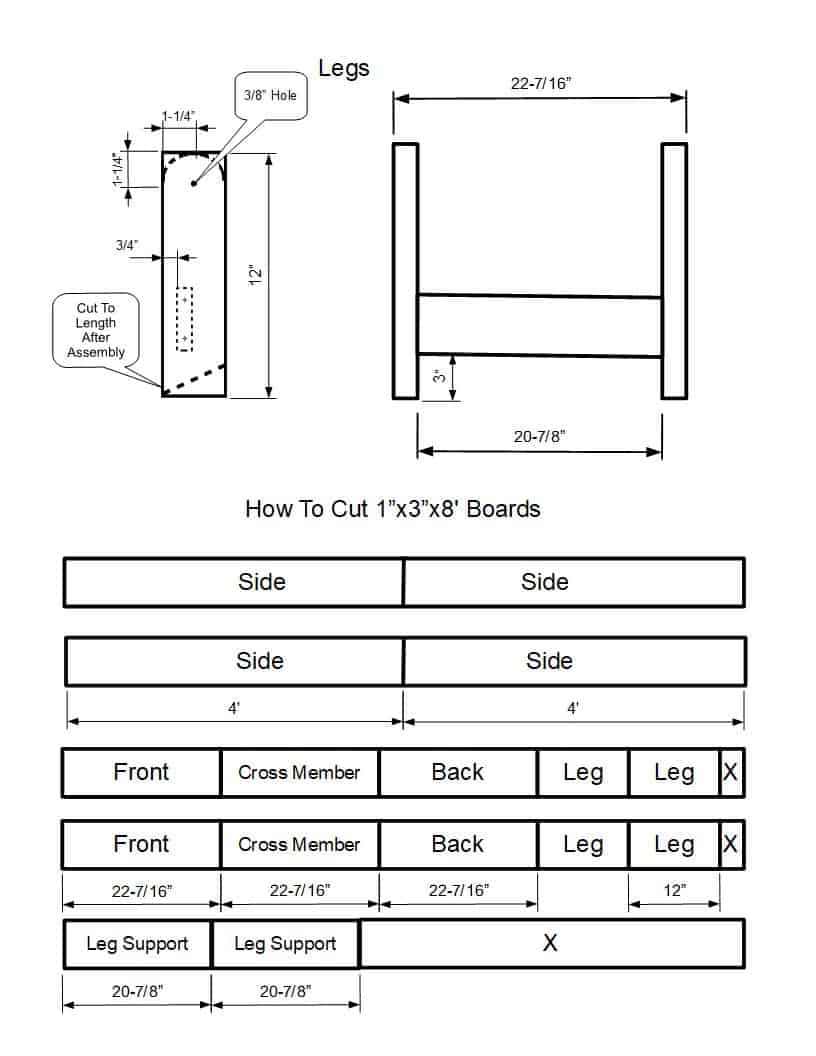
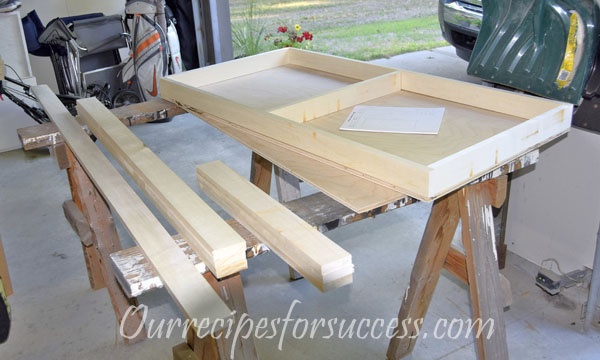
Many plans call for using 2×4 lumber to build their boards, but we chose to use 1×3 inch lumber to construct our board’s frame and legs. This was done in an effort to help keep the overall weight of the boards down. The finished project is still very sturdy and doesn’t affect the playing of the game. Let’s take a look at what you’ll need for this project.
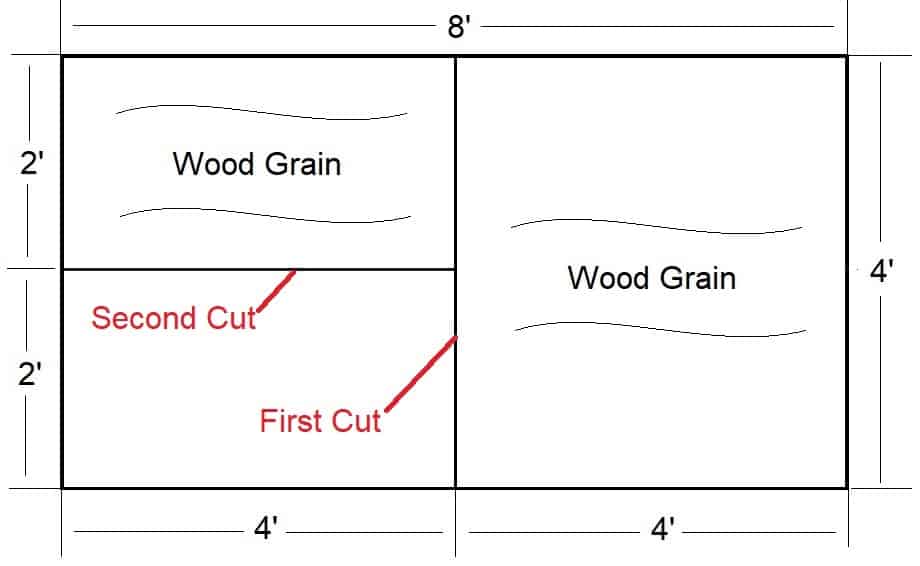
Plywood – 1 sheet of plywood, smooth finish on one side. You only need half of this (4’x4’) for one cornhole set.
1×3 boards – 5, 8-foot boards
Wood screws – 1-1/4” for the top and 1-5/8” for the frame. Drywall screws or similar stainless steel wood screws work well for putting the boards together. Use whatever works best with your color scheme.
Bolts – Carriage bolts, washers, and nylon lock nuts – ⅜”x2-½” bolts work well. The nylon lock nuts are perfect for this application. They can be adjusted to hold the legs snuggly, yet allow them to be folded up easily.
Wood Glue – Optional, but highly recommended. Helps hold all components together tightly for years of trouble-free use.
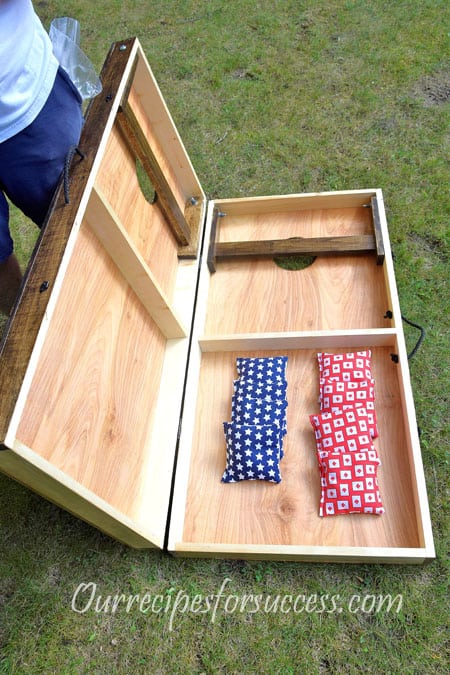
Hardware – Hinges (separable), latches, and handles. This hardware allows you to fold the two boards together for convenient carrying and bag storage. They are optional.
Tools Needed To Make A Cornhole Game
When taking on any project where power tools are used safety glasses and hearing protection should always be worn. For more information on home project safety, please consider reading our article on personal protective equipment.
By adding a few of these tools each time you work on a project is a good way to spread the cost out over time. It also helps prepare you for future projects too. Let’s see what you’ll need to get started.
I have included some links in the tool list below for informational and product pricing purposes. The tools selected are well-known brands, that are reasonably priced, and should provide the average homeowner years of trouble-free service. Let’s take a look at some of the tools you’ll need.
We used a table saw to cut our plywood and many of the 1×3 boards, but you will notice that all my drilling and board trimming was done using cordless power tools. If you’re a DIY’er, I highly recommend investing in cordless power tools.
For ideas on what to look for when choosing cordless tools, I encourage you to read our article on Dewalt power tools. Although I showcase Dewalt tools this article is about what to look for when purchasing any cordless power tool.
Step by Step Instructions
Because most table or circular saw blades are about ⅛” wide, the exact dimension of your plywood will be approximately 1/16th of an inch under 2’. However, with the large tolerances mentioned above, this is fine. You just need to make sure to make those minor adjustments when cutting the 1×3 boards. We did our best to reflect this in our plans, but because not all cuts are exact it doesn’t hurt to take a quick measurement before cutting.
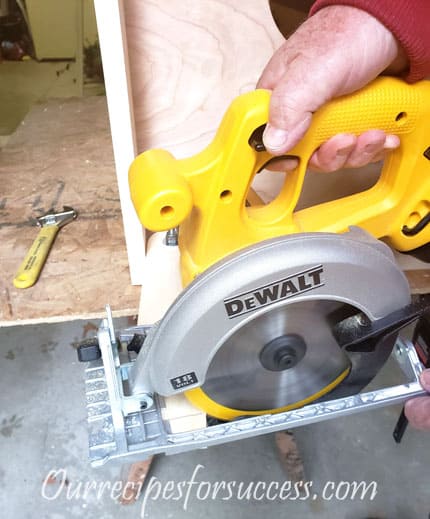
Cutting The Plywood
You only need half a sheet (4’x4’) for one cornhole game set. You can purchase 4’x4’ sheets from most of the home supply stores. However, if you have a use for the other half sheet of plywood (a second cornhole game maybe?), it’s normally more cost-effective to buy a full sheet.
Cutting a sheet of plywood down for a project like this can be a bit tricky. To simplify this, I highly recommend reading our article on “Cutting Plywood With A Circular Saw“. We have a couple of tips that will have you making straight, accurate cuts in no time. You’ll never struggle cutting plywood again!
Mark and cut the 4’x4’ plywood into two equal pieces measuring roughly 2’x4’. We recommend cutting the plywood with the grain, as shown in the diagram (second cut), especially if you’re going to stain the wood. We feel the finished product just looks better.
Cutting The 1×3 Boards
We recommend getting the exact measurements of the 2’x4’ plywood top and adjust the 1”x3” measurements accordingly. In general, these are the measurements you should have following our plans.
The side boards should be 47-15/16” (±1/16”).
The front, back, and cross member boards should be 21-7/16” (±1/16”).
Cut the leg boards to 12”. Later in the project, they will be trimmed to the exact length.
Cut the leg cross members to 19-15/16” (±1/16”).
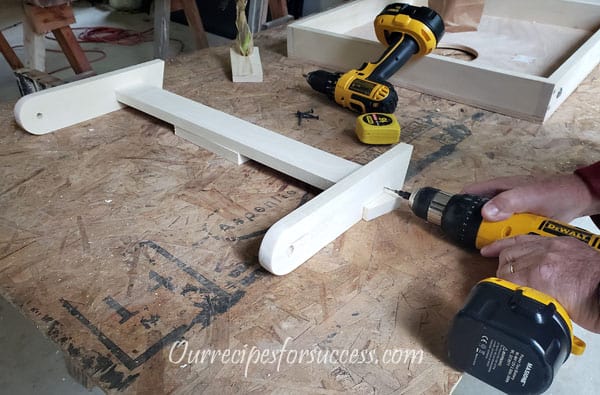
Layout The 1×3
On a flat, level surface dry fit all the 1×3 boards together. Make sure the cross member board fits snugly between the side boards. We like to do this to make sure the overall dimensions of the frame are the same as the plywood top. This helps ensure all the pieces fit together nicely. If not, now is the time to make those minor adjustments before you begin the assembly.
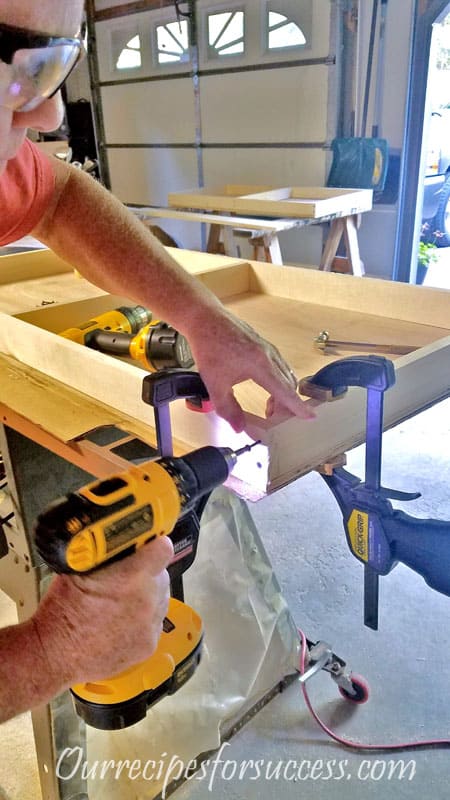
Drill Relief, Pilot, and Countersink Holes
This is important when using thinner material on any project. Pre-drilling these holes helps prevent cracking and splitting the boards, yet makes for tight secure joints. For more information on pilot and clearance holes, check out our article on drill holes safely. It has some good “how-to” information and reference material.
Pilot holes are drilled in the board that the screw will anchor into and should be smaller than the screw diameter.
Clearance holes are drilled through the board that the screw passes through and is about the same size as the outside diameter of the screw threads. This allows the board to be pulled tightly against the board it’s being anchored to.
The countersink ensures the screw heads are flush with the finished surface. This is very important for the screws holding the top in place.
The relief holes, with a countersink, will be drilled in the 4’ side pieces. Two holes at each end of the boards at ⅜” in from the ends and two holes in the middle boards at 2’. This will put the screws in the center of the front, back, and cross member boards when assembled. See the board diagram for more detail.
For the pilot holes, start with one of the side boards and the front board. Hold the ends of the two boards together and drill the pilot holes using the relief holes as a guide. This ensures the holes are aligned perfectly. Repeat this with cross members, the back boards, and the other side boards.
Assembling Your Cornhole Board
At this point, it’s time to add a little glue to the joints and screw the 1”x3” boards together. Tighten the screws until the screw heads are slightly recessed into the countersink. Continue securing all the boards in the same fashion.
With the 1”x3” frame assembled it’s time to attach the plywood top. Apply a small bead of glue to the top of all the frame boards, including the cross member. Carefully set the plywood top onto the frame. Adjust until all edges are evenly spaced. Nows a good time to verify that the frame and top are square, using the carpenters square. You can tweak the frame a little while the glue is still wet, then screw the top to the frame.
Along with the glue, we used a total of 12 screws to secure the top. Five screws on each side and one screw centered on the front and back boards. The middle screws on the side boards were set in 2”, so they are anchored into the cross member board. This just helps tie all the pieces together for a stronger overall design.

Applying Glue Attaching Top

Cutting The “Target” Hole
With the board assembled, it’s time to cut the target hole. The target is a 6” hole that is centered in the cornhole board, 9” in from the back of the board. The diagram shows the location and dimensions.
This hole can be cut in a couple of different ways. The first way is to use a jigsaw. Once the center location of the hole is marked you’ll need to mark the line to cut using a drafting compass. Then drill a pilot hole inside the piece that is being cut out to insert the jigsaw blade. Cut the 6” hole following the line. After cutting the hole you will want to sand the inside of the hole making it as round as possible.
We chose to use a 6” arbor-type hole saw to cut our target. This gives you a very clean, round hole, and the process is much simpler. Just find the center mark for the hole, as described above, and drill the hole. To get a clean hole on both sides, there is an extra step you need to take.
Start by drilling approximately halfway through the plywood. Make sure the center drill went all the way through the plywood. Then flip the board over, place the center drill in the hole just made, and finish drilling the hole. Just a little light sanding and you’re done. If you are planning on making more than one board, I would consider investing in a hole saw. Watch the short video below on how to drill a nice clean hole.
Note: Hole saws can grab the material you are cutting in. When cutting wood keep the drill speed down, hang on to the drill tightly, and be prepared to release the drill trigger. In the video below, the grabbing toward the end was the worse I encountered throughout the project. I don’t believe I was holding the drill high enough. I chose to show you this as a worst-case scenario. Hole saws are a great tool, just be prepared when using them.
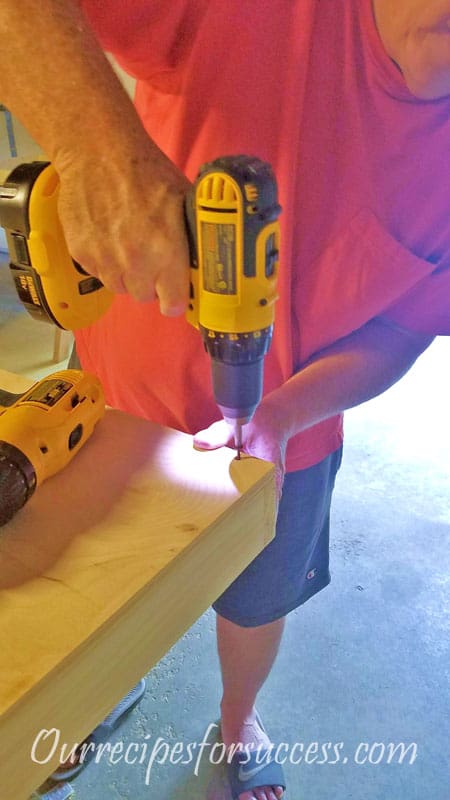
Preparing The Legs
Start by marking the location ⅜” hole that will be used to attach the leg to the assembled cornhole board. Put a pencil mark on the leg board centered on the board (1-¼”) and a 1-¼” in from the end of the board. Before drilling the hole use a drafting compass to mark the radius on the end of the leg boards that will need to be cut. You could also use a soup can or some other round object that is approximately 2-½” in diameter to trace the radius on the end of the board too. The accompanying diagram has more location and radius detail. With the radius marked go ahead and drill the ⅜” hole in the leg boards.
The legs get attached to the underside end of the cornhole board with the 6” target. Place the end of the leg board, with the hole in it, against the side board and snuggly in the corner against the back board. Mark the location of the hole on the side board with a pencil. Repeat this on the other side.
Next, drill a ⅜” hole in the side board on the pencil mark you just made. Using a jigsaw round off the end of the leg boards by cutting on the radius marks made above. Sand the rounded off ends smooth. Temporarily attach the legs to the cornhole board. Make sure each leg moves freely. You may need to remove them and sand the ends a few times to make sure they move smoothly.
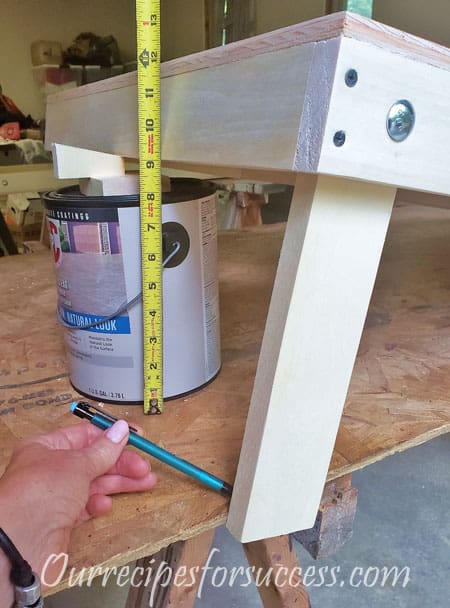
Cut The Legs To Length
The best way we found to cut the legs to length is with the legs attached. This method allows you to get the exact 12” height for the back of the cornhole board. It works best with a
Set the cornhole board on the sawhorses. Position the board so one of the legs hangs down over the edge of the plywood on the saw and leave the second leg folded up. Block the back end of the cornhole board up to get exactly 12” to the top of the board. Now mark a line on the leg where it meets the top edge of the plywood. Reposition the cornhole board and do the same to the other leg. Cut both legs on the lines you drew. After being reassembled, when the board is set on a flat, solid surface the back of your board will be exactly 12” high.
Attaching The Leg Cross Member Support
We chose to add a cross member to our legs for added strength and stability. In the diagram, you can see that the 1×3 is oriented vertically. This gives it more “side to side” movement strength. Why you might ask? Well… eventually little Sean or Kendra (our children’s names) will climb on top of the game while playing. Although not recommended, these boards will take some abuse.
The exact location of the support is not critical. I would keep it closer to the ground and somewhere in the middle for strength purposes. Our plans call for it placed 3” from the ground and set in ¾”. The most important part will be to drill the clearance holes in the legs at the exact same location, so the cross member is level and straight between the legs. This is done easily by clamping the two legs together and drilling both of them at once. You’ll want to remove the legs to attach the cross member. It’s much easier.
After assembling the legs, attach them to the cornhole board and make sure they swing freely. If you notice we call for the support to be 1/16” of an inch smaller than you might expect. This extra space allows for the finish on the board and so it will swing freely.

Sand All Surfaces Smooth
Now sand all the surfaces after the board is fully assembled. That completes the construction of your cornhole board!
Cornhole Board Finishes
To fully complete it all you have to do is put a finish on it. The finish on your cornhole boards
Staining Tip – If you are staining your boards, with a design, we would like to offer one very important tip. Before staining, score all the lines with a thin-bladed razor knife. This Fiskars Craft Knife from Amazon is a perfect example of what to use. You’ll need to make the score lines at least 1/16” deep. These score lines will help prevent the stain from “bleeding”. This will give you a nice clean line between two different colors of stain.
How To Make Your Own Cornhole Bags
According to the ACA and ACO, the finished bag dimensions should be 6” square. They shall have stitched seams on all four sides and weigh between 14oz. and 16oz. That’s approximately 2 cups of dried corn. Dried beans can be used too. The bags are to be made of a durable material such as duck cloth, canvas, or suede.
We chose to purchase a set of bags only because we wanted something with patterns that fit with our board design. That may be one of the biggest limiting factors for not making your own bags. If you want bags with custom designs, check out Walmart and Amazon. They both have good selections.
Another great cornhole board accessory is a carrying case. They protect your boards and help keep your boards and bags altogether. Amazon and Walmart have a wide variety of carrying cases. Some have padded shoulder straps and others have your favorite NCAA or professional sports team logos. There are plenty of options, so be sure to check them all out and see what works best for you.
Cornhole Game Rules
The basic rules cornhole are fairly simple. The cornhole boards need to be placed on a flat surface 27 feet apart. Front edge of one board to the front edge of the other. For younger players, the distance can be reduced to 12-15 feet. You alternate tosses between opponents.
Cornhole scoring – A bag going through the 6” hole scores 3 points. A bag landing and staying completely on the board scores one point. If a bag hits the ground first and then bounces onto the board is considered a foul and must be removed from the board. If a bag is partially resting on the board but is in contact with the ground, that is considered a foul and must be removed from the board.
Cornhole scoring method – The method of scoring used for cornhole is called the cancellation method. This simply means that the team scoring the most points will be the only team to score points in that frame. For example, if Team 1 scores 5 points and their opponent, Team 2, scores 3 points, then Team 1 will record 2 points for that frame. The first team to reach or exceed 21 points, at the end of a frame, wins the game.
However, there are different versions of scoring for those of us playing the game for fun, such as you have to hit 21 points exactly to win. If you go over 21, you go back to 15 and continue playing as before. No matter how you choose to score, just be sure to determine the rules before beginning play.
To help keep track of the score while you’re playing we recommend adding a magnetic scoreboard to the back of one of your boards. They work great and help take the guesswork out of keeping score.
For the serious at heart, I highly recommend visiting the ACA or ACO website and printing out a set of rules. The links above will take you to their rules pages. There are many strict “official” rules in the game of cornhole, right down to a dress code.
Conclusion
I can’t say enough about cornhole. It’s a game everyone will enjoy it. Right down to the youngest. Building a set of cornhole boards using our plans will ensure you many years of trouble-free playing. This project is straightforward and anyone can complete it. All you need are a few power tools, some basic carpentry knowledge, and enjoy creating something from scratch. Get prepared for a summer full of fun! Download our free cornhole board plans today.
If you have any comments or questions, you can leave them in the comments section below or you can email us at [email protected]. FYI, we do not collect or share email addresses. We will only use them to reply to your comments or provide answers to your questions. We are also required to let you know that some of our links are “affiliate links”. This means if you click on a link and make a purchase, we could make a small commission, at no extra cost to you. This helps offset the cost of maintaining our website. So, if you like what you’ve seen, please be sure to give us a “Like” and “Share” on Facebook and Instagram too. Thank you for reading and good luck with all your home projects!
Thank you!
Thank you for sharing indeed great looking !
We’re glad you liked it!
Thank you so much for sharing this wonderful post with us.
Thank you!
Howdy! I’m at work surfing around your blog from my new iphone! Just wanted to say I love reading through your blog and look forward to all your posts! Keep up the great work!
Thank you!
Your internet site is well arranged and very easy to navigate.
Just off the top of my head, I think the 1×4’s would work fine and shouldn’t change the board lengths for the cornhole boards themselves. I believe the only real difference will be in the location of the holes for attaching the legs to the boards with the carriage bolts. The holes need to be centered in the end of the leg boards with the radius cut in them. On a 1×4 (typically .75″x3.5″) you would want to use 1-3/4″, instead of the 1-1/4″, in the “Preparing The Legs” section of the article and adjust the radius on the end to match the 1×4.
As for the Kreg jig, that should work fine. Just make sure you have the correct screw lengths and use a good wood glue to help hold it all together. The reason I say this is, if there are small children around, cornhole boards are a magnet for them. You don’t want them breaking apart and possibly hurting the kids and destroying all your hard work.
With that said, good luck with your boards and I’d love too see a picture of the finished product.
Hello, I plan to build these cornhole boards but I want to use 1x4s because that’s what I have on hand. Can you tell me what measurements I might need to adjust in your plans in order to accommodate the 1x4s? Also, I have a Kreg jig so I thought I would join the boards with pocket holes. That way there are no screws showing on top of the board. Is there anything I might need to be aware of as a result of using pocket holes for joining the pieces?
Thanks!
Tina
Thank you!
Saved as a favorite, I really like your web site!
Thank you!
I’m glad you found it interesting.
Good info. Lucky me I found your website by accident (stumbleupon). I have book marked it for later!
You are so interesting! I don’t suppose I’ve truly read a single thing like that before. So great to discover somebody with some genuine thoughts on this topic. Seriously.. thanks for starting this up. This website is something that is needed on the internet, someone with a bit of originality!
Thank you!
bookmarked!!, I like your website!
Thank you!
bookmarked!!, I love your web site!
We’re glad you liked it!
Pretty! This has been an extremely wonderful article. Thank you for supplying this information.
Thank you! I hope it helped.
Very good article. I certainly love this website. Continue the good work!
Thank you!
Good site you’ve got here.. It’s hard to find quality writing like yours these days. I seriously appreciate individuals like you! Take care!!
There are special hinges that are made to separate. In the article there is a link to the type of hinges we use on our boards. I hope that helps.
how do you “disconnect the hinges” to separate the boards to play
Good day! I just want to give you a big thumbs up for the great information you
have got here on this post. I will be coming back to your blog for more soon.
It was actually covered in the “Cornhole Board Requirements” section, for the two different cornhole organizations. It may help to add it to the “materials needed” section as well. Thanks for your input.
2. The playing surface has a minimum thickness of 1/2” with cross-section backing, or 3/4” with or without cross-section backing.
One thing you didn’t list is the thickness of plywood to use, there are several thicknesses available.
cool! nice site
wow nice..
Thank you! We’re glad you liked it.
Wow! Very well written and informative. loved reading your article
Thanks to shared
They do make great gifts! Enjoy!
Made 8 boards (4 Sets) using your instructions, giving them away as gifts, keeping one set for myself. Thanks!!!
We’ve had good luck with pine and poplar.
Thanks for the detailed instructions! What type of wood would you recommend for the 1x3x8 boards?
Thanks,
AP
Thank you so much. All the credit goes to my artistic wife. I believe my wife just drew it on lightly with a pencil, but you certainly could use a stencil. If you are going to use a wood stain on your boards, don’t skip the “Exacto knife”. It will help keep the stain from bleeding and give you much cleaner lines.
Beautiful boards. Did you use a stencil for the flag design? I love that. Hoping I can get hubby to help me make one.
It’s 2 hinges and 2 latches per board for a total of 4 hinges and 4 latches for a set.
Hi. Is it 4 hinges and 4 locks total? Or
2 hinges and 1 lock total?
Although we cannot be 100% sure, we believe it is a Minwax “dark walnut” (2716) stain. We have several partial cans of stain and occasionally my wife will mix colors to get exactly what she needs. However, we do believe the cornhole boards were done with the dark walnut.
What stains did you use? Is like to find the same ones.
Thanks
That’s a great idea! Thanks for sharing.
Thank you very much!
Howdy! This article couldn’t be written any better! Looking at this article reminds
me of my previous roommate! He constantly kept talking about
this. I most certainly will forward this information to him.
Pretty sure he’s going to have a very good read.
I appreciate you for sharing!
I put a handle on top roolers on bottom for easy movment
Sorry for any inconvenience!
I found your plans through a google search so you’re probably right. We’ll blame it on google caching and call it a day… 😛 We’ve been having fun playing them despite having a small error. Thanks again for sharing the plans.
Our boards are held together with “detachable hinges” and latches. There are links for both of these under “hardware”, but they are listed as optional. They really are nice for carrying and storage but are not necessary. Sorry for any confusion.
Thanks for the instructions. One thing I couldn’t find was how you made the two boards attach to each other for easy storage. Thanks.
I am so sorry for the error! I have made the change to the PDF at the same time I changed it on the website, so it should show up there. It did work for me. There may be a “cached” version still out there, so try clicking a couple of times to make sure it’s fully updated. Again, sorry and thanks for your understanding.
Just FYI, It needs correcting in the PDF too. I came across this comment after I had already built mine using the PDF. Now I realize why something seemed off with the set I built. Regardless of this error, I appreciate you publishing the plans.
Thank you for pointing out the typo error on the diagram! It has been corrected.
Your plans are incorrect on the hole placement. It shows the center of the hole being 6″ to center from the top and everywhere else I look shows 9″ You should correct this or remove the plans so someone else does not make she same mistake as I did and follow your plans.
Thanks! It’s one of our favorite summer activities. We used 3 light coats of polyurethane, sanding lightly between the first two coats. It left a nice smooth finish, which is what you want.
Great instructions! Thank you for sharing! Did you finish the top with anything after staining?